

New Wheels, Just Like Magic
Rebuilding spoke wheels is one of the rights of passage in the “custovation”* of an old bike.
That convoluted three-dimensional puzzle with an alloy hub at the center of a spider web of steel, wrapped in a rubber donut, is not as intimidating as some think.
I admit, my first time was full of anxiety.
Taking the wheel apart was a no-brainer but putting it back together caused me to wonder if I’d taken on a project too big for my abilities.
How do you keep all the details straight? How does the hub get centered in two planes? What is run-out? What if wheel wobbles and breaks apart at speed?
Certainly a lot to think about and accomplish when building a wheel.
However, the job is not impossible and you don’t have to be Albert Einstein or an idiot savant. All you need is a bit of time, a camera, a spoke wrench and a ruler.
Lacing a wheel is like a good magic trick. Genuine motorcycle slight-of-hand — you know how to do it and everyone else is mystified. Now that’s worth the effort and you’ll talk about it for years.
In this example, the wheel du jour is off a 1980 Velorex sidecar. It’s part of a custovation project involving a 1984 BMW R65, the driving force for the sidecar rig.
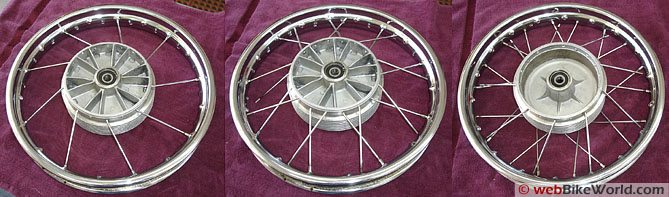
The point is that spoke wheels are very similar to each other; some have 36 spokes, some 40 and all have a hole in the hub. The axle and bearings live inside the hub to allow the wheel to spin with ease.
I learned a while back that replacing the plain steel and plated spokes with stainless spokes and nipples is the way to go. While cost is a bit higher, labor is the same and the conversion will last a lifetime.
Starting the Project
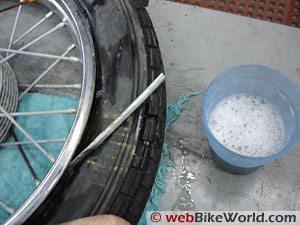
After the Schrader valve is removed from the tube, break the tire bead from the rim. A mallet may be needed help the separation, especially if there’s rust showing (Editor’s Note: See our “el Cheapo Bead Breaker” article).
Mix up a small amount of water and liquid dishwashing soap and smear it in and around the beads, both sides. Continue to remove the tire and tube. Removal should be easy, however, one time I had a wheel project with a tire that was so dry and inflexible; I had to cut it off with a hacksaw.
Measuring and Photos
The next steps are the most important. Be sure to take photographs of the spoke layout on both sides of the wheel and measure the offset.
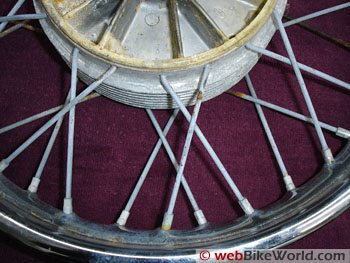
Spoke layout is obvious upon close inspection. On a 36 spoke wheel there are 9 groups of four, while a 40 spoke wheel has 10 groups of four.
Note that each nipple sits in a dome that alternates in alignment around the inside of the rim.
Each dome has a hole and its placement aligns with a hole in the hub. The spoke connects the hub hole to the wheel hole, so each spoke in the wheel has a corresponding mate in the hub.
The good news is that the pattern is repeated, so all you need to do is get the first one started in the correct location.
And the remaining 35, in this case, can only be installed one way. Get the starting point wrong and you’ll be disappointed.
This wheel has all 36 spokes the same length and end bend. Some wheels have different length spokes for the brake-side compared to the opposite side; no worry, just keep them marked, separated and photographed.
Not all hubs are centered on the wheel. Depending on the type of hub, the hub may extend a little or a lot beyond the edge of the wheel. To measure offset, use a stiff piece of metal (yardstick here) to span the brake-side center radial.
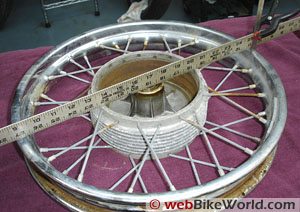
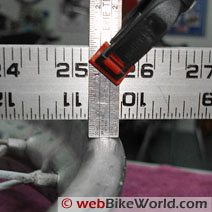
Use a small machinist scale to measure the offset the brake-side of the hub. Check the measurement in four quadrants and record the average measurement. Measure the offset on the opposite side too.
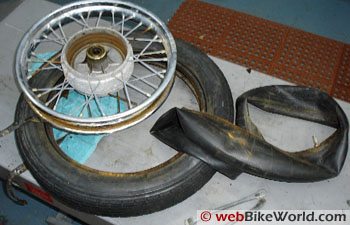
Now the hub can be removed from the wheel. Sometimes it’s easy and the nipples unscrew without a problem, but occasionally they are rusted on and cutting is the only solution.
Be sure to get at least one undamaged spoke from the four positions, keeping track of their original location. Brake-side inner and outer and opposite side inner and outer.
If your wheel is not a popular make, like a Norton or old Triumph, you’ll need to work with a spoke maker and they will make a set for you.
Sounds like a big deal but it isn’t; you can either mail some spoke samples to the manufacturer or copy and fax the shape to them.
The main dimension points are diameter, length and bend. Cost is usually no different than a stock item and turn around time is a few days.
Getting Ready
With the hub removed, clean and polish the wheel and hub and replace the bearings.
Since bearings are cheap and the old ones are 20 plus years old, I usually replace them with sealed units. The cost difference is pennies but they should last 30 years.
Polishing the stainless spokes and nipples pays off in bling and long-term good looks, while also helping to retard the onset of tarnish.
Just be careful, always wear eye protection on the buffing wheel and don’t let a spoke slip out of your hands. I did that one balmy evening and it took two people an hour on their hands and knees scouring the grass on the side of the house before the spoke showed up!

With polished spokes and photo, align the fresh hub with the wheel. Start with the inner spoke hooked into the hub and aligned with its wheel hole-mate. Count four holes and lace another one until all inners are mounted.
Lube each spoke thread with the oil supplied — this is very important to prevent galling and ensure that you’ll get proper tension when tightening. Start each nipple with only 2 or 3 threads.
Pay attention to this because gradual and even tightening will speed the overall alignment process.
After the inners, mount the same-side outers. By this time the lace pattern is obvious. Then flip the wheel, mount the inners, then outers, lubing and maintaining that 2 to 3 thread start.
Now is the time se you are to the proper dimension. You may have to push on the wheel rim to help seat the spokes.
Zeroing in on the final offset can be accomplished a couple of ways. First method is to cut wood spacers the thickness of the opposite-side offset and position them under the wheel. That way the wheel is suspended the proper distance and the brake-side offset can easily be checked. This works particularly well for large offset hubs.
The second method is no spacers; just proceed uniformly around the wheel frequently checking the brake side offset.
The wheel will snug up and you’ll see that either most or all of the spoke thread is covered by the nipple. The spokes should feel tight. Truing is next.
Wheel Truing
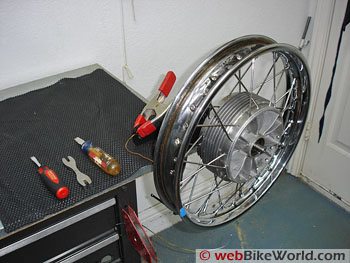
You’ll need some form of a truing stand to hold the wheel, although the bike can be used instead by placing the front wheel in-between the forks or rear wheel in the swing-arm.
Or you can make a homemade stand out of wood or metal. For this project, the sidecar axle is fixed to a large bracket that mounts to the sidecar frame.
Not having the luxury of a separate shaft axle, I mounted the bracket / axle on the bench.
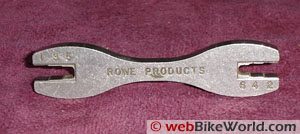
Use a spoke wrench to tighten the spokes, anything else will ruin the nipples and achieving proper tension will be a problem.
Set up two guides, one to indicate vertical run-out and the other horizontal run-out. I use copper wire held by a convenient clamp.
For this kind of wheel, nominal accuracy is fine, nominal being 1/16 of an inch each for run-out deviation. Slowly spin the wheel a few times looking at the vertical high-spot and horizontal high-spot and mark the high vertical spot with tape
Keep in mind the truing process is a combination of adjustments that are opposite to the desired outcome. Do vertical alignment first, horizontal will then be a snap.
Vertical Alignment
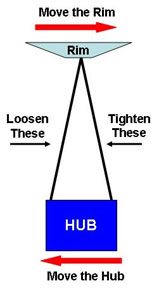
To move the rim from bottom to top, tighten spokes on top and loosen those on the opposite side. Make small adjustments at a time using the spoke wrench.
Keep rotating the wheel slowly, watching the pointer and the change to the tape reference point. Rotate the wheel looking for a new high spot. Adjust as you go until the wheel spins true in the vertical plane to no more than 1/16 inch variation.
Horizontal Alignment
Look at the diagram to see how to remove the horizontal wobble. Find the horizontal high-spot and mark with tape. Watching the pointer and rim, adjust the spokes looking for a new high spot and less than 1/16 wobble.
Recheck the offset and if necessary make adjustments using the horizontal technique but this time, evenly all around the wheel.
With the offset correct go back the truing stand. Mark a starting spot with tape, slowly rotate the wheel and tap the spokes with a long round-shaft screwdriver.
The object is to get the spokes tight with all having the same approximate tension. How tight is enough? One expert convinced me to listen to the pitch of an empty wine glass when tapped with a fork. A tight spoke will make a ping sound.
A loose spoke will sound dead with no noticeable ping. A tighter spoke has a higher ping-note, so tighten the spokes to sound similar.
Tap and listen as you go around the wheel and adjust as needed. Recheck vertical and horizontal alignment and offset one last time. Don’t forget to cover the spoke nipple tops with a rubber band or tape.
Satisfaction
So now you have your rebuilt wheels cleaned, polished and gleaming with stainless spokes!
Mount the wheels and take the bike for a ride on a sunny day.
Park someplace where the bling attracts attention and when someone mentions that your vintage bike wheels look like new, take the complement but work in that fact that you re-built the wheels yourself.
Like Houdini performing his best trick, they won’t believe what they are seeing. Just grin and save the secrets of wheel building to share with a deserving apprentice. You’ll be glad you’re keeping the magic alive!
Custovation
*Custovation is a combination of customizing, and renovation.
Custovation is not a restoration, which means to bring back to an original condition.
Custovation has a more specific meaning: CUSTOMIZE, which is to make or alter to individual or personal specifications, combined with RENOVATION, which is to restore to an earlier condition, by repairing or remodeling.
References
- Adventures in Re-Spoking
- The Vintage Motorcyclists’ Workshop (Book).
- Buchanan’s Spokes & Rims — Stainless steel spoke specialists.
- Spoke Wrenches and Tools
Owner Comments and Feedback
See details on submitting comments.
From “B.P.” (January 2015): “Excellent description, of great value. I enjoyed reading it and it helped me thanks to its clear explanation.
However, I found it odd you did not mention how to restore the offset of the rim with the hub. Nice to have measured it (extremely important – something I forgot to do in a decent way – only to find out after I got my wheel restored), but it is not obvious to check during the lacing of the wheel.
I found it is best done with the wheel in the frame of the bike, so one can actually make sure it is properly aligned to the middle axis of the frame.
My bike is a 1930 Gillet-Herstal, and I was surprised to see that also the front wheel was offset, something I did not notice during dismantling.
Another pitfall is the selection of the first hole when lacing the opposite inner spokes, after the first side is done. I tried to follow instructions found on the web, but apparently the Gillet company did it differently… In any case, your article made me feel confident, and step by step I am approaching the optimum. As you correctly mentioned, with a lot of breaks. Quite important too!”
From “J.W.” (September 2011): “Thanks for the article. I am restoring an XR75 Honda and just had the rims powder coated and ready to lace but did not know if I could re-lace the rims until I read your web site. Reading it helped me make a stand and lace the rims well. Thanks for the information.”
Other WebBikeWorld Articles Posts

i have a set of vintage t bucket hot rod spoke wheels. id like them relaced with stainless spokes. i was told they were made from BSA or Triumph wheels. adding a hub for a early ford axles. id like to know where you are located and appoximately how much cost is involved.
i have a 8fun rear electric motor for a bike. Can you put new spokes and rim on motor so i can use bike again?