

Adjusting Hinckley Triumph Valves
Adjusting the valves on a Triumph Thunderbird Sport, Trophy, Daytona, Trident, Sprint, Tiger, Speed Triple, Legend or Adventurer Motorcycle.
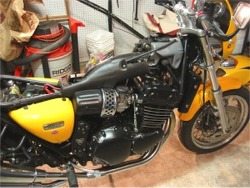
My Triumph Thunderbird Sport had about 9,000 miles on it when I purchased it. The motorcycle was in beautiful condition, and the previous owner said that he had brought it in for a valve adjustment at some point.
Now you may call me weird, but I get as much of a kick out of wrenching on motorcycles as I do riding them. And I like to go through absolutely everything when I buy a used bike to make sure all of the components are properly torqued, greased, oiled, etc.
I’ve never owned a new bike, but I’d probably do the same with it too. So I wanted to check the TBird’s valves for myself to see if everything was ok.
I was also curious to see what a shim-over-bucket valve adjustment system looked like. My other bike, a 1986 BMW R65 “Airhead”, has an easy-to-access valve train with screw adjusters. I can get the job done on that bike in about 20 minutes.
It’s not that I don’t trust anyone, but I feel a great sense of accomplishment when I can successfully complete a maintenance or repair task. And I also know it’s done right — or at least to the best of my ability.
Nothing against shop mechanics, but I just don’t trust anyone working on my bike. This valve adjustment job is a good example — it’s really not that hard of a job, but you need patience, time and you have to be fussy and detail-oriented. I just don’t think that a shop mechanic, under time and profit pressures, would take the time that is really necessary to do this job to my satisfaction.
Anyway, the good news is that adjusting the valves on a TBS really isn’t that hard of a job. If you have some better-than-basic shop skills, a few special tools (described below), and the knowledge of how to work a feeler gauge, you can do this job. In fact, the hardest and most frustrating task was re-installing the valve cover and gasket, believe it or not. That was a real pain, but I have a couple of tips that I think can help.
About those tools — you’ll need the Triumph Valve Shim Removal tool, part number 3880012. I called four Triumph dealers within a 50-mile radius, and no one had one in stock.
One told me “we don’t sell those tools to customers”. Nice, huh? I finally found one for $85.00 at Hermy’s BMW/Triumph in Port Clinton, Pennsylvania.
I called on a Saturday to check if it was indeed in stock, I ordered it, it was shipped on Monday and I had it on Tuesday. Thanks, Hermy’s!
You’ll also need a Triumph Service Manual. You should own one anyway, because there are a few things in there that aren’t covered in the otherwise excellent Haynes manual.
Haynes uses photographs; Triumph uses line drawings. There are benefits and drawbacks to each, but the main issue here is that Haynes advises to remove the cams to check and replace the shims, and doesn’t provide any details on using the Triumph tool.
I was too scared to remove the cams, to be honest! But, I’ve since been told by the folks over on the Triumph Trophy groupthat removing the cams isn’t too difficult, and if you have several valves to adjust, it may be easier than using the Triumph tool.
Maybe I’ll try it next time and report back… In any case, the Triumph manual clearly describes the procedure for using the shim removal tool, and I found it to be relatively easy to use both the tool and the described process.
You’ll also need some basic hand tools, and you should really have a swingarm stand to hold the bike up (here’s a wBW review of the Steel Horse stand), because you’ll have to move the rear wheel to turn the engine over. The 10mm box endGearwrench came in especially handy for installing the shim removal tool.
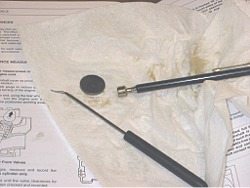
You’ll need some kind of strong “pick” (see photo below) to lift the shim out of its bucket; one of those cheap, telescoping magnets; and a telescoping small “dentist” type mirror may come in handy if you have to remove a shim where it may be hard to see.
A metric micrometer comes helps also, but I really don’t think it’s necessary (see below).
wBW Visitor “J.B.” also sent in some tips on adjusting the Triumph’s valves and how to improve performance.
Where to Buy Triumph Valve
Check Reviews & Prices on AmazonSee More: Motorcycle Accessories, Motorcycle Tire, Motorcycle Helmets
The first task is to remove the fuel tank. This is very easy to do on a TBS; see the wBW Technical Article “Changing the Coolant on a Triumph Thunderbird Sport” for instructions.
Before you go any farther, here’s an important tip: clean up the valve cover and everything else from the frame’s spine on down as best you can.
This will help prevent any dirt from falling into the top end when the valve cover is off.
The engine cylinders are numbered 1, 2 and 3, from the left hand side of the bike to the right as you’re sitting on the bike.
Check to make sure your spark plug wires are numbered first; they should have little yellow bands with numbers on them from the factory. If not, make sure you number them to correspond with the correct cylinder with a piece of masking tape or something before you take them off.
Next, remove or loosen the spark plugs. I loosened them all the way, but left them down in their holes to prevent anything from falling into the cylinders in case I dropped anything.
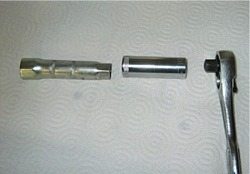
The Triumph spark plug tool from the tool kit works best for removing the plugs on a TBS, as it has a little rubber doughnut inside that grabs the top of the plug and helps to pull it out.
Otherwise, you can try an 18mm deep socket. I found it easiest to place the Triumph tool on the plug, then put a 16mm deep socket over that, and use a ratchet.
The number 1 and 3 plugs are easy to remove. Number 2 (middle cylinder) is a tight fit, but not that difficult to get to if you use the Triumph tool, the 16mm deep socket over it, and a ratchet wrench without extension.
There’s not that much of a mystery in removing the valve cover. It really doesn’t hold in any pressure; it’s just there with a gasket under it to hold in the oil that splashes around on the cams.
The 6mm bolts that hold it down only use 10 Nm of torque, which is about the lightest you’ll find on the bike. 10 Nm is something like “a little bit snug” if you used a 6 mm L-shaped hex key (Allen wrench) and tightened it by hand.
A “ball end” hex key works great to help loosen the bolts, because it’s a bit hard to get to some of the bolts directly. Once you loosen the bolts a little bit, they should be easy to remove the rest of the way by hand.
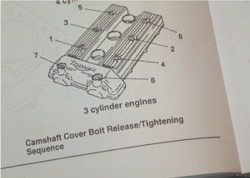
Triumph recommends removing and tightening the bolts in a certain sequence (Photo left). Tip: The bolts are all the same except for numbers 7 and 8 in photo 4, which are a bit longer.
I was kind of disappointed that the chrome plating flaked off in spots on a couple of the bolts just from the action of removing them. C’mon Triumph, you can do better!
After all the bolts are off, it’s time to remove the valve cover. Tip: the throttle line and a couple of other bits hang down from the frame’s spine over the valve cover.
Tie these up snug to the bike’s frame with a piece of string or something to get them out of your way. This helps keep them from snagging on the valve cover and when you’re removing and replacing it.
You’ll probably need a rubber mallet to loosen the valve cover. I took a small piece of wood and found a couple of spots on each side of the valve cover and gently tapped it up.
It should come off rather easily, after you get past the initial friction of the gasket sticking to the engine.
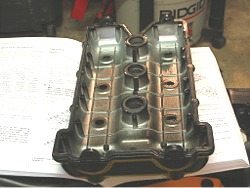
Be careful to lift the whole valve cover gasket off with the valve cover. It’s actually a pretty thick, rubber/plastic gasket that would be hard to destroy. You know those two “half moon” looking things on each side of the valve cover?
They’re actually part of the gasket. They may stick to the engine casing a little bit, so carefully pull them up with the gasket and the valve cover.
The valve cover must be removed from the right side of the bike only, as there is a hose for coolant on the left that prevents sliding it out in that direction.
Gently work the valve cover and gasket up and towards the right. It takes some work and some fussing to get it out; you kind of have to shuffle the right side of the valve cover towards the back of the bike as you pull it out.
The gasket and/or cover will tend to get hung up on the camshaft’s bearing towers. Be careful not to drop the gaskets that sit under each valve cover bolt also.
Once the valve cover and gasket are removed, check the gasket to make sure there are no tears or chunks missing.
As I mentioned, it’s a pretty sturdy gasket, so chances are you won’t have to replace it. The gasket fits into a groove machined into the valve cover. This photo shows the gasket on the cover. By the way, when you turn the cover over, make sure the bolt gaskets don’t fall out!
The engine will have a lot of oil collected towards the front of the bike because the engine tilts towards the front.
The level of oil on mine was just below the top of the engine casing, preventing all but a few drops from leaking out (Photo left). Triumph recommends suctioning all the oil out before you go any further, but I left mine as is.
Right — next task is to check all the clearances. Get a nice, big piece of paper handy to record the clearances.
The Service Manual has a good description of how to run through this procedure, either by putting the bike in gear and turning the rear wheel to turn the engine, or removing the engine’s side cover and turning the crankshaft with a wrench.
I chose to turn the engine over using the wheel method; you do this by engaging the transmission in a high gear and muscling the rear wheel around. Put the bike into high gear by turning the rear wheel slightly as you click the shifter up until you’re in 6th gear.
Then slowly spin the rear wheel and watch until one set of cam lobes is pointing straight up. When they’re straight up, the valve is closed, and that’s when you check the clearance. Next time, I’m going to remove the side cover and use a wrench on the crankshaft end, as I think it will be a lot easier.
Note: The Trophy folks advise removing the crank cover to spin the engine. They wrote: “The really good thing about removing the crank cover is that you get to check the condition of the cam chain tensioner blade, and if you want you can check the tensioner itself. Pulling the cams is a no-brainer. Just have to be careful with torquing everything back”.
You’ll eventually need to clean up the high-temperature RTV silicone sealant from the corners of the engine casing.
This can be removed with a single-edge razor blade or some type of scraping tool.
Be careful not to get any of the RTV crumbs in the engine or oil. I’ll have more thoughts on the use of RTV later…
I used a K-D tools feeler gauge set to check the clearances. This is a nice set, I got it at the local auto parts store.
Where to Buy Triumph Valve
Check Reviews & Prices on AmazonSee More: Motorcycle Accessories, Motorcycle Tire, Motorcycle Helmets
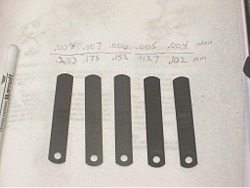
It has many, many feeler gauges in it; flat blades that you can take out of the fan-fold set. The ones that are most useful for this job are the ones marked 0.102mm, 0.127mm, 0.152mm, 0.178mm and 0.203mm.
This corresponds to 0.004″, 0.005″, 0.006″, 0.007″ and 0.008″. How anyone can label a feeler gauge out to 0.0007mm, which is 0.000027 inches, is beyond me, but that’s how they’re labeled!
Tip: before you spin the cams around, it might be a good idea to get an oil can or whatever oil you have left over from your last oil change and squirt some on all the cam lobes, just to make sure they have some lubrication before you start moving the cams.
This is probably unnecessary, as my bike had sat for a week or so before I pulled the valve cover, and there was still a nice film of oil over the cams, but it can’t hurt either, and it’s better to be on the safe side.
Since the valves in the Triumph Thunderbird Sport should be between 0.10 to 0.15mm for the intakes and between 0.15 to 0.20 for the exhausts, I removed the five appropriate blades from the set as illustrated above. The feeler gauge should slide through with a nice, firm feel (“not too loose, not too tight”), and if the next biggest blade doesn’t fit, that means the tolerance is pretty close to the first.
As it turns out, whenever one set of intake valves are closed, another set of exhausts are closed also. I found that when the exhaust valves for cylinder #3 are closed, so are the intakes for #2; #2 exhausts close with #1 intakes; and #1 exhausts close with #3’s intakes.
This means that you can check the clearances of the two sets of valves at once, because there’s always one pair of intakes and one pair of exhausts closed at the same time (this is due to the unique timing of the 3 cylinder engine). Check each valve (remember there are 2 valves on each side for each cylinder = 4 valves per cylinder!) and record the clearances.
I was kind of lucky, I guess; all of my valves were within tolerance, with the exception of the pair of #3 exhaust valves, both of which allowed the 0.127mm blade to slide through, but not the 0.152mm blade. So there was not enough clearance by about 0.03mm, or about 0.001″.
The clearance on the other valves varied; for example, the pair of #2 intake valves measured 0.15mm for one and 0.18mm for the other. After some discussion with list members and others, the recommendation is that if they’re in tolerance, leave ’em alone, rather than try to fuss with them to get everything exactly even.
The next step is to pull the shim or shims to check their sizes. My suggestion is that if you have more than one valve that is out of tolerance, pull only one set of shims at a time, check their thickness, then replace them before you do the same with the other out-of-tolerance valve.
This will help prevent them from getting mixed up, and I think it’s also important to leave the shim over the bucket when the cams are turned.

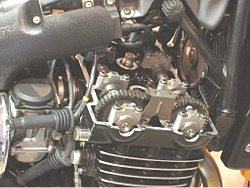
This photo illustrates how the TBird’s valve clearance system works. The pink arrow points to the shim sitting in the “bucket”.
You can just see the edge of the bucket and the edge of the shim. The bucket sits over the valve, and the end of the bucket opposite the shim end rides up and down on the end of the valve stem and spring.
The shim simply sits in the cutout in the bucket, and is held there because the spring’s tension doesn’t allow enough clearance for the shim to slip out when the engine is running.
Each bucket has a little notch cut out along the top in one location. Before you remove the shim, you’ll need to spin the buckets so that the notches for both valves face outwards, either towards the front of the engine for the exhaust valves, or the rear of the engine for the intakes.
The notch allows you to slip a “pick” or wedge under the shim to remove it. The buckets turn pretty easily — I was able to move them around with my fingers.

To remove the shim, you’ll need to use the Triumph valve shim removal tool (Photo left).
This tool is pretty simple; a rectangular piece of metal with threaded holes along the outer edge and two holes in the middle.
First, you have to spin the camshaft so that the cam lobes (over the valves that you want to remove the shims from) are pointing straight down, i.e., the valve is all the way open.
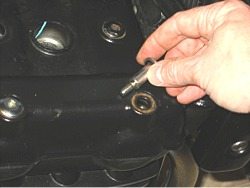
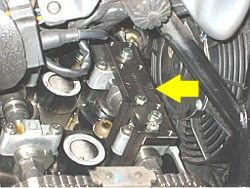
You then bolt the removal tool onto the top of the camshaft bearing towers — Triumph has conveniently provided some threaded holes there for just this purpose (White arrow, photo above).
You don’t need much torque at all on the tool’s hold down bolts; only 7Nm will do it, which is just barely hand snug. Then you bolt the two “L” shaped arms so that they project down over the edge of the bucket (See yellow arrow, photo below).
You spin the cam back the other way so that the lobes are now pointing straight up again, and you’ll have enough clearance to remove the shim.
Be careful when turning the cams with the tool attached — there is only limited clearance and you can only turn them in one direction!
It’s pretty hard to turn the rear wheel and get the cams to rotate.
You may have to get an assistant to help, at least to watch the cams as you turn the wheel. You sort of have to get behind the bike and pull on the rear wheel to get the leverage necessary to overcome the resistance in the engine.
Be careful — after a piston hits top dead center on its compression stroke, all of a sudden the resistance can lessen dramatically, and you may have some momentum built up. You don’t want the cam lobe to smash against the arms of the adjusting tool!
Once you have the cam lobes pointing straight up (the valve is now closed) over the valve shim you want to remove, take your “pick” or other device and slip it under the shim at the notch.
It takes a few tries, but the shim should come out pretty easily — it’s only held in by the surface tension of the oil underneath.
This is where those weird, cheap tools you buy at swap meets come into their own.
I found a set of strange shaped metal picks that look like dental tools some time ago and figured they’d come in handy some day.
This is the day! I also have one of those telescoping magnets and a telescoping dental mirror, and they both came in handy also. The magnet works great for grabbing the shim after you lift it with the pick.
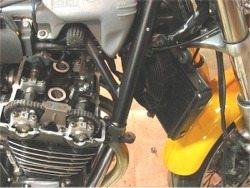
I ended up having to loosen the radiator to push it out of the way to allow my hand to access the inside #3 exhaust valve — the one that is nearest the middle of the bike (Photo left).
This is easy to do; take off the radiator side covers, which have two bolts each and come right off.
Then take off the single lower radiator bolt (unfortunately, a size T30 Torx bolt, so you’ll need a T30 Torx bit or tool).
Where to Buy Triumph Valve
Check Reviews & Prices on AmazonSee More: Motorcycle Accessories, Motorcycle Tire, Motorcycle Helmets
Take off the upper two radiator hex bolts, and you can push the radiator out of the way easy enough.
Both of the #3 exhaust valve shims that I removed were labeled “2.675” underneath and were in like-new shape. I measured them with my metric micrometer, and sure enough, they were 2.675mm.
Both the Haynes and the Triumph manuals have a chart to look up the required shim thickness. You read across the top of the chart (curiously in 0.05mm increments only) to find the thickness of the shim you just took out.
Read down along the left column to see the measured valve clearance. The point of intersection of these two columns indicates the size of the shim you need to get to replace the one you took out to give you the correct clearance.
You can, and should, check this manually also. In this case, I measured a 0.127mm valve clearance (really about 0.13mm, but the feeler gauge reads “0.127, so who am I to argue?). Triumph calls for somewhere between 0.15mm and 0.20mm clearance for an exhaust valve. I figured I’d try to land it right in the middle of the tolerance, at around 0.17mm.
Subtracting 0.127 (what I have) from 0.17 (what I want) gives 0.043mm (about 0.0015”), which is what I needed to increase the clearance.
Since the shim that came out was 2.675mm, subtract 0.043mm from that and you get 2.632. I’m subtracting in this case because the 2.675mm shim was too thick, resulting in less than required clearance between the shim and the cam lobe. A thinner shim would give me more clearance. If the valves had too much clearance, I would need a thicker shim.
I called the local Triumph dealer (Fredericktowne Yamaha/Triumph in Frederick, Maryland) and crossed my fingers, hoping they’d have a 2.625mm or 2.500mm shim.
The parts guy connected me with the service department, and he rummaged around in a box and said he had two 2.625 shims — outstanding! It must have been my lucky day, because he also said to bring in the old shims and he’d swap me for them. Fantastic!
In any case, new shims run around $5.25 each. My feeling is you don’t want to buy a bunch of these before you measure what you have, or for sure you’ll end up with a bunch of 5 buck shims that you don’t need and won’t use for years to come, if ever. It just isn’t worth it.
Any Triumph dealer that does valve adjustments HAS to have a selection of shims, or they aren’t worth a darn.
After that, it’s a simple matter of replacing the new shim in reverse order. Since I only had the one pair of valves that needed shim replacement, I left the valve shim removal tool on while I went to the shop and back. To replace the shims, first put a few drops of oil on them, then slide them back into the bucket.
Be careful and very sure that the shims are indeed in their cutouts on top of the buckets! The tolerances are very tight, so it’s easy to get the shim slightly cocked. You should be able to easily spin the shim around with your finger once it’s correctly situated in the bucket. Use a strong flashlight and the dental mirror to check.
It’s a good idea to re-check the valve clearance again after you put in the new shim. Mine measured about 0.175mm, exactly what I was looking for.
OK — ready to button everything back up. First, remember to take out the valve shim removal tool. Then you’ll have to scrape away any remaining RTV silicone sealant from the top of the engine on the gasket face. This is nasty stuff, so make sure you don’t drop any into the engine.
This is where a lot of patience comes in handy — scrape it off a bit at a time and use your fingers or a paper towel sprayed with brake cleaner or contact cleaner to remove the bits. When you get the gasket face as clean as you can, take a clean paper towel, spray the degreaser or contact cleaner on it and clean up the entire gasket face and let it dry.
Now comes the truly hard part! You should clean up the inside of the valve cover; there will probably be bits of old RTV everywhere. The valve cover gasket should fit tightly in its groove in the cover. If it isn’t, you’ll have problems getting the cover back on without the gasket hanging up.
It took me 3 tries of putting everything together, re-cleaning and scraping the RTV and trying to fit the cover back on (it’s a tight fit under the bike’s frame tube), and I was ready to scream.
Tip: I finally realized that if I used some Permatex “Form-a-Gasket” #2 to “glue” the gasket on to the valve cover in the spots where it was coming loose, that would hold the gasket to the cover and allow me to get the whole unit situated correctly on the engine.
The Triumph manual calls for high-temperature RTV silicone sealant to be placed at the corners of the engine’s gasket face and in the half-moon cutouts at the end of either camshaft to help prevent leakage.
My personal feeling on the use of RTV for valve cover gaskets is that it’s a cop-out and a cover-up for poor engineering.
The stuff is absolutely miserable to use — it gets over everything, it squeezes into the engine after you replace the valve cover, bits of it can get stuck in tiny oil passages in the engine and have the potential for causing all sorts of problems.
As I said, it took me 3 tries, and hopefully if you follow these tips you can do it right the first time. But each time, I got the RTV all over my hands and everywhere else. It’s a real mess.
And as it turns out, I really don’t think you need it. I figured it would take a miracle for the gasket not to leak after I manhandled it on and off so many times.
But it hasn’t leaked a drop. I interpret this to mean that the gasket itself does a good job of sealing out the oil.
There’s no pressure in there, and the oil level never gets above the gasket line anyway, and the valve cover bolts only take 10Nm of torque, so this tells me that it doesn’t take much to keep the oil in.
Next time I’m going to try it without the RTV for sure. Even if it does leak, it’s not that hard to take the cover off, put on some RTV and put it back on — but I’m betting that it won’t leak even without the RTV.
If you do use the RTV, use your fingers [rubber doctor’s “inspection” gloves work great for this — don’t ask me why I have a box of them laying around! 😉 ] and put a very thin coat distributed only half the width of the engine’s gasket face, from the outside in.
The stuff will squeeze in towards the valve side of the gasket face, and the farther away you keep it from getting in the engine, the less the chance of having some of it get squeezed into the valve area and finding its way into an oil passageway somewhere.
I did order a new gasket to have on hand for next time. My feeling is that it’s worth the $26.00 for a new gasket if a new one will seal it up without having to use RTV Silicone sealant.
Replacing the Valve Cover
You’ll have to really work at getting the valve cover with the gasket back in over the engine and in place.
The problem is that there’s not much room above the valve cover, so it tends to get hung up on the camshaft bearing towers.
Just have patience, and make sure the gasket is in place not only over the engine gasket face, but also over the spark plug holes.
Replace the valve cover bolts, tightening in the same order as indicated in the book and photo 4.
Replace the radiator and clean up anything else. I used some degreaser to get the RTV mess off the top of the valve cover and sprayed it with S100 Engine Brightener (review), which works great on the TBird’s black engine casings. I cleaned up the bit of RTV that squeezed out from under the gasket, and everything looks like new.
I started up the bike and watched for leaks as it warmed up…perfect! I then took it out for about a 5 mile loop and came back in the garage and checked again…still perfect!
Went out on a 50 mile ride and came back and checked it once more…no problems!
This may sound like a complex job, but it sounds harder than it really is. I feel really good now, knowing that my valve clearances are all in good shape and knowing that next time, the job will be much easier. Have fun!
Where to Buy Triumph Valve
Check Reviews & Prices on AmazonSee More: Motorcycle Accessories, Motorcycle Tire, Motorcycle Helmets
Owner Comments and Feedback
See details on submitting comments.
From “W.N.” (October 2011): “Just to say a massive thanks for this article – it is so detailed and so useful, has given me the right direction to work on my Triumph. I am eternally grateful to people like his who fill the internet with so much useful information……….I’d be lost without it.”

No Comment