

Sena SR10 Form, Fit and Functionality
Part 3: Sena SR10 Form and Function
All of the nitty-gritty details regarding the construct of the SR10 were provided in Part One of the Sena SR10 review, so I won’t repeat everything here but will instead focus on what I see as some salient form observations.
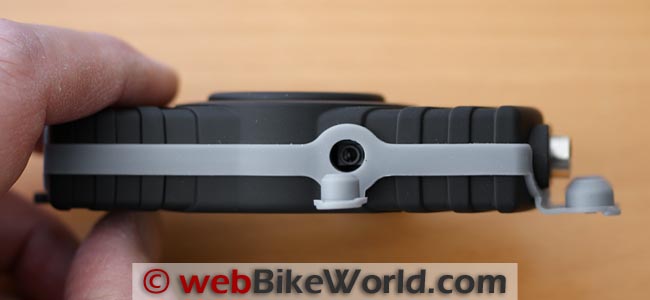
The SR10 is small and sits easily in the palm of the hand with a soft but resistive tactile touch due to the rubber-like water-resistant material that encases it.
A gray band of the same material runs around the periphery of the module as a bumper guard — clever.
Molded into this guard on short straps are the push-in weather caps for sealing all the ports. Well, all but one, that is.
And this observation raises a question. Why isn’t the small black mini-DIN cap attached to anything when all the other caps are?
It is one of those “going-to-get-lost” items that shouldn’t, especially when trying to maintain the weather-resistance integrity of the module when the port is not being used (transport/storage).
And while I’m on my evaluation “milk carton”, I have another form issue regarding portability: the SR10 mounting kits.
The portability requirement for the SR10 was obviously well recognized, with both a handlebar mounting kit and a belt clip kit provided…but they are not quickly interchangeable.
Although sharing a common mounting point, only one mount can be physically secured to the back of the SR10 at one time.
The belt clip uses two screws, while the handlebar assembly four screws. Having to manually change the complete mount every time you want to change the mounting location is not an expedient solution.
Both issues could be resolved simply and both should have been caught during testing and fixed before the product was released to consumers. Provide a tether for the radio port cap and a single quick-release mechanism for both mounts — problem solved.
Where to Buy Sena SR10
See More: Motorcycle Intercom, Motorcycle Accessories, Motorcycle Helmets
Fitment
As identified above, the SR10 kit comes with two simple but not compatible mounting options: a handlebar mounting kit and a belt clip kit.
The handlebar kit comprises two pieces. The first is the “joint pad”, a plastic square four-hole pattern mounting plate with an engagement hook and a rubber base with strap component. The base of the strap component goes between the back of the module and the joint pad, which is then secured to the module using four small screws.
The stretchable strap can be wrapped around a convenient and secure mount on the motorcycle and the end loop secured over the hook on the mounting plate.
For true portability, the belt clip kit is the way to go. It is a simple spring-loaded clip that mounts to the back of the module using two small screws. Note: getting the two small screws in place can be a minor challenge. As such, refer to the mounting observations made above.
But once the desired mount is in place, the next step is to locate the desired peripherals, mount them in an appropriate spot and connect them by the appropriate cable or wirelessly to the SR10. If a two-way radio will be part of the mix, then it is time to address the PTT requirement.
Push-to-Talk

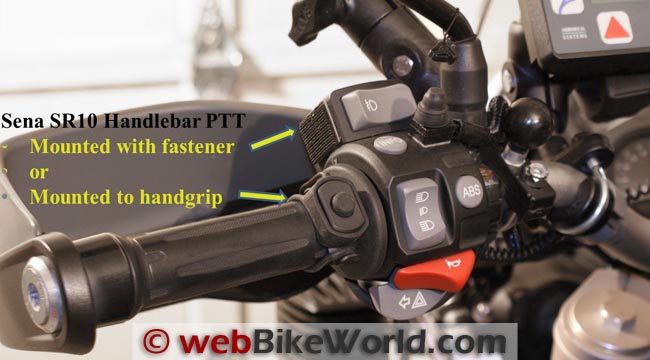
Either the large PTT button on the module or the PTT extension component can be used for radio communications. The extension component is made up of a small hard plastic button switch fitted inside a pliable rubber housing and strap component, similar to the handlebar mounting kit strap.
The extension PTT can be mounted around the handgrip, an open and easily accessed spot on the handlebar or even around a mirror mount. The key issue here is safe and easy access.
Once the static table-top testing was done, the systems were moved onto the motorcycles, initially the BMW F800GS (review) machines which provide challenges for adding anything else to their already cluttered handlebar environments.
Where to Buy Sena SR10
See More: Motorcycle Intercom, Motorcycle Accessories, Motorcycle Helmets
Installing the SR10
And this is where the size and flexibility of the Sena SR10 units come into play. The SR10 module with the handlebar kit installed was mounted in various spots while the standard peripherals were assigned their usual mount or carry points on or in the tank-bag or a pocket.
The first mounting point was a RAM-B-201 Medium Arm secured to an available RAM B Ball Mounton the handlebars.
A small length of bicycle handlebar foam (great stuff with numerous uses for mounting and cushioning delicate accessories) was cut to fit around the arm and the clamp’s fastener. With the elastic securing the device in place, it was ready for use.
More of the handlebar foam around the lower part of the left mirror stalk provided another quite secure mounting point with even better access than the RAM-B mount although it did hang out in the breeze slightly. If there is room on the handlebar and with the orientation of the strap changed (square 4-hole pattern, so anything goes), it will sit nicely strapped to the bar with the outer cushioning material working to ward off minor contact with neighbouring devices.
Using the belt clip component, the SR10 module could be mounted to one of several hanging points on most tank-bags, including the FAMSA Tank Pannier combination (review) adorning both of the BMW F800GS machines.
I usually put the SR10 on the left side, which is good, as the Bluetooth headset is on the left side of the helmet. Besides, the low-output two-way FRS/GMRS radio usually clips to the right side of the tank-bag while the high-powered CB or VHF radio sits in a RAM cradle on the right side of the handlebar.
These mounting points typically facilitate radio use and also serve to keep the devices away from the rider and passenger, for the same reason I won’t use a two-radio held up against my head.
When dismounted, the clip mount is a convenient and secure means to attach the module to a belt, strap or pocket. The loop molded into the top of the module provides a lanyard mounting point if desired or for a safety strap, to keep the SR10 from disappearing while at speed.
Just don’t forget to keep a small Phillips-head screwdriver on hand if you will be changing those mounts… As currently designed it really is one or the other.
Where to Buy Sena SR10
See More: Motorcycle Intercom, Motorcycle Accessories, Motorcycle Helmets
Owner Comments and Feedback
See details on submitting comments.

No Comment