Big, Bold, Round LED Brake Lights
I had the Radiantz “Puckz” 2.25″ LED brake/running lights hanging around in the garage for years — literally.
I don’t even remember why I bought them or when — could it possibly have been 10 years ago?
That could very well be, because Radiantz has been making the Puckz since 2000.
The problem — for me — was that they’re chrome. And designed for flush mounting on a custom cruiser.
They’re made from billet something-or-other and the body does appear to be machined out of a solid block and there’s a top ring that holds the lens.
I’ll get into this more in the following sections, but the 21 mm thick Puckz are not easy to mount on any type of bike.
After thinking it over for, oh, a decade or so (!), I finally found them a home.
The rear of the Versys and the way the license plate holder is designed gave me an idea that popped into my head after following an older Harley Street Glide one day recently.
That bike has a big metal bar across the back, holding the two plain round amber turn signals on either side of the brake light.
We decided to fabricate something similar out of aluminum bar stock, then attach the Puckz lights out at the ends.
So for this project, the hardest part was thinking it through. After that, it was easy to cut and drill a piece of 1/8″ aluminum bar stock purchased at the local hardware store.
We then bolted the Puckz to either side and spliced them into the same wires controlling the Electrical Connection brake light bar.
The Puckz lights also have an optional running light feature, so we connected that as well, since the wiring was already in place from the Electrical Connection LED light bar.
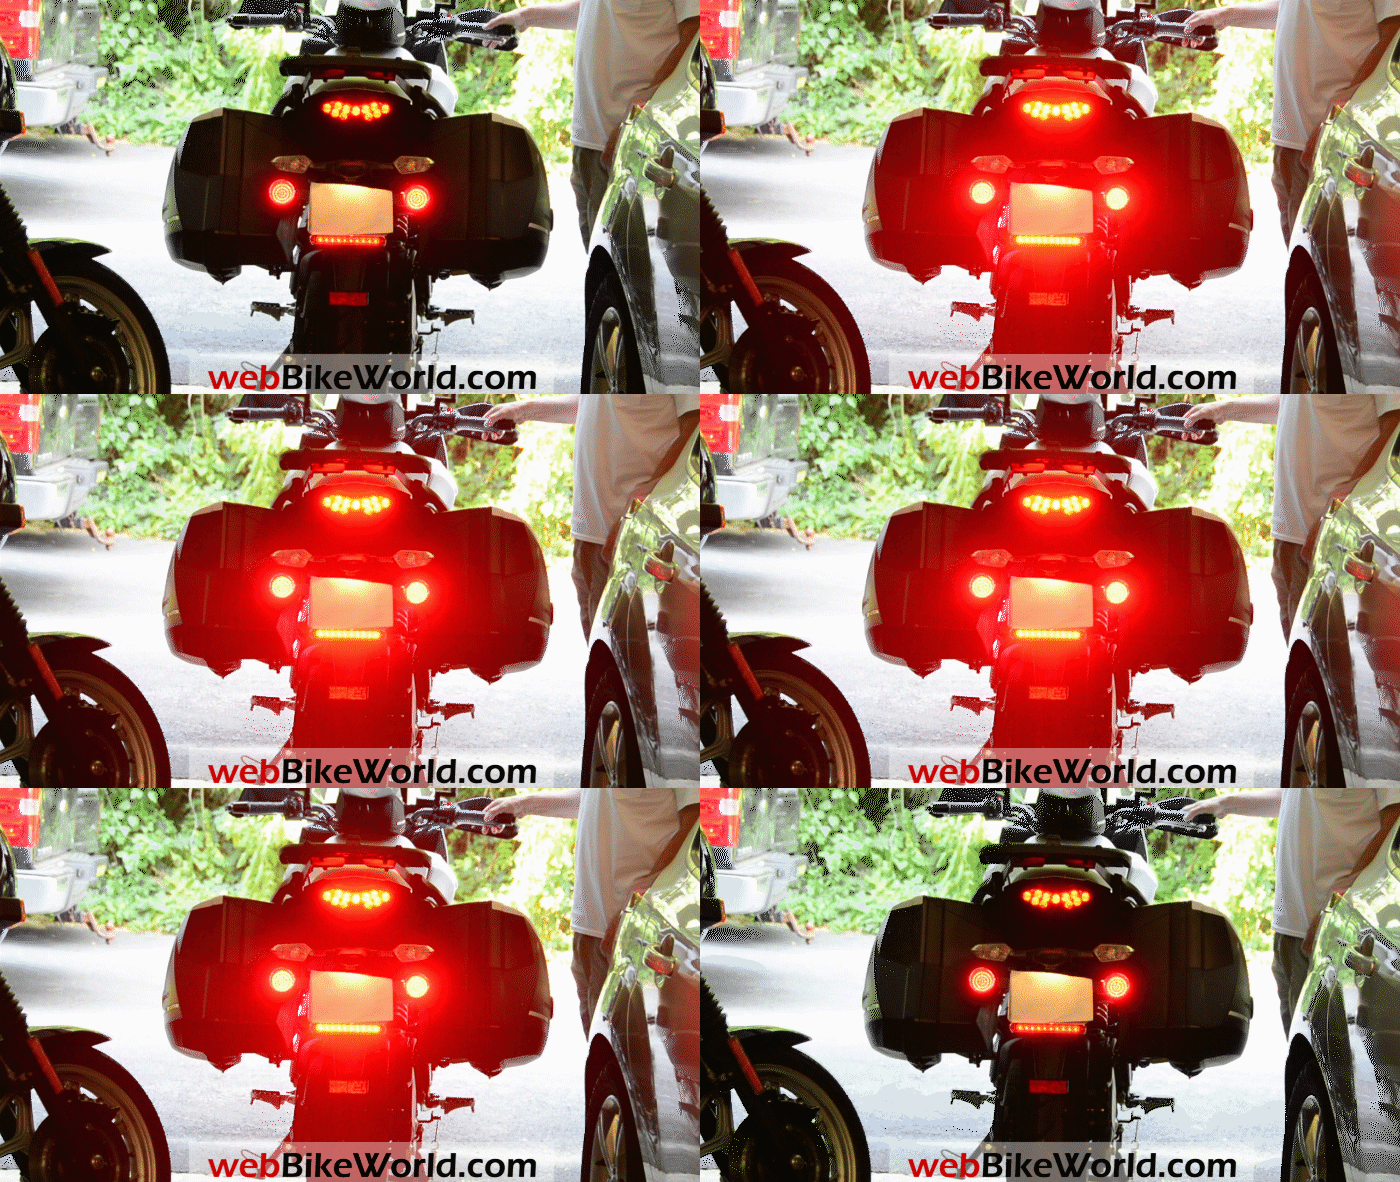
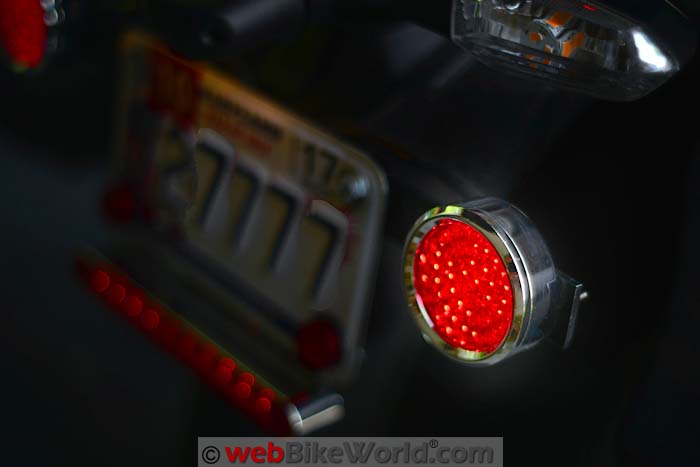
Bottom line? Photos don’t do this justice, because when the brakes are applied, it gets BRIGHT back there.
The Radiantz Puckz lights and the method we used to mount them may not work for all bikes.
But in the spirit of “Waste not, want not”, it’s nice to know we finally put these to good use and we’re really pleased with the results.
This is Part 2 of a series describing rear brake and running light LEDs.
In Part 1, we featured the Electrical Connection LED license plate brake light bar (review).
Next, we added the very bright 2.25″ (53 mm) Radiantz “Puckz” LED running light and brake light combination.
Where to Buy Radiantz Puckz LED Brake Light
Check Reviews & Prices on AmazonAlso Shop for: LED Lights and Bulbs, Auxiliary Driving Lights, Motorcycle LED Headlights
Background
“Mad Dog” and I first installed the Electrical Connection LED brake and running light bar on the rear of the 2015 Kawasaki Versys 650 LT (Blog) Project Bike.
I rarely connect the running light feature to an accessory brake light, but the tail light on the Versys seems kind of small, so we figured it could use some help.
It’s tucked up under the luggage carrier I added to hold the (nearly) color-matched SHAD SH39 top box (review) and the solid plastic SHAD universal mounting plate sort of hides the tail light underneath.
This means that the bike needed more photon power at the rear.
After looking around at various options, I remembered the now very old but brand new pair of Radiantz Puckz LED brake lights I had stashed away.
The Puckz have been sitting around here since at least 2005 and the Radiantz “Dogeye” LED turn signal review. The Dogeye lights use the same billet body but they’re combination running lights, brake lights and turn signals all in one.
I actually had the Puckz lights listed in the webBikeWorld Garage Sale for several months at one point with no takers.
So I pulled them from the sale and added some extra CPU time to the ol’ gray cells, trying to think of some way I could deploy them.
The Radiantz Puckz LEDs
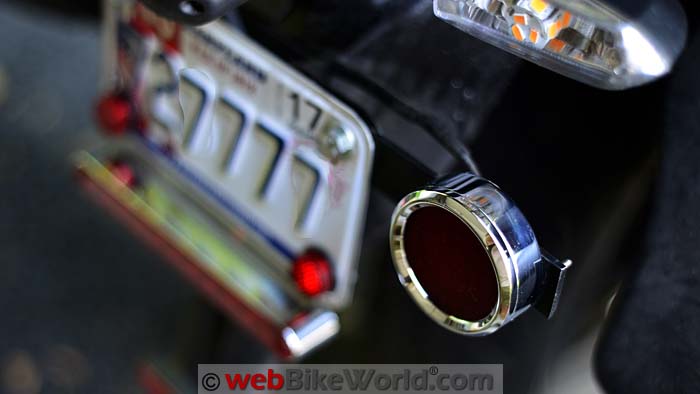
The Puckz lights are big, heavy and solid chromed pieces and there’s no doubt about it, they’re also very bright.
They’re available in amber or red and they come in three diameters: 1.5″ with 16 LEDs; 1.75″ with 25 LEDs and the Puckz shown here, 2.25″ with 48 LEDs. The 2.25″ version is nearly an inch thick (21 mm).
[UPDATE: I sent an email to Radiantz asking about the Puckz power requirements, which are: 13.6 Volts DC input, 300mA and 4W (each).]
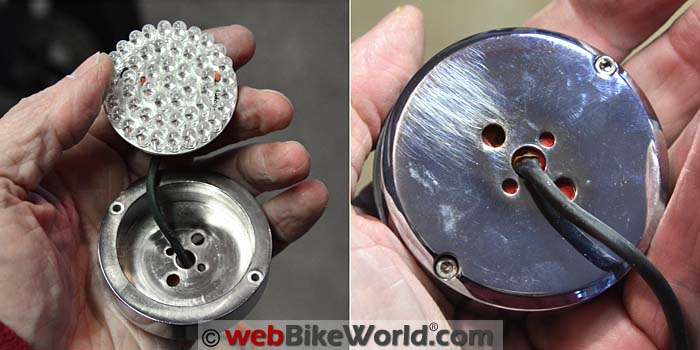
The design is also kind of strange. The main body of the light is a hollowed-out (thus the “billet”) cylinder that holds the round LED array, with wiring coming out the back.
The red circular disk lens is held on to the main body by a chrome ring.
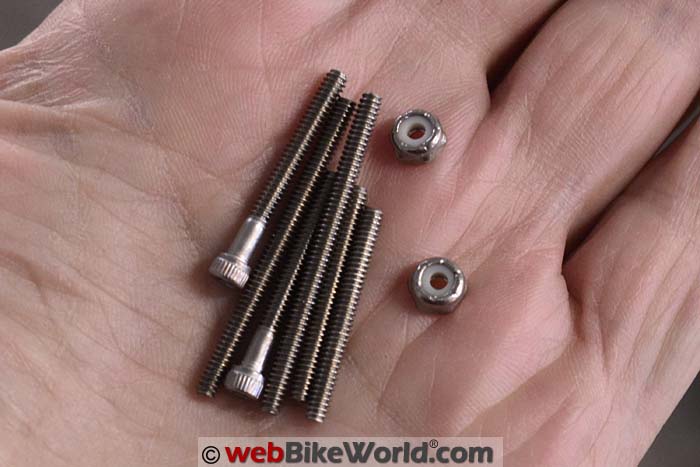
The “sandwich” that results from this ring, the lens and the main body is fastened with what appear to be very tiny M2 hex head cap screws and a Lilliputian Nylock nut that has to be the smallest I’ve ever seen.
The kit also comes with two extra sets of M2 studs of about 25 mm long and 40 mm long.
By the way, the chrome top ring has threaded holes on the back side, so no nuts or fasteners appear on the outside, which gives it a “clean” appearance.
The idea, apparently, is that you mount the chrome ring and lens on the outside of a (flat) fender or something.
And then you’d have a nearly flush running light, brake light or turn signal if you’re using the amber lens version.
The main body of the light that holds the LEDs would then be hidden behind the fender…but then why is the main body chromed?
And why is the bottom or rear of the base chromed also?
One more design quirk: the lens “floats” under the chrome ring.
There’s no O-ring to hold it tight and even with the ring tightened as much as we dared, considering the tiny M2 threads, the lens can still be turned under the ring.
So it’s not waterproof unless you add some clear silicone and you have to be really careful doing that or it will bleed out on to the lens.
And then there’s the bottom or rear of the light. It’s chrome plated like the rest of the body.
They could have simply chrome plated the trim ring and left the main body painted, since that will be hidden behind a fender.
There are 4 holes in the rear (or back or bottom, depending on orientation) of the Puckz body (see photo above), surrounding the 3 wires that connect to the circular LED and which fit through the center hole.
For the life of us, we could not figure out what the 4 holes were for.
You’d think they would be for the bolts so you could fasten the entire Puckz body to a flat surface…but nope. You can’t fit a bolt with any type of head on it underneath the LED, because it would then interfere with the LED array.
So these remain a mystery and we ended up taping them over and adding some silicone to hopefully make them waterproof.
Mounting the Puckz LEDs
After removing the license plate holder assembly on the Versys while we were mounting the Electrical Connection light bar, something hit me.
It would be easy enough to add an aluminum bar across the back and fasten it using the license plate bolts. The aluminum bar would sit between the license plate and the metal license plate bracket mount on the Versys.
Then, we could drill some holes and mount the Puckz lights on either side of the aluminum bar.
I had some 1/8″ by 1″ wide aluminum bar stock left over from installing the Kawell amber LED light bar (review) on the front of the Versys, so that’s what we used.
This thickness is sturdy enough to hold the lights but it’s thin enough to make drilling (or bending) fairly easy.
(And by the way, I also recently installed another Kawell amber LED light bar on the BMW F800S (Blog) using the same aluminum bar. I also added a custom relay harness and a waterproof on/off switch for the light bar on the BMW).
Once we got everything figured out, it was pretty easy. You may be able to make something like this for your bike; it will depend on the configuration of your license plate holder.
Where to Buy Radiantz Puckz LED Brake Light
Check Reviews & Prices on AmazonAlso Shop for: LED Lights and Bulbs, Auxiliary Driving Lights, Motorcycle LED Headlights
Aluminum Bar Dimensions
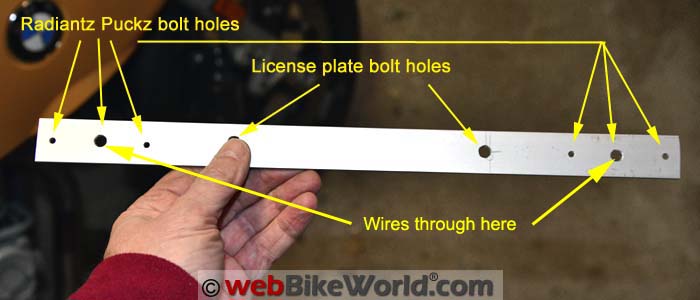
The mounting holes on the license plate are 6″ to the centers, so we cut the aluminum bar 14.5″ long (37 cm).
Measuring from the center of the bar, each license plate bolt will pass through a hole 3″ from center. We opted to mount the bar at the top of the license plate because the Electrical Connection LED brake light bar is mounted at the bottom.
Next, we marked off holes for the Puckz LED wiring to pass through, measuring 6″ from center on either side of the aluminum bar. This gives enough room to mount the 2.25″ diameter Puckz lights on either side.
Finally, we drilled some smaller holes for the Puckz mounting studs to pass through and then we spray-painted the aluminum bar semi-gloss black.
We opted to use the longer studs to mount the Puckz lights and we used red (not blue) permanent Loctite to hold the studs into the back of the chrome trim ring.
To mount the lights, the studs pass through the body of each Puckz light, holding the red lens to the body. The LED array is inside and the wiring passes out the back and through the large holes drilled into the aluminum bar.
Then we used small flat washers, lock washers and the Nylock nuts to fasten the Puckz lights to the aluminum bar.
Before tightening the nuts, we added some clear silicone sealant under and around the back of the Puckz light body to hopefully keep them sealed from moisture.
After that, it was simply a matter of fitting the aluminum bar under the license plate, sliding the existing license plate bolts through the plate, the aluminum bar and the Versys license plate mounting bracket.
Wiring the Puckz Lights
We already had the Electrical Connection brake light bar wired as a running light and brake light, so all we had to do was tap into those wires to get the Puckz up and running.
The Puckz lights have 3 wires: Black (ground), red (brake light) and orange (running light).
If you’re wiring the Puckz lights directly (i.e., don’t have an Electrical Connection brake light bar), then connect the black wire to a ground and the orange wire to a switched power wire.
Switched power at the rear of the bike is usually the license plate light or the original equipment tail light, if it also acts as a running light.
Finally, connect the red Puckz wire to your brake light wire and you’re done.
Conclusion
As usually happens, it’s next to impossible to clearly illustrate the light output of motorcycle brake lights or running lights.
I can only hope that our photos have done that, so the only other thing I can say is that the Radiantz Puckz lights are very bright.
I have asked many people to stand behind the Versys while I throw the switch (i.e., squeeze the brake lever) and invariably, their first reaction is “WHOA!” and then they immediately squint.
There are a few curiosities about these lights however.
First, the big chrome bodies are not for everyone. Also, the Puckz lights are more difficult to mount than they could be. And the multi-part construction doesn’t seem waterproof.
They’re also expensive. The 1.5″ diameter Puckz lights have a list price of $55.00 each (Puckz are sold as single units).
And I wish there was a way to adjust the difference between the running light brightness and brake lights.
The lights are very bright at both settings, but sometimes I wonder if the running light brightness might be too bright.
Too bad there wasn’t a dip switch or wiring choice to turn off a number of the LEDs on running light and maybe have only the outer LED rings get power when in running light mode.
But on the other hand, in the dark or in dim or foggy conditions, maybe more running light power at the rear is a good thing.
And now that I think about it, maybe more running light power is better also in full sun, which tends to wash out any auxiliary motorcycle lighting.
Finally, there’s the price: the 1.75″ diameter version lists for $69.00 each and the 2.25″ version has a list price of $83.00 each. That’s $166.00 for the pair!
Radiantz Puckz lights are available with amber or red LEDs and with a clear, amber or red lens.
Where to Buy Radiantz Puckz LED Brake Light
Check Reviews & Prices on AmazonAlso Shop for: LED Lights and Bulbs, Auxiliary Driving Lights, Motorcycle LED Headlights
Owner Comments and Feedback
See details on submitting comments.
From “G.W.” (August 2016): “If you don’t like the chrome, then just Plasti-Dip them black. If matte black doesn’t work for you then add the glossifier coat.
$15 and they change from chrome to black and it’s an easy change back to chrome if you aren’t happy with the results.”
Other WebBikeWorld Motorcycle Lighting Reviews


No Comment