

Motorcycle Fork Oil Change
I had some problems with my Triumph Thunderbird Sport motorcycle front suspension. These problems are described in “Part I” of this saga: “Motorcycle Front Tire Change – Triumph Thunderbird Sport“.
To recap, I noticed that the front end of the motorcycle had a repetitive bouncing motion that I just couldn’t get rid of. No combination of rebound, damping or compression adjustments seemed to help. I thought perhaps it was the oversize tube that I installed with the recent front tire change, so I found the correct size tube and checked the balance several times, but nothing seemed to help. This is all described in detail in Part I.
So the next logical step was to remove the forks and take a look inside. I had never taken a pair of forks apart before, so I was a bit wary of what I might be getting in to. But the Haynes manual is a gem, and I had no significant problems with this maintenance task. I’m glad I did it, because I think I’ve solved the problem.
I had planned on changing the fork oil anyway, since the bike is nearing 10,000 miles, so the work wouldn’t be in vain, even if it hadn’t solved the bouncing problem. The bottom line is that I found that the forks had only about 1/2 of the amount of oil required.
This could certainly cause the problems I had encountered. I’m not sure why the motorcycle had only 1/2 the amount of fork oil — the previous owner mentioned that he hadn’t done anything to the forks, so I’ll have to assume that the bike came from the factory this way. So if you’re having some problems with your Triumph motorcycle, and the front end feels like it’s bouncing around and you can’t get it damped, this may be the problem.
As I mentioned, the Haynes manual is fairly clear on the procedure for removing and disassembling the forks. You don’t actually have to completely disassemble the forks, but it is necessary to remove the top nut that holds the rebound and preload adjusters, and to remove the spring, so that the correct amount of oil can be installed.
Here are some tips based on my experience:
The Haynes manual suggests loosening the 27mm top nut that holds the rebound/preload adjusters before you remove the forks. I didn’t do that, and ended up having to re-insert the forks in the triple clamp to remove the nut.
BUT, Gary G. wrote to let visitors know that a drawing in the Triumph manual shows that the correct way to hold one complete fork leg in a vice is by clamping the outer fork tube (lower) in the vice with soft jaws by the lowest brake caliper mounting boss. This sounds like a good way to do this also.
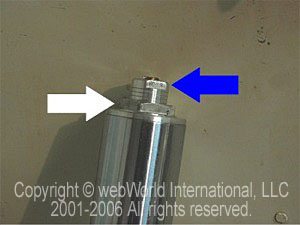
The problem is that the top nut (white arrow, photo 1) is held on with 23NM of torque, and you don’t want to hold the fork tube in a vise while you remove it, because you don’t want to risk crushing the tube.
The triple clamp offers a good, strong hold on the tubes and allows you to loosen the nut, so you’re better off doing this while the fork tubes are still on the bike.
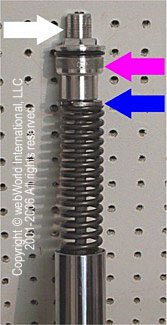
I was worried that the spring would come popping out of the top of the fork tube if I loosened the nut, but if you back off the preload and rebound adjusters all the way (blue arrow, 2), you shouldn’t have a problem.
Removing the forks from the bike is a straightforward process, and the Haynes manual clearly describes the procedure.
Remove the brake calipers, the speedometer cable and the front tire and axle, per the wBW article “Front Tire Change – Triumph Thunderbird Sport“.
The front fender must be removed; it’s held on by 4 hex bolts and is easy to remove.
Then loosen, but do not remove, the four (2 on each side) lower fork tube clamp bolts and the 2 (1 on each side) upper fork tube bolts. The forks should slide out with little effort.
Where to Buy Motorcycle Fork Oil
Check Reviews & Prices on AmazonSee More: Motorcycle Accessories, Motorcycle Tire, Motorcycle Helmets
Since the top nut has already been loosened, it should be fairly easy to unscrew the entire top assembly that houses the preload and rebound adjusters.
By the way, I had a flat stamped metal 27mm open-end wrench that fit the top nut, but I found that a 1-1/16″ open end wrench will also work, although it is a bit loose; if you use one, be careful that you don’t round the corners of the nut.
The top assembly (pink arrow, photo 2), includes the preload/rebound adjuster (white arrow) and unscrews from the rebound rod that runs down through the center of the spring.
There is a U-shaped washer (blue arrow, photo 2) that sits between the top of the spring and the top assembly; it slides out to reveal a locknut that tightens up against the top assembly to locate it.
The spring must be removed to drain and refill the fork. Once the locknut is loose, the top assembly can be unscrewed via the 17mm preload adjuster and remove the washer and the spring.
Pump the forks up and down several times while holding them over a container for the oil, and also pump the preload rod in and out. I left the forks upside-down in an oil drain pan overnight to make sure they were fully drained, and still had to pump them some more the next day to get the last little bit out.
As long as I was changing the oil, I figured I’d experiment a bit with the fork oil weight. I used BMW 7.5 weight fork oil, which is a bit heavier than the 5 weight called for by Triumph.
Here’s the surprise: each fork had about 240cc’s of fork oil when I drained them, and I was careful to drain them dry. But when I followed the manual’s directions to fill the fork to 145 mm from the top of the compressed fork leg, I found that this took about 470cc’s in each fork!
The original owner told me he never changed the fork oil, so the only conclusion is that the factory under-filled the forks by almost half. I can’t believe he drove it for 9,500 miles without noticing it — I noticed something was wrong right away.
As you fill the forks, be careful to expand and compress the forks several times; cycle the preload rod up and down, etc. to make sure that the fresh oil is completely distributed throughout.
 The manual advises using a special tool that you can set for 145mm and place over the top of the fork tube to measure the correct height. The tool will suck out any oil over 145mm in height.
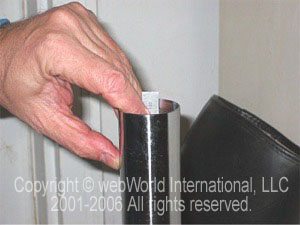
But it’s just as easy to hold a scale (ruler) down in the tube and fill it up until the height of the oil column is correct as shown in this photo.
I poured in about 425cc, and worked it up from there, expanding and compressing the fork tube and the preload rod each time, until I finally hit the 145mm mark.
To re-assemble the fork, first insert the spring, with the coils that are closest together located towards the top.
Then locate the top of the locknut 11mm from the end of the threaded rebound rod, and screw on the top assembly. Tighten the top assembly against the locknut, and try to keep the locknut from moving up or down along the threaded rebound rod.
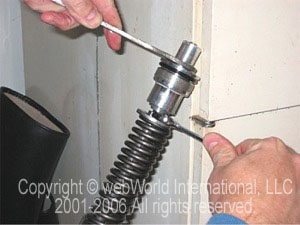 This photo shows the 27mm flat open-ended wrench holding the top nut, but I found that you’re better off using a 17mm wrench on the preload adjuster to tighten it, because the 27mm top nut turns the entire outer assembly, which fits over the preload adjuster and screws up and down.
So if this piece is held with the 27mm nut, you may end up with an incorrect location for the entire assembly because it will slide over the preload threads, rather than tighten against the locknut.
Where to Buy Motorcycle Fork Oil
Check Reviews & Prices on AmazonSee More: Motorcycle Accessories, Motorcycle Tire, Motorcycle Helmets
Installation is the reverse of the removal procedure; just remember that you’ll need to tighten the 27mm top nut after you have the forks secured in the clamps. It’s supposed to be torqued to 23NM, but there’s no way you’ll be able to find a socket deep enough to fit over the entire preload/rebound assembly to tighten the nut, so I just gave it a good tug with the 27mm open-end wrench. Alternatively, Gary G. also suggested using a “Crow’s foot” attachment for a torque wrench to achieve the correct torque.
Also, don’t forget to correctly torque the socket head cap screws on the triple clamp to their correct torque after you re-install the fork tubes!
So far, the bike’s handling and feeling has improved dramatically — like two different bikes. The adjusters now actually seem to do something! So if you’re experiencing front end problems, you may want to try changing the fork oil.

No Comment