

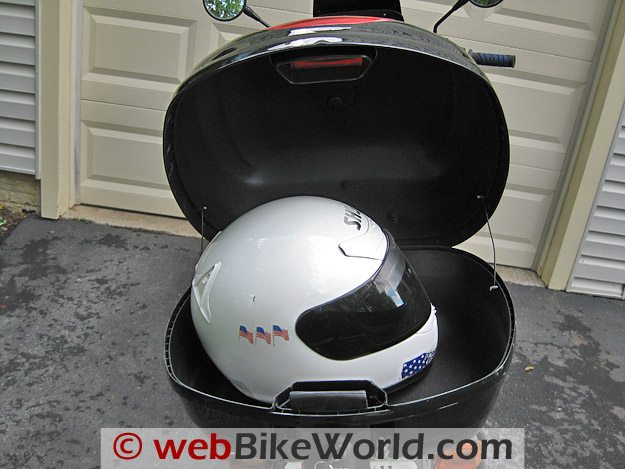
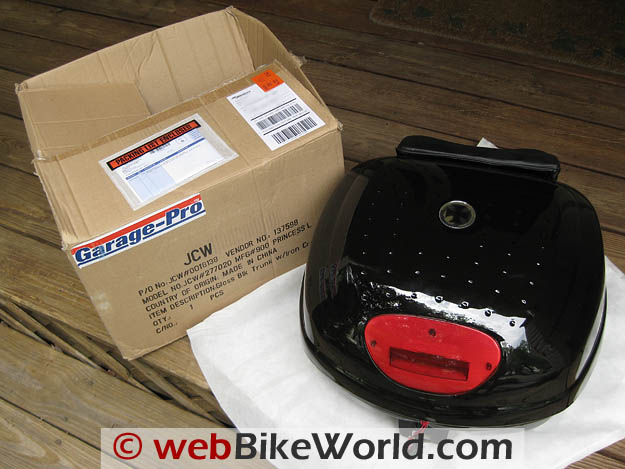
The JC Whitney “Glossy Motorcycle Trunk”
Since I will be using the Ninja 1000 for commuting as well as light sport touring, getting luggage installed was a high priority. As such, the very first add-on for this new machine was my Bags Connection Daypack tankbag followed soon after with a top case rack to mount my Shad 37 liter case.
The Tankbag
This particular bag is one that I removed from my crashed Sprint 1050 before it was released to the insurance company. It is several years old now and faded but it still does the job. You can read the full review of the Daypack tankbag here. If you are not familiar with the Daypack or Bags Connection tankbags in general, these bags mount to the tank by way of a “ring” that attaches around the fuel filler cap. The ring mates to an adapter on the bottom of the bag so that the bag itself doesn’t physically touch the paint of the tank. Bags Connection has updated the adapter rings over the years and had switched to a version called the EVO after I had purchased this bag years ago. However, new rings are still available to fit the older style system I have (now called ION) and a quick two days after ordering I had a new tankring setup ready to install for the NInja. As with the previous two bikes I had installed this setup onto, installation was quick and easy. In order to install, one removes some of the screws that attach the fuel filler cap assembly to the tank. Next, a metal adapter ring is sandwiched between the plastic quick release ring and the assembly. Removal and replacement of some of the fuel filler assembly screws take only a few minutes. It helps if one keeps track of which original screw came from what position during installation as this makes it easier to choose the correct length screw from the included ones. It should be noted that you one will likely receive more screws than needed in the installation kit. For a detailed look at installation you can view our article here. Installation from start to finish took maybe ten minutes. I have the bag sitting about as far forward as it can but I might adjust this back a little bit. The adapter plate on the bottom of the back provides for several inches of back/forward placement on the bottom of the bag. However, this does require drilling the base of the bag itself so I’m still on the fence about doing so as this would be the third time it will have been drilled since I have had it. As far as function there is nothing new here, but that is fine. Iit is faded and worn it still holds what I need it to (wallet, keys ,earplugs, bottle of water, etc) and does so without rubbing on the shiny new paint on the Ninja. .
Where to Buy Kawasaki Ninja 1000 Luggage
Check Reviews & Prices on Amazon Check Reviews & Prices On RevZillaAlso Shop for: Motorcycle Jackets, Motorcycle Gloves, Motorcycle Boots, Motorcycle Pants
Top Case Mounting
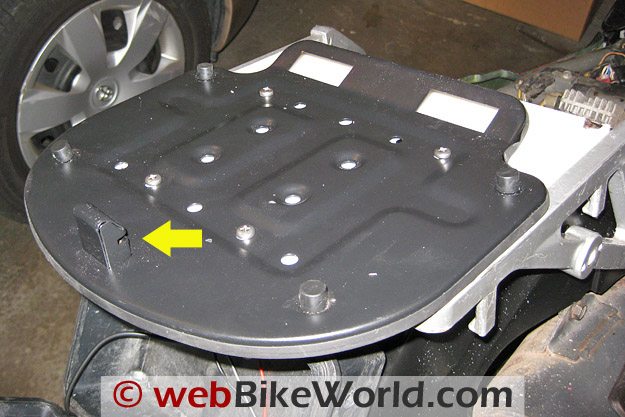
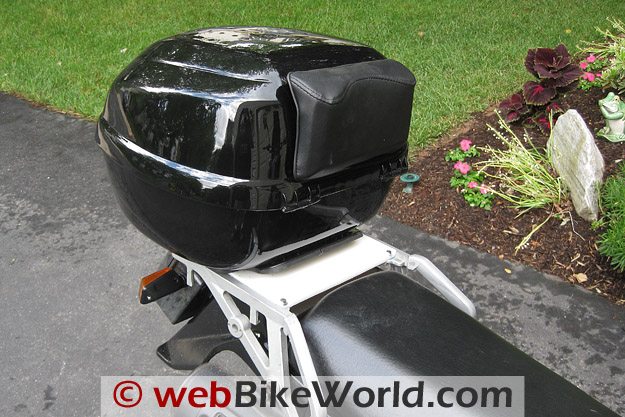
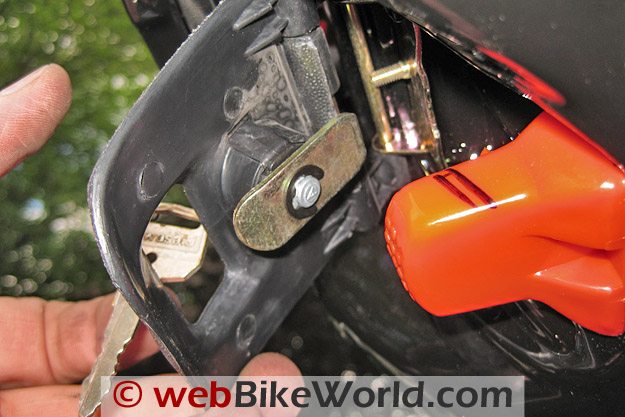
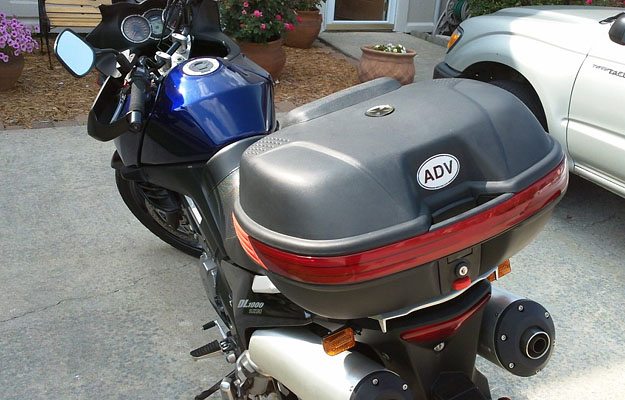
Top Case Rack Like the Daypack, my Shad 37 liter case had been installed on my Sprint and had also been in service on my SV650s before that. This case had been in place on the Sprint when I crashed but received only a light bit of scratching on the side so the plan was to move it to the Ninja. For fitment I had two choices. SW-Motech and Givi both make top case racks for the Ninja 1000 but in the end I went with the SW-Motech Alu-Rack as it could be set up to directly connect to my Shad case. I could have adapted the case to the Givi rack but why not go with the “out of the box” solution. I received the Alu-Rack rack package about three days after ordering it from Twisted Throttle. There were a lot more parts for this particular installation than had been needed for the Sprint or the SV. With those previous bikes, the rack I received was bolted to the grab handle and only needed a few small parts to attach to the bike. In the case of the fitting for the Ninja 1000, two arms would need to be mounted in addition to the top plate that would hold the case adapter. This was going to take a bit more time than the previous setups. A word about SW-Motech and their instructions. They are simple and complex at the same time. What I mean is that there is typically just one page with an exploded view of the whole setup one is installing. This is the simple part, the one page diagram. The complex part is that this can entail quite a busy diagram and some time may be needed to study all the drawings and connecting lines. Also making sure you understand which fastener is represented by each drawing can be challenging as well. After a few minutes it became a bit clearer and I felt comfortable moving on. The rack setup is attached using the grab handle fasteners and the connection point of the rear fender assembly. A small, but substantial, aluminum U shaped plate is attached under the rear seat using two of the four holes where the fender is attached. New, longer fasteners are provided by SW-Motech for this purpose. This is perhaps the easiest part of the installation. Next up is attachment of the support arms which with only two fasteners on each side seems like it would be easy, but a challenge is present here. Removal of the grab handles is relatively easy but as they are removed, there is a washer and rubber-bumpered washer that essentially fall out into the empty space in the frame where the handle covers. They can’t be lost in the space but it makes it difficult to determine which “face” of the rubber bumper washer points where. Facing in or out wasn’t as apparent as I would have thought. I made a choice though and moved forward. It would turn out to to be the wrong one and later I would have to remove the handle and switch them up before finishing the installation. That bit of mystery was not the challenge. Once the handle is removed, an aluminum spacer (provided) is dropped into the outside facing side of the handle. Then the new fastener is set through the spacer, the handle, and then through the previously mentioned washers. This sounds easy enough until one realizes they have to have both stacks of fastener hardware held in place while being moved into position. Then one needs to be able to turn the fasteners while holding the whole thing together. An assistant really helps at this point but I commenced to try to do this myself. After a couple of false starts involving dropped washers I was able to get the assembly into position. It was at this point where I grabbed the handle to test it was firmly fastened and hear a “click-click” as I put pressure on it. This is where I had discovered I had the washer stack inserted incorrectly. The photos here show the correct way to stack them. After getting this washer stack issue sorted I attached the grab handle fasteners loosely leaving wiggle room for attached the fasteners at the fender mount location. SW-Motech did a good job on their measurements as everything buttoned up nicely. Once the rails were set in place, the top plate is attached using four large fasteners. This is where the case adapter will be attached later and SW-Motech offers several adapters that fit this plate which makes this setup rather versatile if one wants/needs to change their brand or series of top case. My Shad case had originally come with it’s own adapter that I had DIY’d into place on my previous two bikes. This time though I decided to purchase the SW-Motech adapter for a cleaner look. I was not disappointed. The new adapter plate looks like it can actually be easily converted to support different cases by use of different bolt on pieces that will work with your particular case. The “back rail” and latch hook are separate pieces as well as the rubber bumpers and are made to fit a particular case. I have asked Twisted Throttle about being able to just order the hardware pieces convert their adapter plate to other cases but I did not get a response. The plate has various locations drilled in it for mounting this hardware. I was not able to find. After placing these in the correct locations I found the new plate held more snug than my old original one. Finally, the plastic adapter plate is fitted onto the top rack. There is a cutout in the rack that conforms to a protrusion in the bottom of the adapter. Then three twist lock screws are used to hold the too together. This particular arrangement makes is very difficult for someone to remove the case and adapter from the bike without having the key to unlock and remove a locked topcase first. .
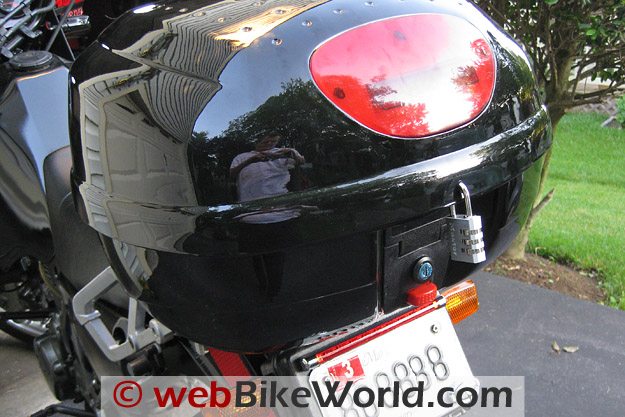
Riding With the JC Whitney Top Case
Where to Buy Kawasaki Ninja 1000 Luggage
Check Reviews & Prices on Amazon Check Reviews & Prices On RevZillaAlso Shop for: Motorcycle Jackets, Motorcycle Gloves, Motorcycle Boots, Motorcycle Pants
Conclusion
I am very pleased with how the SW-Motech hardware came together and the fit and finish is very good. The rear rack especially feels very solid and I have no concerns about loading my backpack with my laptop, lunch, extra shoes, etc into this case for my commute to work. One potential downside to the rear rack is that taller vehicles positioned behind me might have difficulty seeing my tail / brake light as the topcase and rack hang pretty closely over these lights. I will be adding additionally brake/tail lights in an upcoming entry. The fact that Bags Connection still makes tank rings to support their older system that I had for the Daypack was great news. Maybe the new system is improved but mine has worked flawlessly for years so i’m glad to continue not fixing something that isn’t broken. The bag exterior has faded and I have not found a method for restoring the black color. If any readers out there have an idea on this I’d be glad to try it. The luggage additions have quickly transformed the new Ninja into a useful commuter / and light sport touring machine, at least from a storage perspective. More modifications are on the way and they will be covered here soon.
SW-MOTECH Alu-Rack Toprack ● $226.95 ● Black ● Made in – ? SW-Motech case Adapter for Shad 37L case ● $53.99 ($24.99 when purchased with Alu-Rack) ● Black ● Made in – ? SW-MOTECH Bags-Connection QUICK-LOCK Type 140 Tankring ● $31.95 ● Black ● Made in – ?
| wBW Review: JC Whitney Top Case | |
|---|---|
| Manufacturer: JC Whitney | List Price (2010): $79.99 |
| Colors: Black | Made In: China |
| Review Date: July 2010 | |
| NOTES: Officially known as the “Glossy Motorcycle Trunk” with part number 1JA 277020. | |
From “S.L.B.” (7/10): “It reminded me of a very similar case I bought a year ago that looks just like yours, except mine did not have a Maltese cross on it, it had a blank circle, onto which I glued a BMW logo.
My case is water tight and, while it bounces around a bit, never has come loose by accident.”
From “C.Z.” (7/10): “I enjoy your articles and more so the reviews, I’ve purchased several items based on your comments and findings.
Regarding the JC Whitney trunk, I’ve purchased the same one some 3-4 years ago and mounted it onto my Givi rack on a Honda VFR.
I’ve had to add a brake light to it, as tall vehicles (trucks) can’t see my factory brake light as the trunk hides it from view when the other vehicle is close to the back of the bike.
For the money it works well, not once did it fail to remain open and is leak free. It does squeak when going over rough road, but for the money I don’t care.”
From “T.G.” (7/10): “I recently purchased the same trunk for the same discounted price. What have I got to lose?
It cost another $20 to ship it standard. So, I’m into it for ~$42 by the time it arrived. The intended bike is a Kawasaki Concours C10.
The included mounting bolts and rails didn’t help me in attaching to the Concours built-in mini-rack behind the seat. Fortunately, Murphs carries top box mounting brackets with bolts that fit into the factory rack holes. Another $40. So, I’m into it for ~$82.
I was able to easily install the box mounting plate to the brackets though. I experienced some of the reviewer’s same issues with mounting the box to the mounting plate.
It is not a precision fit but I was successful without modifying anything. I do double check myself as the reviewer did on the latch to make sure it has latched, but once done it has stayed shut.
Contents of my box stayed dry while I rode in a heavy rain this last weekend. I am able to fit a 2XL full-face helmet in it plus some other stuff when I stop.
I also rode with a passenger for about an hour this past weekend and had no problems with the backrest or box mounting stability.
While not exactly plug-n-play, it does work and probably the discounted price reflects that. I don’t intend to frequently remove the box from the mounting plate, if I did, this may not be the box for me.
However, I recommend buying it if you don’t mind a little extra work to mount it.”
From “RLD” (7/10): “I have the exact same case, but I got it through Sears! I have the larger size and it works well on my Suzuki V-Strom DL1000K5 It even has the same “Maltese cross” sticker on top.
The latch is not loose on my model – but it’s great for less than $50 delivered.
I can only think that Givi is worried about charging folks so much for what they deliver. If this goes bad – I’ll spend another $50 to replace…”
Editor’s Reply: I’ve seen Bob’s case and this one looks a LOT better! Congratulations on a good find!
From “M.K.” (7/10): “I had a different model Top Box from JC Whitney, SKU Number: 2JA 277021. I bought it for $50 and had it on my DL650 for 3 years with zero complaints.
The only reason I replaced it was I needed a larger bag for my fiancée’s stuff. No, it’s not a Givi, but it cost less than just the mount for a Givi bag.”

No Comment