

Part 3: CANopener Installation Notes Installation Notes
A wealth of information is available on the Clearwater Lights website with their usual excellent Installation Manuals covering generic and specific CANopener installations for various makes and models.
The information also includes lots of background specifics and technical data.
In addition, webBikeWorld has reviewed all of the Clearwater Lights products over the years, including the Clearwater Erica LED lights (review) and Clearwater Darla LED lights (review).
Accordingly, this section won’t be a detailed step-by-step, but rather a collection of observations regarding installation of the CANopener 3 system on the 2014 BMW R1200GSW test mule.
Preparation
Before starting, always disconnect the battery terminals, in this case the negative post and the accessory screw connectors are accessible once the right side cover is removed.
Also, remove the fuse from the in-line holder on the positive battery lead of the CANopener harness…but don’t forget to replace it once all the connections are made.
Component Removal
Installing the CANopener harness and components is described and illustrated in the instruction material provided by Clearwater and the task is pretty simple. TIP: I always write my own notes and take step-by-step photos (and a voice recorder comes in handy also); you never know when that information will come in handy, especially when buttoning everything back up.
Where to Buy Clearwater CANopener
Check Reviews & Prices on AmazonSee More: Motorcycle Accessories, Motorcycle Tire, Motorcycle Helmets
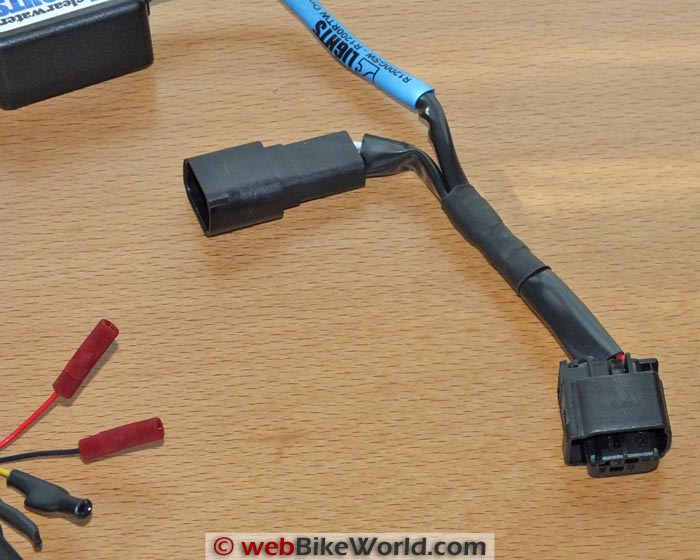
The CANopener Harness
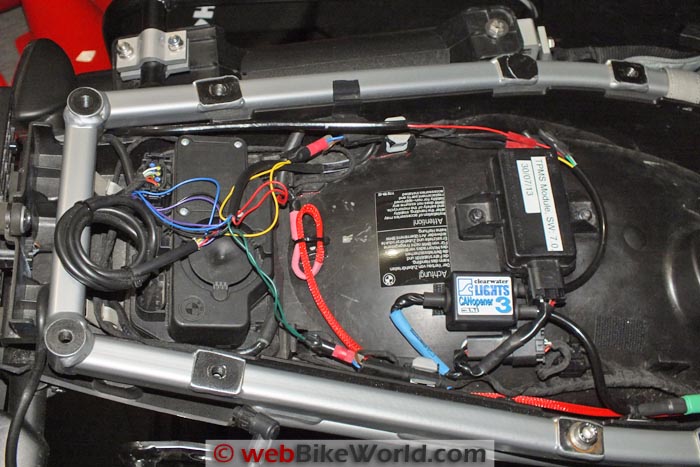
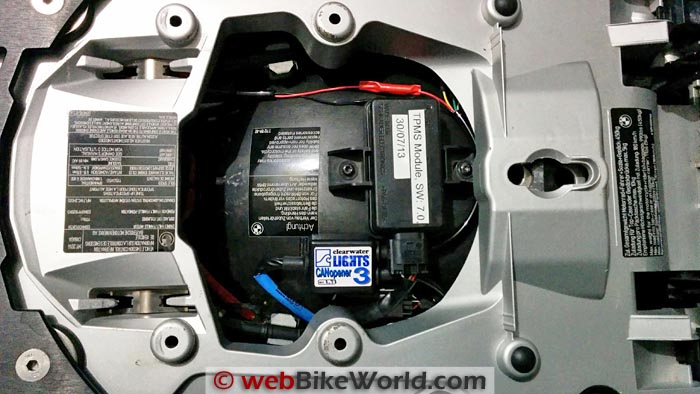
Speaking of access, the main section of the CANopener harness with the controller module can be fitted near the TPMS module or the TPMS original equipment harness nestled against the right side of the fender wall. As such, removal of the rear deck may or may not be required, depending on where components will be located.
This approach worked well in testing four iterative versions of the CANopener module. There may also be slight differences in the middle or data cable section, depending on whether the BMW Multi-Function Controller is installed or not. If not, then the rotary dimmer control interface is needed and some retrofit kits may also have separate wire leads as well.
CANopener Harness Installation
Only two minor deviations were made from the instructions. The first was deciding not to use the somewhat difficult-to-access original equipment wire trough, but instead using the space between the fuel cell and air box housings as a conduit for the harness, which was already in use for two other small wiring sets.
Also, the relay didn’t get located under the steering column frame on the GS but rather nestled inside the right beak frame just forward of where the wiring is routed and the Clearwater Darla lights Posi-Twist connections were made. Everything is close together and easy to access.
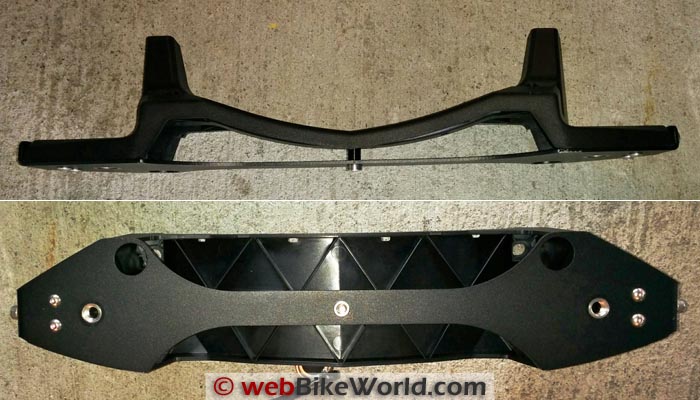
The Clearwater-Modified BMW Light Bar
To address strength concerns — especially if multiple sets of Erica or Krista LEDs are installed — Clearwater adds a thin reinforcement brace (plate) to the underside of the BMW GS light bar with everything held together with small drilled-and-tapped aluminum blocks positioned inside the molding; a clever solution requiring no modification of the light bar accessory.
Sample Installation: 2014 BMW R 1200 GSW
The Clearwater CANopener 3 (and CANopener 4) variants are optimized for motorcycles equipped with the BMW Multi-Function Controller (MFC), also known as the Jog Wheel or Wonder Wheel. But for our purposes (and correctness) we’ll stick with “MFC”.
As part of the CANopener instructions (.pdf), Clearwater includes a small table listing the functions, commands and modes that are available. This table is a very good reference and it identifies the essential steps and resultant actions for each function and mode.
The following sections follow the basic framework of this reference in presenting and discussing each of the CANopener functions and modes in greater detail, along with assessment notes and recommendations based on actual use.
Common CANopener Steps and Actions
- Initialization: A one-second push of the turn signal control serves to “prevent adjustments to the Nav involving tilt and hold actions on the “Wonder Wheel” (MFC) from affecting the CANopener.
- Channel Activation: A following two-second hold of the MFC (either left or right) activates one of the programming channels in the CANopener (assignments are described below). Activation of either channel is confirmed by a double flash of the selected lights (front or back).
- Exiting: push the turn signal control again or just wait two to four seconds for the system to exit the mode automatically, both actions are confirmed by a single flash.
- Mode Indicator: depending on the function and mode initialization sequence the current mode is indicated visually. Example: Mode 3 = 3 flashes.
- Channel Dimming: if two sets of auxiliary lights are installed on the bike, the set not being programmed will automatically dim to its lowest setting while the other pair is being programmed, making it easier to discern the output adjustments.
A relevant observation (subsequently confirmed by Clearwater) is the relationship between the Multi-Function Controller and the Navigator V GPS. On the R1200GS models, the MFC communicates directly with the Navigator V, whereas on the K1600 and RTW models with their (typical) additional media components to be managed a different configuration is used.
But the initial “one second push” on the turn signal control works well, especially with the latest v1.72 CANopener firmware. Nevertheless, for the R1200GSW configuration it doesn’t hurt to have the Navigator V set to the home screen or just turn it off while programming the CANopener channels with the MFC.
Where to Buy Clearwater CANopener
Check Reviews & Prices on AmazonSee More: Motorcycle Accessories, Motorcycle Tire, Motorcycle Helmets
Programming the CANopener For Darla/Glenda LED Lights
As with other Clearwater Lights installations, the Darla LEDs are always-on, functioning as DRLs and augmentation lighting when needed.
- To Program the CANopener, push the turn signal control for one second, hold MFC to the left for two seconds, a double flash of the lights confirms channel activation, rotate the MFC to adjust the LEDs through the ten (10) discrete steps to the desired setting.
- For DRL use a setting of one or two works well and for low-light or night time augmentation, depending on the way ahead and traffic conditions moving them up to four or five is effective without blinding oncoming traffic. Anything higher should be reserved for divided multi-lane highways, off-road or FTP/Hi-Beam use.
Programming the CANopener For Erica/Krista LED Lights
As one would expect, Clearwater provides positive On/Off switching for the lights. A two-second push of the turn signal control turns the mounted Erica LEDs On/Off. I really appreciate this quick means to add or remove the ultra-output LEDs from the forward lighting environment.
To program the CANopener for the Erica/Krista lights, push the turn signal control for one second, hold the Multi-Function Controller to the right for two seconds, a double flash will confirm channel activation, rotate the MFC to adjust the LEDs through the ten (10) discrete steps.
The LEDs need to be switched on for programming. For reference, Mode 1 = On and dimmable (default) and Mode 2 = Off. Outside of temporary and very effective activation using the Flash-to-Pass, Horn or Hazard functions for traffic management purposes (also known as collision avoidance), I never use the powerful Erica LEDs on the streets and only occasionally on multi-lane roads when additional frontal and side lighting is needed.
But they come into their own on deserted back roads or trails where settings between 10 to 40% is more than enough, at least for the speeds I travel.
Automatic/Programmable Dimmer Functions
Day, Night and High Beam settings can be programmed into the CANopener manually using the Multi-Function Controller, although with the CANopener monitoring the onboard system settings, automatic compensation is provided (based on ambient lighting data collected from the BMW in-dash photocell sensor). Clearwater uses system defaults per the table below.

To program or adjust settings, the photocell needs to be covered with tape (or a finger) so that night mode programming can be done and of course high beam programming requires that the high beam (along with the Krista/Erica LEDs as applicable) are turned on first. Resetting the system (described below) restores the default levels listed in the table.
Where to Buy Clearwater CANopener
Check Reviews & Prices on AmazonSee More: Motorcycle Accessories, Motorcycle Tire, Motorcycle Helmets
High Beam Mode
High Beam Mode is a multi-dimensional mode that provides programming of the LED light sets and depending on the settings made, impacts Horn Activation and Hazard Mode output as well. Two operational modes are available.
Programming: hold the brake lever/pedal and press the flash-to-pass (FTP) button three (3) times. (Note: some settings and outputs have changed from earlier CANopener versions and the modes described here are for the current v1.72 installation).
High Beam Mode 1 (single flash): when FTP or high beam is activated, the Darla/Glenda lights go to 100%, whereas the Erica/Krista LEDs do not respond unless they are turned on. If turned on, they use the default or any programmed settings on Low beam but go to 100% with FTP or high beam.
High Beam Mode 2 (two flashes): when FTP or high beam is activated, ALL Clearwater lights go to 100%, even if the Erica/Krista LEDs are not turned on. Mode 2 is provided primarily to address regulations in jurisdictions in which continuous hi-output running lights with the low beams are not allowed.
Remember — the high beam output modes configured here apply as well to the horn and hazard modes described below.
Horn Activation Mode
For some riding environments and situations, the horn (like the Stebel unit on my BMW) is a critical component of the safety envelope by itself or better yet, used in conjunction with flash-to-pass or flashing of the auxiliary lights to increase conspicuity and (hopefully) raise awareness on the part of everyone involved, quickly.
Programming: hold the brake lever and press the turn signal control button three times; the Clearwater lights flash accordingly depending on the current mode.
Mode 1 (one flash): default mode, normal horn use.
Mode 2 (two flashes): pushing the horn button causes the horn to sound and the Clearwater lights flash at full power for a single event notification, and
Mode 3 (three flashes): pushing the horn button causes the horn to sound and the Clearwater lights strobe for a multiple-event notification
Clearwater identifies that Mode 3 can be used for parades or as an escort service but they also clearly state that use of strobe mode may not be legal on public highways. Trust me when I say that using Mode 2 or Mode 3 WILL get the attention of anyone standing, walking or driving…which in many instances is exactly the needed response!
Hazard Flasher Alert Mode
Where a purely visual alert suffices, this mode provides a very effective eye-catching solution.
Programming: hold the hazard flasher button (Red Triangle) and simultaneously press the brake lever three times; the lights flash accordingly depending on the current mode.
Mode 1 (single flash): default mode, pressing the hazard flasher button activates the four-way mode with only the signal lights, and
Mode 2 (two flashes): pressing and holding the hazard flasher button causes the four-way lights and the Clearwater lights to flash — alternately if two sets are programmed.

Auxiliary Relay Drives
The newer CANopener harnesses incorporate a five-lead auxiliary harness:
- Red wire: positive (used for Clearwater tail/brake module).
- Black wire: ground (used for Clearwater tail/brake module).
- Yellow wire: auxiliary 12V DC trigger for products like the Centech AP, PDM-60, Dispatch 1 or the Arboreal Systems Neutrino (review).
- Gray wire: auxiliary horn, for triggering relays needed for something like a high output horn;
- Green wire: auxiliary high beam, suitable for adding an auxiliary high beam (bypass).
Note: Clearwater makes it very clear that auxiliary accessories should not be connected without a relay (or compatible solid-state component). Circuits are rated at 0.25A maximum.
CANopener Memory
CANopener programmed settings are stored in non-volatile memory so they will be remembered when restarting the motorcycle or if the battery is disconnected. To facilitate initial use the system comes pre-programmed for the most useful day/night settings.
CANopener System Reset
To reset to the factory settings or defaults, activate and hold the turn signal control to the left while simultaneously pressing the flash-to-pass (FTP) button six times within six seconds (piece of cake, right!). If successful the default dimmer levels and modes will be set with five flashes of (the) installed Clearwater lights confirming the reset.
Next: Part 4 Clearwater LED Brake/Tail Light and Conclusion
Where to Buy Clearwater CANopener
Check Reviews & Prices on AmazonSee More: Motorcycle Accessories, Motorcycle Tire, Motorcycle Helmets
Owner Comments and Feedback
See details on submitting comments.
NOTE: See Part 4 for the Owner Comments and Conclusion.

No Comment