
Cardo Scala Rider G4 Motorcycle Bluetooth Intercom Review
webBikeWorld was provided exclusive access to version 2.2 of the G4 upgrade software while Part 2 of the G4 review was underway, which allowed us to provide some insight into this much anticipated release.
However, we couldn’t publish the full details about the upgrade because Cardo was still putting the final touches on the release.
But the release has now been finalized and it’s readily available to G4 owners for downloading.
In a nutshell, Cardo has designed a fairly simple and generally easy to use application that allows users to keep their G4 systems up to date.
The main features found in this initial release include the ability to pre-set radio stations; activate or deactivate the RDS and VOX functions; and change the Status Announcement language settings. Some other “fixes” and enhancements have also been made, as noted in the Part Two evaluation.
The Cardo software upgrade downloads page provides access to the latest G4 software for owners of G4 intercoms that have previously been registered with Cardo. If you haven’t done this, registration can be done by moving back to the “Downloads” page and providing the requested information.
A valid email address is the only requirement, along with a valid device serial number for either a single G4 unit or one/both serial numbers from a Powerset bundle (Tip: if you enter both serial numbers from a Powerset bundle, don’t put a comma between the two numbers, a space will work — don’t ask me how I know this…).
Downloading the G4 Software Upgrade Application
Follow the on-screen instructions to Download and Save the application, which is just over 6.0 MB in size. Just remember where you saved it on your computer.
As long as you are running 32-bit Microsoft Windows 7, Vista or XP, the application should install without issue.
For what it’s worth, my 64-bit version of MS Windows 7 Professional handled the installation just fine.
If you do get a “corrupted” message when trying to install the file, delete the file and download it again. This happened to me once.
Depending on individual system settings, you may need to install the application as Administrator.
This can be done by right clicking on the application and selecting the “Run as Administrator” option.
Don’t forget to print out or save off a copy of the brief Installation Guide instructions as well; they pertain mainly to just getting the application installed successfully, something that can be an initial source of frustration.
So, presuming the application installed successfully, the final screen allows you to launch the application once you click on “Finish”. At this point you should connect the G4 to the computer using the USB cable supplied with the system that is used for charging and data connectivity purposes.
Once the cable connection is made, the Red charging light on the device may come on, this is normal and does not impact anything.
When the application is launched, a small pop-up will visually let you know that a connection attempt is being made. If a data connection is made (not usually on the first pass), the connection screen will come up, telling you how to initiate the connection sequence.
Where to Buy Cardo Scala Rider G4 Intercom
Check Reviews & Prices on Amazon Check Reviews & Prices On RevZillaSee More: Motorcycle Intercom, Motorcycle Accessories, Motorcycle Helmets
G4 Data Connection
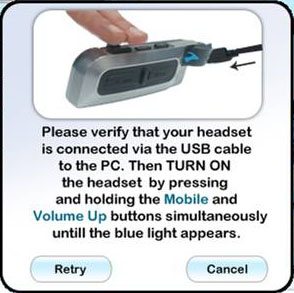
To initiate a data connection, press and hold the Phone and Volume Up buttons on the G4 simultaneously until the Blue LED flashes once or twice: release the buttons.
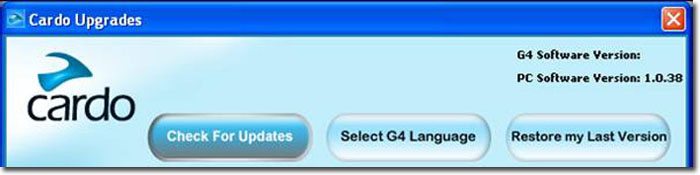
If a data connection is made, another pop-up advisory will display “Headset read successfully” and accordingly the main Cardo Upgrades window will now show G4 Software Version (2.2) and PC Software Version (1.0.44) information for the connected device in the upper right corner of the window.

Primary Upgrade Application Features
 Helmet Intercom")
Presuming a successful connection, all upgrade functions will be available. There are three main function buttons along the top: Check for Updates, Select G4 Language and Restore my Last Version.
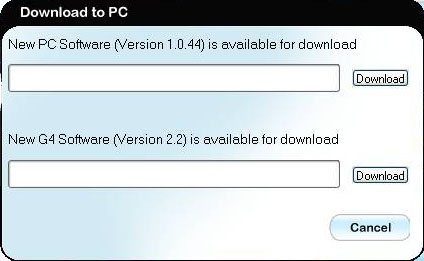
Check for Updates: Clicking on the “Check for Updates” button tells the application to go out and look for an update from the Cardo site. If an update is available, clicking on the “Download” button will initiate that process. Once the file is downloaded, pressing “Install” will either: a.) initiate programming automatically or b.) bring up the “Programming the Headset” window.
If the Programming the Headset window comes up, follow the instructions and once this procedure is undertaken, programming should start, with a pop-up status bar showing progress. If the unit or units are already up to date, another pop-up window will open confirming the situation.
In the event the connection has timed out, it may be necessary to reinitiate the data connection as described earlier. Once the pop-up window verifies a connection, click on “OK” to complete installation. Once completed, a pop-up message window displays “Headset updated Successfully”. Warning — do not disconnect the G4 from the PC during the download or installation process.
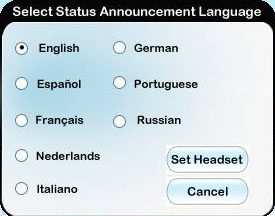
Select G4 Language: Clicking on the “Select G4 Language” button brings up another smaller window that allows you to select the desired Status Announcement Language.
Once a language is selected, click on the “Set Headset” button. A small pop-up connection window will appear and once the connection is made and the update sent to the G4, a “Headset updated Successfully” pop-up will appear.
Restore my Last Version: While the “Restore my Last Version” feature may not be totally relevant right now, if for some reason the original or an earlier (as applicable) software version needs to be restored to the system, this is the way to do it. Note: make sure the connection is active before starting this procedure.
With an active connection click on the “Restore my Last Version” button. In short order a “Programming the Headset” window will appear. The information in this window will tell you that the system was turned off (it will have been) and that you now need to initiate the connection again.
It is important to follow the instructions in the window — hold the two buttons down simultaneously for at least ten seconds until the window disappears or a pop-up windows display the message “release the buttons now”. The previous version or update should now be installed.
If the change was successful, you will need to activate the connection again, and once done, a message window will pop-up advising that G4 software installed and headset read successfully. If you haven’t released the two buttons by now, do so.
Where to Buy Cardo Scala Rider G4 Intercom
Check Reviews & Prices on Amazon Check Reviews & Prices On RevZillaSee More: Motorcycle Intercom, Motorcycle Accessories, Motorcycle Helmets
Other Upgrade Application Features
With this release, both the VOX and RDS functions can be activated or deactivated and, a personal favourite, all six available Radio Station Frequencies can be manually set as defaults.
Three right side-bar icons are for “Read G4 Data”, “Set G4 Data” and “Help”. Selecting Read G4 Data will load the current G4 devices settings into the application and display them in the appropriate box in the window. Set G4 Data is used to save settings entered via the window to the G4 as default.
If you make changes to any of the input boxes, don’t forget to press the Set G4 Data button and if the connection is still active, a pop-up message window will tell you “Headset updated Successfully”, and pressing “OK” will get rid of that window.
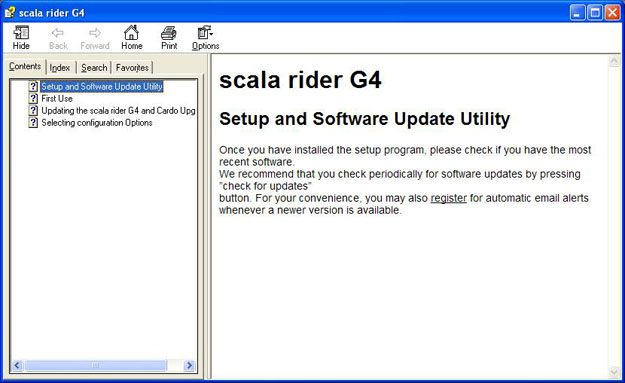
Pressing the “Help” button brings up a Windows-based context driven help menu that is simple but very complete and it should provides virtually everything users might want to know.
Updating the Upgrades Application
This is also done via the main Upgrades window and selecting the “Check for Updates” button will result in any new PC Software being identified in the Download window and once downloaded, pressing the Install button will initiate this activity.
Disclaimer
Even though I have been using the Cardo Upgrades application for some time now, it seems to work or react differently on each type of computer I’ve tried it with. As noted, specific functions and screens can be slow to appear, so patience is needed.
Bottom line: the application works as advertised in providing a dynamic and interactive means to maintain, update and (down the road) enhance the G4 systems.
If you have questions, don’t forget to use the typically responsive Cardo Technical Support resources. Please send your comments or tips to the Editor.
In This Review: Cardo Scala Rider G4 Review: Part 1 | Part 2: Ride Report
UPDATE: Part IV: Cardo Scala Rider G4 Software Upgrade 3.0 Report
| wBW Review: Scala Rider G4 Intercom |
|---|
| Details, pricing and information in Part 1 of the Cardo Scala Rider G4 Review. |
| Publication Date: June 2010 Note: Products were provided by the manufacturer for this review (more). |
Where to Buy Cardo Scala Rider G4 Intercom
Check Reviews & Prices on Amazon Check Reviews & Prices On RevZillaSee More: Motorcycle Intercom, Motorcycle Accessories, Motorcycle Helmets
Owner Comments and Feedback
See details on submitting comments.
Other WebBikeWorld Intercom Posts

No Comment