WorldNav 3500 GPS Review
Part 4: Navigating With the WorldNav 3500
wBW WorldNav 3500 GPS Review
▪ Part 1: Introduction and Details
▪ Part 2: WorldNav GPS 3500 Overview
▪ Part 3: Applications and Settings
▪ Part 4: Where To? WorldNav 3500 Navigation
▪ Part 5: Using the WorldNav 3500
▪ Part 6: Installation and Conclusion
▪ WorldNav 3500 GPS Owner Comments
Related wBW Reviews
▪ Motorcycle Bluetooth Intercoms
▪ Motorcycle Intercoms
▪ wBW Review Index
Where To? Using the WorldNav 3500 GPS
Starting the WorldNav 3500 Navigation Software application requires a bit of patience; it takes 35 to 40 seconds to load the three segments, identified on the lower pane.
The user must also press the “Agree” icon during or after the files are loaded to actually start the application.
As long as the GPS receiver locks on to the required number of birds (satellites), nominally four, the current position will be displayed.
Once progression is detected, the direction of travel will be displayed.
Depending on the options selected when initially configuring the device, the screen will typically be full size, with the familiar plus and minus icons on the left side for zooming in or out.
A (very) small scale marker sits in the left corner with the “Tool” icon just above it.
Pressing the Tool icon will activate the top pane, with a “Where To” segment on the left and the Tool menu segment on the right; pressing either will bring up the respective screens.
The Navigation Tools menu has three screens, each with four tool icons.
Pressing the left or right cursor on the bottom pane navigates between the screens with the last screen featuring an exit icon in the right corner.
Pressing this will bring up a screen asking you if you want to exit the navigation program and the choices are “Back” or “OK”.
As with other screens, the omnipresent “X” in the upper right corner takes the user back to the main active application screen, in this case the navigation screen.
WorldNav 3500 Navigation Use and Configuration Tool Screens (displayed clockwise) consist of:
- Screen 1: Info, My Points, Route Menu, Find.
- Screen 2: Units, Services, Day/Night, Map Settings.
- Screen 3: Language, Nav Panel, GPS Status, Trip Stats.

Where to Buy WorldNav GPS
Check Reviews & Prices on Amazon Check Reviews & Prices On RevZillaSee More: Motorcycle GPS, Motorcycle Intercom, Motorcycle Accessories
Where To?
The Where To? menu has two screens each with three icons that when pressed initiate other features of the navigation software.
Screen One provides Home, Address and Services icons while Screen Two has My Points, History and Intersection.
Pressing the “Services” icon brings up four search options: By Nearest, By City/Town, By Phone Number or By Zip Code. These can be useful search strings, but the phone number and Zip Code/Postal Code options only work for US-based searches.
Canadian postal codes will cause the system to search, then a “No match was found…” error message appears.
To use the “Address” search option, press the upper left corner icon to select the desired country (CA, US, MX) and (then) refine the search by entering state/province, city, house or street number and the street name.
As the active search is refined, the screen will offer up a solution to the query.

Route Creation – Let’s Go For a Ride!
Creating a basic route, for warmer climates south, seems appropriate at this time of year and besides, it’s a good excuse for becoming more familiar with the WorldNav 3500 GPS.
Setting a home address is a good starting point. Press “Menu” then “My Points” and “Set Home”.
A home point can also be established by address, GPS position (current location), map position, “My Points” or “History”.
The “Find Wizard” menu can be used as a shortcut if data has already been entered.
From the main navigation screen, press either “Where To” or “Menu”; both can be used to initiate a new route.
Using “Menu”, then “Route Menu” brings up the View Route, Clear Route and New Route options. Pressing “New Route” presents a two panel view. In this view the system assumes you are getting ready to leave (home) and want to navigate somewhere.
The top panel contains the start or current positional information while the second pane is where the desired destination will be entered, either from existing data or data brought up from the resident database.
Note: On either pane switching between positional or address information is done by toggling the icon of the house on the right side of the panes.
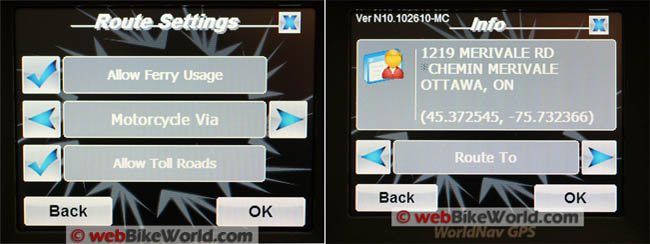
Now it is time to set some basic routing conditions. Pushing the “Settings” icon in the lower left corner will present three primary routing options:
The top line is “Allow Ferry Usage” and the bottom line is “Allow Toll Roads” and both are simple On/Off selections, indicated by a “√” (check mark) or an “X”.
Because the WorldNav 3500 Cycle GPS is designed for motorcyclists, other choices include:
- Motorcycle Quickest
- Motorcycle Shortest Distance
- Motorcycle Avoid Freeways (my favourite)
- Motorcycle Prefer Freeway
- Motorcycle Via
- Moped
- Biking
- Walking Path
WorldNav 3500 GPS Routing
For this trip, I selected Allow Ferry Usage, Motorcycle Avoid Freeways and Allow Toll Roads.
After pressing the “OK” icon in the lower right corner, the spinning bezel appears for a few seconds followed by the New Route screen appearing. Basic parameters established, it is time to create a destination point.
Press the second line pane to initiate the “Find Wizard” screen. Touch “Address” to bring up the “State/Province” screen.
With the US already selected, type in the initial letters of Florida — after “FL” the state was recognized and the next screen, “City Name” comes up.
The Daytona Speedway is located at 1801 W International Speedway Blvd, Daytona Beach FL 32114, so it is just a matter of progressing through the City, House Number and Street Name screens until the system offers up two addresses.
Both are the same basically but the second entry also identifies the boulevard as US-92 as well.
Selecting the second one invokes a short time-out as the system loads everything, then the “New Route” screen reappears, with the start and destination addresses displayed.
To actually create the route, press “Create Route” located in the lower right corner.
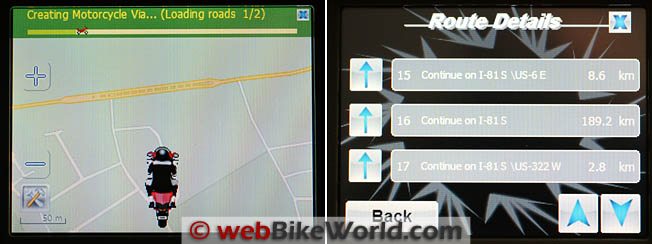
After a second or two the main navigation screen will appear, with the route creation progress scale in motion in the top pane…a motorcycle crosses left to right as the route is built based on the basic parameters defined earlier.
After working away for just over a minute, the progress panel disappears to be replaced by the navigation/travel screen.
This view puts the turn-by-turn instructions in the top pane in large easy to read lettering, with various navigation data displayed along the right side.
In this regard, the user has a number of choices for what data to display on the navigation screen and the type of display.
As configured under the navigation tool screens, particularly the “Navigation Panel” and “Map Settings” screen, I typically have all the data selected rotating through the right side display area.
For example, one data set tells me that it is only 2192 kilometres or 1362 miles to the destination — just a short jaunt! With the headset connected, pushing the small conversation balloon, one of the icons displayed on the right side initiates the turn by turn instructions in the headset and on the screen.
Pressing the top pane will bring up the “Route Details” screen that allows a step by step progression through the route.
Pressing any of the steps will activate the appropriate screen display for that point, along with applicable audio instructions. Pressing the “Back” icon or the “X” icon takes the user back to the main navigation screen and the current travel point.

Where to Buy WorldNav GPS
Check Reviews & Prices on Amazon Check Reviews & Prices On RevZillaSee More: Motorcycle GPS, Motorcycle Intercom, Motorcycle Accessories
My Point and Route Via Options
Routes can also be prepared from using existing data in the database or from user-created “My Point” entries.
This lets a route with virtually any number of stops to be built-up and saved off. Press “Route Menu” and “New Route” which brings up the dual-pane planning screen.
Press the “Settings” icon and select “Motorcycle Via” as the middle option and hit “OK”.
The New Route reappears but now with the “Add Via” icon in the lower right corner. My home address/coordinates show in the top pane and my destination in the lower pane.
Pressing “Add Via” lets me add via points. Tap the “Add Via” and the “Add a Via Point” pane will appear – tap it and the first of two Add Via Wizard screens will appear.
A via point can be entered from “Services, Home, Address, Intersection, History or My Points”. In this instance I just pulled information from previously created My Point entries.
Highlighting one of them will put it in the top panel of the Via Points screen, with a second panel now appearing below it, allowing another Via Point to be entered…and so on.
Once done, just press the “Create Route” icon in the lower right.
The default navigation screen will appear with the route creation panel doing its thing on the top. If the route is short and simple, the motorcycle zooms along rapidly.
Saving the Route
Saving the Route Before going any farther (pun intended), saving the route off is a good idea.
Press the small “Hammer & Wrench” icon in the lower left of the main screen to invoke the top pane Menu icon and press it again to bring up the first navigation tools screen (identified earlier).
Press “Route Menu” for the first sub-menu screen and use the right cursor to tab to the third sub-menu screen which has two choices: Load Route and Save Route.
Press the “Save Route” icon to bring up the “Save Current Route” screen and enter a file name.
Avoiding freeways and tolls adds a bit of complexity to the route; it took five minutes of watching the spinning bezel before the “Route Exported Successfully in KML Format at SDMMC TTWorldNavigator Routes” screen appears.
This confirms that all has been saved off to the specified folder on the removable media.
Detours
At some point in time while travelling, detours — voluntary or forced — are a fact of life and even the best planning cannot foresee everything. But this is what makes it an adventure, right?
Accordingly, if any part of the active route needs to be avoided for whatever reason the user can identify a one, five or ten mile distance for recalculation purposes.
Pressing “Menu”, then “Route Menu” and cursor over to page two and press “Detour” to select the distance.
I got this feature to work without a hitch for the start of a route, but trying to inject it at any other point seemed a hit and miss activity.
I am going to investigate some more, there is a possibility that this feature is more responsive when on the road and in motion – more to follow as known.

Where to Buy WorldNav GPS
Check Reviews & Prices on Amazon Check Reviews & Prices On RevZillaSee More: Motorcycle GPS, Motorcycle Intercom, Motorcycle Accessories
More Tools
More Tools The information provided on more of the tools is not exhaustive by any means but hopefully it will provide a bit more insight into what the navigation software can do and how the system can be put to work effectively.
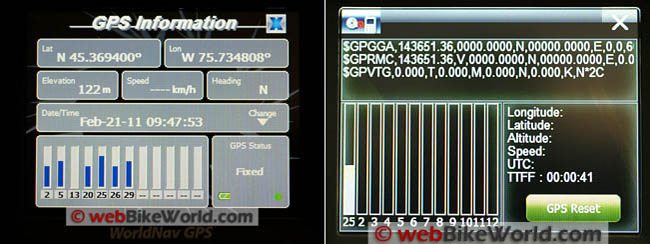
GPS information can be obtained at any time by pressing “Menu” and scrolling over to the third and final screen and pressing “GPS Status”.
The information presented here is similar to that available under the Setting tools, but it is presented here in separate panels. The Date/Time can be changed here as well to allow a 12 or 24 hour clock display and to change the time reflected by the system.
The number and IDs of the satellites being used is displayed as well.
Trip information is also available within four or five touches of the screen. Press “Menu” and scroll to the last screen and press “Trip Stats”.
The current speed, distance to go, ETA, time, odometer and trip timer panels will be displayed –- all can be reset by pushing the “Reset” icon.
Simulator: Finding more prominence on most GPS devices, being able to pre-run a route of any type for familiarization, logistical or rehearsal purposes is very handy.
To access this feature, press “Menu, “Route Menu” and right cursor to “Simulator”.
Simulation of the loaded route will begin automatically. A progress bar along the bottom of the screen .
To move along to a further point, drag the progress bar to the desired point.
To review route details, press “Menu”, “Route Menu, “View Route” and “Details”, this provides route details with a blinking Green border around the detail currently selected.
The simulation can be ended by just tapping the screen and accepting the menu instructions to end the simulation.
Similar to resuming a “live” route, the simulation can be resumed by touching the faded Red arrow in the lower left corner.
Navigation Language: The preferred display language can be selected from the “Setting – Preference – Language” tool menu, but to hear the preferred language during navigation, it must be selected, along with the desired “voice” from the navigation software tools.
Press “Menu” and use the Right cursor to scroll to the third menu screen and press “Language” to select the desired “voice” in the desired language.
The user can also switch between the “Regular Keyboard” (QWERTY) or “Motorcycle Keyboard” (large letters in blocks) from this screen.
File Extension Default: TeleType GPS devices use the Keyhole Markup Language (KML) file format or .KML extension for their route files.
KML is an XML schema (grammar) and file format for modeling and storing geographic features, including 3D coordinates — longitude, latitude and altitude — and these components are defined by the WGS 84 standard.
Audio Instructions generated by the system are timely, factual and complete.
This is something that reflects positively on the maturity of the software. There are more than a few pronunciation errors in all the languages, but c’est la vie.
Importing Data: Importing static GPX data (GPX is the GPS Data Exchange format) compatible with the WorldNav navigation software is listed as a feature, although I have not tried it yet, but will.

Where Does This Leave Us?
Parts Three and Four of this review have hopefully provided an initial foray into the media applications, tools and of course the primary navigation application that comprises the software suite of the WorldNav 3500 GPS.
As with any navigation system, the WorldNav 3500 GPS has strengths and weaknesses and is therefore not without issues. Part 5 identifies and discusses some of these issues.
Part 5: Using the WorldNav 3500
WorldNav 3500 Review Index
Where to Buy WorldNav GPS
Check Reviews & Prices on Amazon Check Reviews & Prices On RevZillaSee More: Motorcycle GPS, Motorcycle Intercom, Motorcycle Accessories
Owner Comments and Feedback
See details on submitting comments.
Comments and feedback are located in Part 1: WorldNav 3500 GPS Review


No Comment