The Vololights “Brakeless Deceleration Indicator”
The Vololights Brakeless Deceleration Indicator is an LED that provides attention-getting visual warnings to following traffic when the motorcycle decelerates.
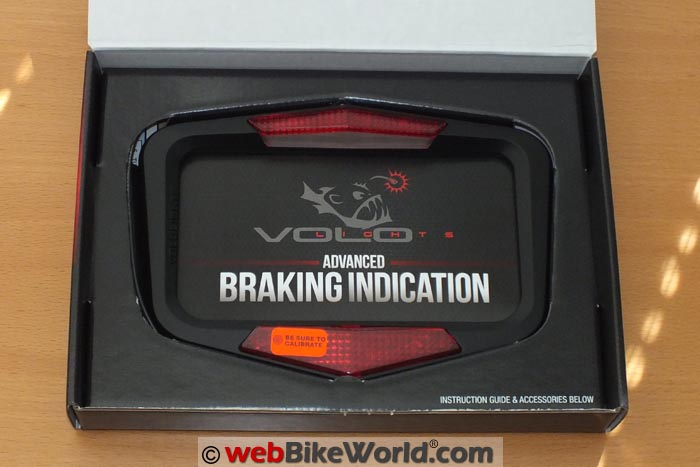
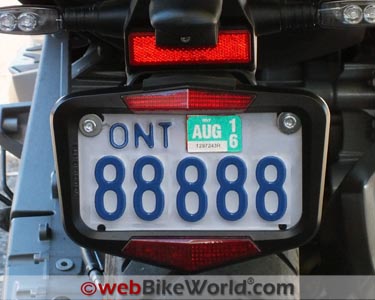
The Vololights consists of a stylish license plate surround, which houses the Vololights system.
This includes two high-output LEDs and the electronics are integrated into the top and bottom centre of the housing.
The only wit at two rates between the top and bottom LEDs and “Steady”, which provides output from both LEDs simultaneously with no rate patterns.
Although losing some points to competitive products due to a frequent need for recalibration and a lack of upgradeability, the Vololights device performs as advertised.
It is a good addition to the ever-growing list of user options available to motorcyclists that can enhance and improve our safety envelope as well as the safetyof all road users.
Background: Acceleration and Deceleration
A commonly stated and accepted definition for acceleration is “the rate of change of velocity of an object”. In simplest terms, acceleration is the action of speeding up, while deceleration is the action of slowing down.
As motorcyclists, we live with these two actions as soon as the wheels start turning.
And for the most part, we take for granted that acceleration will, at some point in time, be followed by deceleration — hopefully of the controlled type.
To measure acceleration,
Besides the Vololights systems, others that use deceleration to control rear lights include systems from Clearwater Lights, such as the Clearwater CANopener Billy Brake (review) and Billie Jr. Lights; the Ohmics Intelligent MotoBrake Light (review) and others.
And we can’t exclude the integrated BMW Dynamic Brake light (report) feature found on certain BMW motorcycles for 2016.
Many of these systems have been or will be reviewed by webBikeWorld.
Where to Vololights
Check Reviews & Prices on AmazonAlso Shop for: LED Lights and Bulbs, Auxiliary Driving Lights, Motorcycle LED Headlights
Measuring Deceleration
While each of these systems is unique, they all utilize multi-axis accelerometers to measure acceleration and thus deceleration.
On a motorcycle, deceleration is brought about by one or more factors that include rolling off the throttle to let gravity and loss of momentum take its natural course, downshifting and engine braking or use of the brakes.
The when, where, what, why and how aspects that need considering to develop a product that senses deceleration and provides a warning via LED lights can be staggering in their complexities, computations and permutations, especially in working towards that ‘perfect’ solution.
And adding to all of the research and development required to develop and evolve these devices is the ever-increasing suite of sensors and systems installed on modern motorcycles.
As an example, the BMW S1000XR (Blog) residing in the garage includes ABS, Dynamic Traction Control, Dynamic ESA, Gear Shift Assist Pro and Ride Modes Pro, Engine Mode Selection, and other electronic goodies.
Ducati, Aprilia, and others offer comparative systems and, dare I say, some even more advanced than found on my XR.
But regardless of whether one, some or all of these systems are installed and active, they do influence motorcycle behaviour, with or without rider intervention, including those related to acceleration and deceleration.
Given the direct and indirect factors and dynamics discussed above, timing and output of a device used to sense deceleration must be accurate, positive and reliable — not an easy task.
If device settings are not accurate for the specific motorcycle (considering electronic-based systems) or an individual’s riding style, output can be sporadic or inconsistent and possibly unrelated to what the motorcycle is actually doing.
A visualization might help here. Think of a vehicle you have followed where the driver “covers” their brakes, sometimes in error, sometimes just because…
This can be a real annoyance and it can also “de-sensitize” other road users.
On a motorcycle, false positives can be generated from hard shifting, braking variances, road conditions and leaning in on curves; one reason why advanced systems have as a minimum 3-axis accelerometers or dual accelerometers for accuracy.
Trigger points or sensitivity levels are typically based on a G-force scale that for the respective product or device is programmed into one or more mode or sensitivity settings.
This latter point is a relatively simple statement, but the research and development, including algorithms that must consider multiple factors and the filtering of false positives is anything but.
And over time, with feedback received from many users on different motorcycles, trigger points and sensitivity levels may also need to be adjusted and the firmware updated.
All of this is to say that variables need to be well defined and understood for optimum performance to be realized. For firmware-centric systems that allow customization or tuning to best suit a motorcycle and riding style the settings need to address an even larger set of requirements.
Editor’s Note
It’s important to note that currently there are no recognized standards for brake light modulation that we are aware of and very few — if any — formal studies to understand how traffic will react to anything other than the standard off/on brake light.
For example, it is possible that the driver of a vehicle behind a motorcycle using a non-standard brake light accessory may become confused when the lights start to pulse, which could actually decrease their reaction times.
There are also no standards for brake light modulation during deceleration, so traffic behind the motorcycle may not understand the meaning of those lights either.
Further, non-standard rear (or front) lighting systems may not be legal in some jurisdictions. Bottom line? Use with caution.
Introduction to the Vololights System
So here we are with an ever-growing list of products that sense deceleration and signal via LED lights.
The first into the webBikeWorld review queue was actually the Vololights Brakeless Deceleration Indicator. But as a new “bleeding edge” product, some initial teething difficulties created the inevitable delays, requiring a replacement unit.
Thus, while the Vololights products were on the market (2014) well before the Ohmics MotoBrake (review) was announced, the Ohmics product was reviewed first for the reason identified above.
In obtaining the first Vololights system for review, webBikeWorld also received one of the first voloMOD units.
Where the Vololights system is a license plate surround with built-in LED lights and the Brakeless Deceleration Indicator electronics, the VoloMOD is a “black box” module with the electronics only.
It fits under the motorcycle seat and it can be used to control the stock lighting or auxiliary brake/rear lights on the motorcycle, without requiring the Vololights license plate surround.
Thus, it offers more application options, because the Vololights license plate surround doesn’t fit on every motorcycle. A review of the VoloMOD system is ongoing.
Both of these products were designed by Vectolabs, LLC., the parent company. It was formed by a group of motorcycle-loving engineers who were not satisfied with many of other safety devices on the market.
As the story goes, after some close personal riding experiences involving following vehicles, the Vololights concept was formed with Kickstarter campaigns providing the means for initial development.
In the Kit
The Vololights kit includes:
- The Vololights frame with LEDs and electronics.
- One Neodymium magnet.
- Two Posi-Taps.
- Illustrated instruction sheet
The magnet is used to activate a programming condition in the the Vololights system allowing pre-programmed modes and sensitivity settings to be selected and activated.
Where to Vololights
Check Reviews & Prices on AmazonAlso Shop for: LED Lights and Bulbs, Auxiliary Driving Lights, Motorcycle LED Headlights
Vololights Brakeless Deceleration Indicator Overview
The Vololights device is a license plate surround or frame made of high-impact ABS with a black or carbon fiber finish.
The license plate is sandwiched between two close-fitting front and rear sections of the Vololights frame.
The Vololights frame has a stylized shape, measuring 20.32 cm wide by 14.48 cm tall (8.0 x 5.7 inches). Those are the maximum height and width measurements.
The interior license plate accommodation measures 17.8 cm x 10 cm (7 x 4 inches), which should fit most North American motorcycle license plates.
(Editor’s Note: See the webBikeWorld report “Motorcycle License Plate Dimensions for States in the U.S.A.“)
Horizontal mounting holes are located 5.75 inches centre-to-centre and the vertical holes are 2.7 inches centre-to-centre.
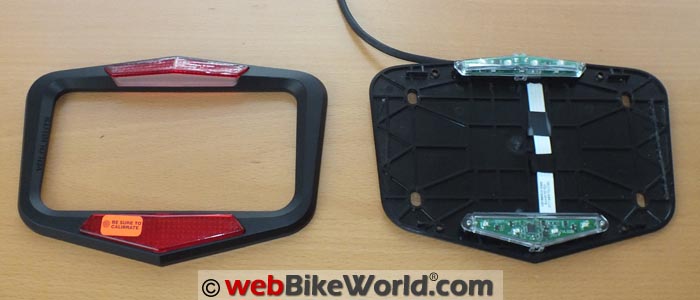
Removing four small Phillips-head screws on the back of the Vololights frame and carefully separating the two halves reveals the inner moldings, the 4 x 7 inch area for the license plate and the other components.
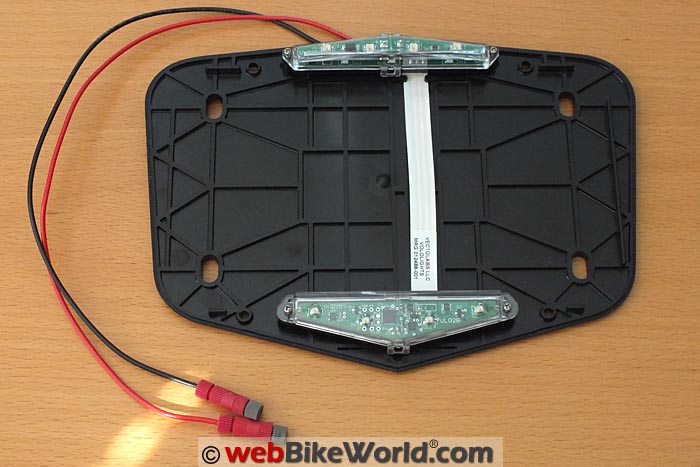
The “brains” and the LEDs for the Vololights are found in two shaped modules centred on the top and bottom of the rear half of the frame, with the lens secured to the front half.
The upper LED module also provides the license plate illumination, via a white LED, to meet jurisdictional requirements.
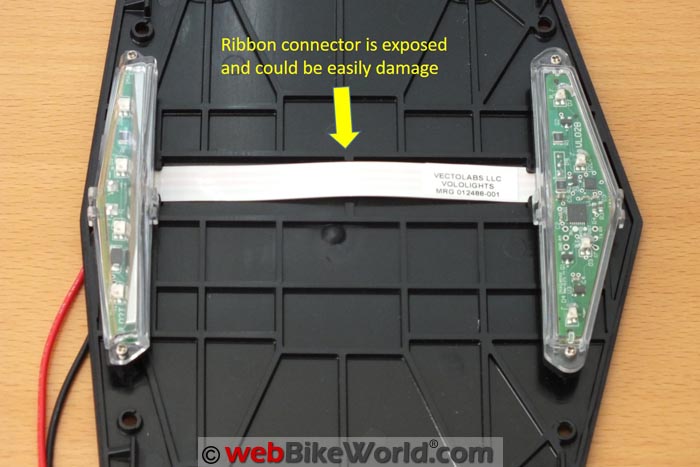
A short flat ribbon connector, somewhat exposed, runs vertically, joining the top and bottom LED light modules and 33 cm long (13 inch) power and ground leads exit the centre of the back section of the Vololights frame.
How It Works
As the motorcycle decelerates, the top and bottom LEDs on the Vololights system flash either an alternate sequence or simultaneously, at two rates (2Hz or 5Hz) depending on the motorcycle’s deceleration and sensitivity and mode settings.
The Vololights has three sensitivity settings:
- Touring is the most sensitive setting, good for larger motorcycles and/or those with automatic transmission, including a CVT like the BMW C 650 GT (Blog), or a C600 Sport, which is one of the hosts used for this review.
- Default is the standard setting, which should work for many motorcycles.
- Sport is the least sensitive and tuned for lower geared machines and/or more aggressive riding styles (akin to “active” mode in other LED deceleration warning light products).
There are also two Operational Modes:
- Flash, which is the default, with 2Hz and 5Hz LED flashing rates based on the “Urgency Indications”.
- Steady, a constant LED light output during deceleration with no flashing patterns.
The Touring, Default or Sport sensitivity settings can be used with either Flash or Steady mode programmed.
Pre-Installation Activation and Tilt Tests
Before installing the Vololights frame on the motorcycle, a couple of important tests need to be completed with the module connected to power and ground and positioned upright.
Initial Power-Up
This initial activation didn’t go smoothly for me. In turning on the ignition to power the Vololights, three flashes were seen from the upper module, followed by a single flash from the lower module — all good.
But then the unit went into a continuing fast flash sequence — not good. After cycling the ignition off and then on after a minute, the same sequence occured.
I tried a workaround by disconnecting the power and ground leads for five minutes. After connecting the leads and with the ignition on, I briefly held the programming magnet (provided with the kit) over the left side of the lower module and quickly removed it. The magnet sets the internal switching.
The upper light flashed twice, followed by one flash from the lower LED, with nothing else. This is not what’s supposed to happen, but from this point on, unit behaviour was as expected.
The same initial output sequence was seen and the same workaround needed for a replacement Vololights unit. Maybe some other initialization process is required?
The Tilt Test
With the ignition on and the initial check sequence completed, a tilt test is required. A slow rotation forward from vertical results in the first “Urgency Indication” stage activating, which causes a slow alternate flashing between upper and lower LED lights.
Continuing the forward tilt test results in a transition from the first to second Urgency Indication stage, indicated by a faster flashing LED sequence between the two LED lights.
Turning the module back to vertical sees the output transition from fast to slow, then off. Now the Vololights system is ready for installation.
Installation
Mounting the Vololights is a simple job, but only if the license plate follows the normal 4 x 7 inch template; we all know motorcycle license plates are made to one standard, right (see Motorcycle License Plate Dimensions for States in the U.S.A.)?
And while many states and provinces adhere to the overall dimension standards, mounting holes and edge finishes on the license platee are another story.
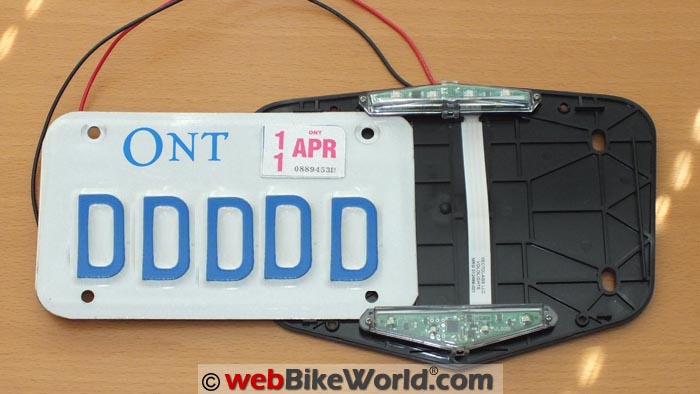
Bottom line, a bit of preparation work is needed to get the Ontario license plate mounted inside the two Vololights halves properly so that the whole assembly fits together and functions correctly.
Complicating things are three design issues with the Vololights housing and components.
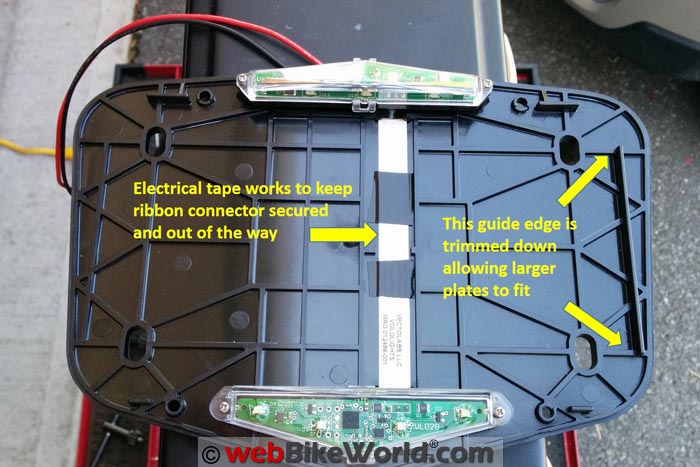
First, the ribbon connector running vertically between the lower and upper module sits up a bit in the middle and isn’t well protected or recessed at the top or bottom; even the replacement Vololights unit sent out didn’t have the fix discussed on their website.
Second, the inside of the back section has a right side molded line that is meant to act as an alignment stopper for perfectly sized license plates.
But for larger and/or longer plates, it just gets in the way, causing the plate to locate off-centre and the two halves of the Vololights unit not fitting together properly.
And finally, the two electronic modules need to be loosened almost completely from their small screw mounts so there is enough clearance to slide the license plate in. Also, any sort of finished edge on the license plate just complicates things.
And don’t forget about the fragile ribbon cable… Solution: five minutes with a Dremel tool (cutting and grinding wheels) had the offending edge removed and the area smoothed down.
Caution: make sure other pieces (like the ribbon connector and modules) are protected during any customization work you might attempt.
Where to Vololights
Check Reviews & Prices on AmazonAlso Shop for: LED Lights and Bulbs, Auxiliary Driving Lights, Motorcycle LED Headlights
Final Installation
So after the completing the non-destructive work, a strip of electrical tape over the vertical run of the ribbon connector secures it to the wall of the back section and adds ongoing protection as well; a simple and effective fix that shouldn’t have to be done by the user, quite frankly.
An even smaller Phillips jeweler-type screwdriver is needed to loosen the modules and gently wiggle them up so the license plate can be slide carefully into place.
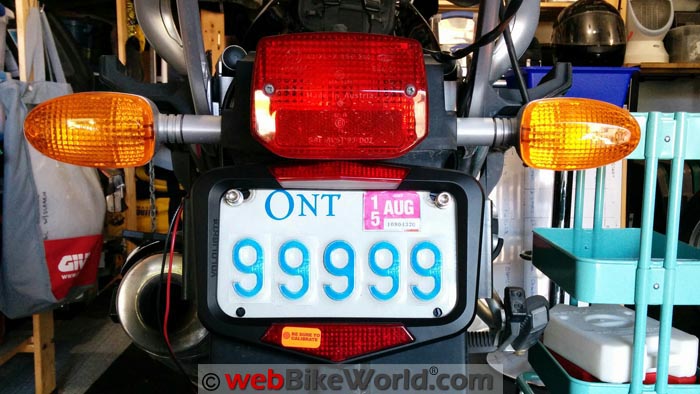
With the license plate situated, the screws are carefully tightened up again and with an alignment check done the two halves get screwed together.
The two surfaces fit well together when empty, but less so with a license plate inside.
If the license plate and Vololights component were going to form a long-lasting relationship, a small layer of black or clear silicone around the edge of the back section before reassembly would help seal the deal — literally.
But my Vololights unit is going to be transient and mounted on a variety of motorcycles, so this step was skipped for now.
The final step is making the simple power and ground connections.
Some installations may require the 33 cm (13 inch) long leads be extended even further, depending on the path required to make the connections on your particular motorcycle.
On a 1998 BMW R1100R, the harness runs up behind the license plate frame to the left side and up between the frame and side panel into the under-seat area, where accessory power and ground leads await; the leads are just long enough.
Using the supplied Posi-Taps, tapping into a tail or license plate light power lead and convenient ground lead will do the trick for many installations. (Note: Do not use a brake lead.)
CAN Bus Installation
A guaranteed non-obtrusive solution for CAN bus equipped motorcycles is the use of a separate switched 12V supply from an accessory outlet, diagnostic plug power wire or a circuit from a power distribution system of some sort.
If fitment issues might be encountered, Vololights offers a powder-coated 1/8 inch steel bracket with slotted mounting holes, useful for bikes with a fender eliminator or if height adjustments are needed for the Vololights license plate frame.
Calibrating the Vololights Unit
With the ignition turned on, the system should go through its power-on check, as detailed earlier. Once that’s complete, the all-important calibration routine is next; its importance cannot be understated.
Calibration is or should be a two person effort.
With the motorcycle on level ground and resting on its side stand, turn the ignition on (do not start the motorcycle) and wait for the Vololights start-up sequence to complete (5 to 7 seconds).
Now bring the motorcycle to an upright position and have the other person introduce the magnet to the left side of the lower lens. Remove the magnet from the lens immediately after the first flash.
Keep the motorcycle upright and still until the flash sequence is completed; typically 12 to 15 seconds, with the bottom module flashing rapidly to signal completion of the process.
At this point calibration is complete and the motorcycle can be put back on the side or centre stand.
Note: both the original and replacement Vololights that we received need constant re-calibration. It is a daily (or more frequent) exercise, especially if sensitivity or mode changes are made.
The systems just seem to lose memory. Recovery is typically successful if the ignition is turned off for a few minutes before another attempt is made. Disconnecting the power lead helps as well.
Needless to say, this gets old pretty fast. Even using the Vololights on the same motorcycle for a few days without any changes being made requires recalibration on a daily basis.
But, as the Vololights instructions clearly state, “When in Doubt, Recalibrate!” And to that I will add, “Don’t leave home without the magnet”.
And a final friendly point to remember: sensitivity or mode setting changes (as described previously) can be made without the motorcycle being level, which is only required for calibration.
Vololights Functions
Once the Vololights unit is calibrated, the desired Sensitivity and Mode settings are done, although for many applications the default sensitivity setting will work and make a good starting point regardless.
The colourful illustrated instructions included with the Vololights (also available on the website) do a good job of detailing installation, initial set-up and making sensitivity/mode changes.
Basically introducing the magnet for one through five flashes initiates switching between sensitivity settings and modes with confirmatory flashes, all identified in the table.
In summary, the first flash initiates calibration, flashes two through four change sensitivity settings (Touring > Default > Sport) with the fifth flash changing the system between Flash or Steady output mode.
On the Road
Depending on the host motorcycle and the sensitivity setting programmed into the Vololights, rolling off the throttle to decelerate brings about first stage output: a slow, two flashes per second output, serving as an alert to following traffic that they should take note.
As deceleration increases — such as with downshifting with engine braking or use of the brakes — the Vololights transitions to the second stage immediately with its rapid and very attention getting five flashes per second output.
If the Vololights is in Flash mode, output from the two modules alternates and when in Steady mode both modules flash as one; both modes are highly visible, distinctive and shouldn’t be missed!
Needless to say, the higher rate output sends an even more urgent visual to following traffic that it needs to fall-back and maintain a safe distance…we know how fast motorcycles can decelerate, but other road users, less so.
And if the rider just activates the brakes, bringing about rapid deceleration, the Vololights responds at the high rate providing an auxiliary brake light function.
While my testing with the various sensitivity modes on different motorcycles is still ongoing, it is obvious that output differences exist (per Vololights instructions) between the mode settings on the same platform that is driven in a consistent manner.
For example, a Suzuki V-Strom 650 and BMW S1000XR provide the most noticeable differences in output when switching between sensitivity settings.
The Vololights has not yet been mounted on a large touring bike, but it will be (something the Vololights team was anxious for us to try).
The 2013 BMW C600 Sport scooter with its CVT-based drive and softer throttle transition does indeed like the Touring setting, although the Vololights is effective in any setting on the large speedy scooter that loves to humiliate other two wheelers.
Another observation, noted on both the original and replacement Vololights units I have tried, is a tendency for the system to trigger when a big bump or crack in the road is encountered. Four or five seconds of rumble strip brings about the same reaction.
Overall testing, while objective in approach, is also pretty subjective regarding interpretation of how effective the unit is working in any one mode on any one motorcycle.
But appreciating everything , including the need for frequent re-calibration and some fine tuning using the three sensitivity settings, the Vololights works and works well.
Conclusion
Deceleration indicator lights and their application have the potential to play a major role in virtually any motorcycle.
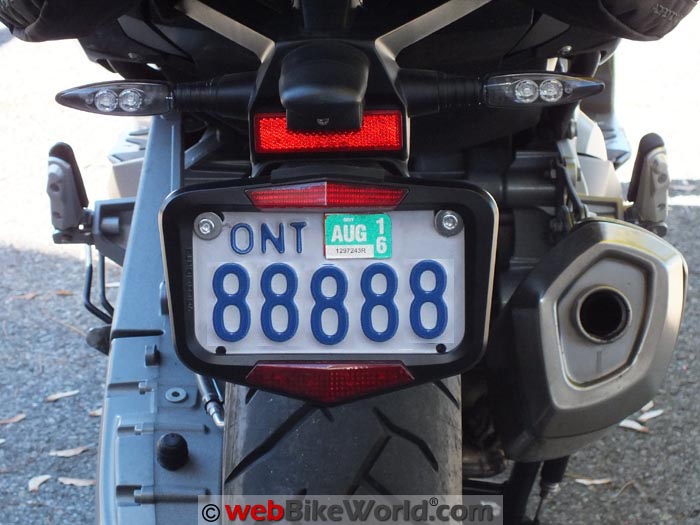
The Vololights Brakeless Deceleration Indicator is a very good product for its intended purpose, with its dual LED output implementation being one of its best features. Both LEDs are highly visible, even in bright sunlight.
In this instance, the additional output surface area gives it a visibility advantage over the original Ohmics MotoBrake unit. But the higher output found on the Clearwater CANopener-based Billie Brake Light is brighter.
The performance of the Vololights system is, however, marred by the need to constantly recalibrate the unit.
And while many users will find the optimum sensitivity setting and not play with it, programming the system for test and play purposes hasn’t been very satisfying.
Compared to the Ohmics Intelligent MotoBrake Light that self-calibrates and provides great reliability and has more user-selectable output options and firmware upgrades (via its USB interface), the Vololights loses points, at least in its current iteration.
But as a long time rider, trainer and avid safety advocate, I can say that the simplicity of the Vololights, its ease of use and performance cannot be overlooked. It is a good and valuable safety-related product.
And as an active safety-related product, its application cannot help but raises awareness — an awareness that needs to translate into education for all road users, authorities and educators.
Where to Vololights
Check Reviews & Prices on AmazonAlso Shop for: LED Lights and Bulbs, Auxiliary Driving Lights, Motorcycle LED Headlights
Owner Comments and Feedback
See details on submitting comments.
From “W.S.” (June 2016): “The review indicated an issue with the unit having to be re-calibrated frequently. How did you determine the unit needed to be re-calibrated?
Can the rider tell something is amiss by observing the unit on power up or does a following vehicle need to observe the operation of the unit?”
H.B.C.’s Reply: The answer is ‘Yes’ to both. Sometimes the unit doesn’t display the typical start-up sequence described in the article or just doesn’t work consistently while on the road, based on observations by the rider or a fellow rider on both startup and when on the road.
Recalibrating the system restores the desired function for a day or a even a week, but at some point it seems to go astray again.
And this repeating issue is present no matter what motorcycle is has been mounted on, or the mode used.
When functioning as intended, the Vololight works well as a deceleration-based product — great visibility and attention-getting output.
But in using and testing other similar products, the Vololight doesn’t have the same reliability, primarily due to the fact that it isn’t self calibrating, something the other products do.
From “W.S.” (June 2016): “Where did you tap the power for the unit? I’m thinking of getting this or a similar product but most all of them don’t seem to play well with the CAN bus.”
H.B.C.’s Reply: The Vololight doesn’t have much a power draw, but it can still be enough to be detected as a ‘intruder’ on a CAN bus circuit, resulting in an warning/error indicator and/or the specific circuit shutting down until reset (ignition cycled).
But this isn’t always a constant for many CAN bus-equipped motorcycles, especially BMWs; some 2012/2013 models will tolerate tapping into the tail-light lead for power, but then some won’t.
And for the most part, less one or two exceptions, any BMW CAN bus 2013+ isn’t likely to tolerate even this minimalist draw.
To forestall potential issues, we recommend using a switched 12V supply as the power supply needed by the Vololight or basically any rear-facing auxiliary lighting.
Depending on the motorcycle (make and model), an accessory circuit can be tapped into, like a rear-mounted power outlet (BMW outlets are typically rated at 5A) or perhaps the 12V power wire of the OnBoard Diagnostic (OBD) connector.
A fused or solid-state power distribution system is another very good option — just use or share one of its circuits as the supply.
I keep one of the Neutrino BB V2 circuits as a switched with ignition shared circuit for two or three devices that require a minimal but switched 12V DC supply.
Also From Rick: See our review and report on adding a load balancing resistor to BMW motorcycles.
From “B.P.” (November 2015): “The Vololights is one more case of H.B.C.’s thorough and well-written reviews. So thanks for that. I have some questions and comments, though.
First, I’m wondering about the mounting angle requirement. A lot of bikes have leaned-back plates, i.e., more in keeping with the curved line of the rear fender.
I looked at the instructions at the Vololights web site, and they don’t seem to address whether the unit needs to be pretty much vertical. Maybe the VoloMOD will make this a non-issue.
Second, along those same lines, how’s the visibility of the LEDs if the unit is not mounted essentially vertical? Are they still as bright, as seen from the rear?
Last, that need for constant recalibration would be a show-stopper for me. I mean, you buy something so you can worry less while on the road — you’re now, in given situation, more visible to other road users — only to discover that you have one more thing to worry about: does the unit need to be recalibrated?
Not for me. Shades of the turn signals on my Victory.
The Cross Country Tour is the first bike I’ve owned that has self-canceling signals. Sounds like a helpful electronic aid… until the algorithm in the ECM decides to cancel them prematurely.
So in reality, I spend more time checking the turn signals, after initiating them, to make sure that they’re still on, than I did in the manual-cancellation days. I actually wish that I could disable that feature.
Like H.B.C., I consider myself safety-conscious. I’ve added CustomLED’s Magic Strobes Brake Flasher to my bike. I use its pattern number 6: “Blaster X Pattern for 3 seconds, then Solid (LED Only).”
Incidentally, that option is set by a physical switch, which hasn’t budged in a year of use.
So, for now, I’ll pass on the recalibrating, magnets, flashing over bumps, etc. Instead, I’ll rely on my mirrors and the occasional old-school quick tap on a brake, when decelerating heavily without braking and traffic’s behind me.”
H.B.C.’s Reply: A good question not directly addressed in the article, even though the measurements had been done. From vertical, tiling the Vololight forward 60 degrees activates the response system in steady mode, and pretty much the same when in flashing mode.
Recovering back to vertical usually has the lights shutting down at 45 to 35 degrees (this was not a constant, no matter the speed of angle change.
So in general, a somewhat angled mount, probably in the order of 25 to 35 degrees may be tolerated by the system, although it may also impact sensitivities and thus output.
I wouldn’t want to mount it on anything approaching 45 degrees or so — just my input at this point in time, and with the question now being raised, some angled mounts and sensitivity testing will be attempted, unless Vololights provide this type of information?
And your point about the voloMOD is relevant. The installation instructions for the voloMOD state that the mounting surface must not be more than 45 degrees, so this would seem to provide a clue into sensitivity and triggering of the system, which is likely also applicable to the Vololight.
If we get the opportunity, some angled mounting and use might prove interesting with some good info, which can be added to the article as an update.
Regarding the question “How’s the visibility of the LEDs if the unit is not mounted essentially vertical? Are they still as bright, as seen from the rear?”
Answer: The LED modules are not recessed, but actually sit above the frame of the Vololights frame if viewed horizontally, so their design provides very good projection at wider angles for following traffic, be they directly behind or coming up from a side…and this was noted during low light/night use.
So given this placement there shouldn’t be much degradation regarding visibility to following traffic with the unit angled up to a maximum of say 40 degrees (give or take), although perhaps the trigger point as identified above might become relevant.
If you do put one on at a good angle, let the Editor know how it goes.



No Comment