Vertix Raptor-i Intercom Review Redux
As Derryn stated in his original review of the Vertix Raptor-i “…it delivers all of the features expected of a ‘new generation’ Bluetooth device at a competitive price.”
I can’t and won’t argue with that assessment, but I can expand on it.
The Raptor-i has all of the good stuff, including a very functional FM stereo radio.
But what distinguishes this system from so many, in addition to its styling, is a simplicity of purpose, a very effective remote control and an ability to truly be the sum of its parts.
The newly added remote control feature is likely to attract many consumers, as well it should – it works.
Between the provided lightweight and cleverly designed mounting components and other perhaps less permanent mounting options, the remote control can find a home on any moto-machine.
Intercom performance and overall audio quality is right up there, challenging the UClear HBC200 Force (review) intercom systems for the top rung spot.
This is testament to the Raptor’s overall capabilities and performance and, well deserved.
Derryn Wong first described the original Vertix Raptor-i intercom in this review for webBikeWorld in October of 2012.
The intercom has been updated since then with several new features and we decided to take a second and more detailed look.
Introduction
Derryn Wong’s original Vertix Raptor-i Bluetooth Intercom Review was a great introduction to the Vertix helmet intercom system.
This follow-on evaluation builds upon Derryn’s initial look by delving into what the latest version of the Raptor-i system, now enhanced by a handlebar-mounted remote control.
As part of this planned follow-on, the Editor arranged, received and subsequently forwarded two of the latest Raptor-i headsets along with the helmet headset kits and of course, two of the new Vertix Remote Controls.
All was well timed as I was getting ready for my annual March drive south in search of slightly less snow…and clearer riding roads.
Piquing my interest was the new handlebar-mounted remote control kit.
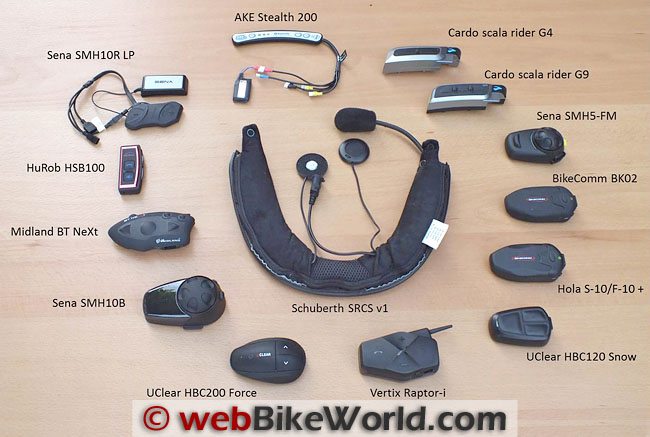
We haven’t yet managed to evaluate the compatible remote control for the Midland BT NeXt (review) intercom system, but in having used the Bluetooth-based UClear WT300 Spyder PTT Remote (review), the advantages of having a fully wireless control capability with minimal hand movement becomes evident quickly.
Being able to activate a handlebar PTT is good, but being able to also control the helmet-mounted system while keeping the left hand on the grip or just slightly off it is a great option for users…safety first.
Vertix Raptor-i Intercom Kit Variants
The most recent Vertix Raptor-i kits we received are basically as described by Derryn in the original review, although the most recent units can now be augmented, in a very positive way, with a handlebar-mounted remote control module, available as an optional accessory.
Also, the FM radio is standard and now common on most motorcycle Bluetooth helmet intercom systems. For this longer-term look, the following components were evaluated:
- Two Vertix Raptor-i intercoms (with firmware 1.56.3).
- Two Vertix Raptor Remote Control Units (PN RTR-RC-01).
- One full-face helmet headset with wire microphone (PN RTR-WS-01).
- One open-face helmet headset with boom microphone (PN RTR-BS-01).
- One full-face helmet headset with wire microphone and in-ear speakers (PN RTR-WE-01).
- Two open-face helmet headsets with boom microphone and in ear speakers (PN RTR-BE-01).
Where to Buy Vertix Raptor-i
Check Reviews & Prices on Amazon Check Reviews & Prices On RevZillaSee More: Motorcycle Intercom, Motorcycle Accessories, Motorcycle Helmets
Headset Configuration Kits
All five of the Vertix Raptor-i headset variants were used in full-face, modular or open-face helmets over the course of the evaluation and once installed, they were employed on different motorcycles.
Those included the BMW R 1200 GS and F 800 GS; a BMW R 1100 R; a sports machine and an un-faired moto.
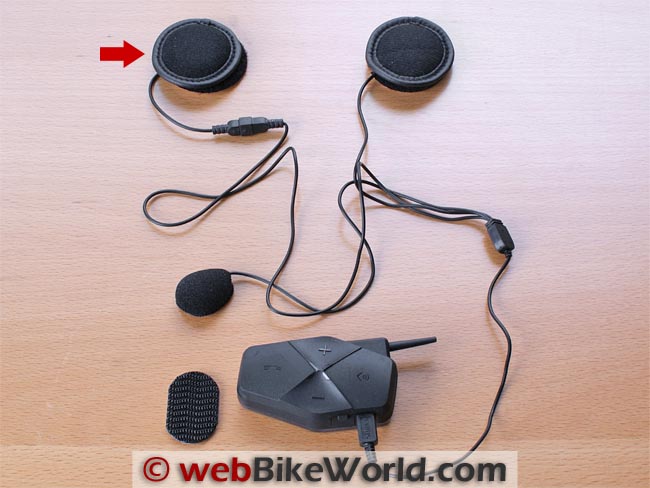
The Vertix speakers are listed as 16 ohm moving-coil dynamic speakers rated at 0.3W with frequency response of 20Hz to 20kHz. Addressing user or legal requirements, the right speaker is detachable via a two-pin mini-connector.
The speaker enclosures measure 49 mm in diameter and are approximately 12 mm thick.
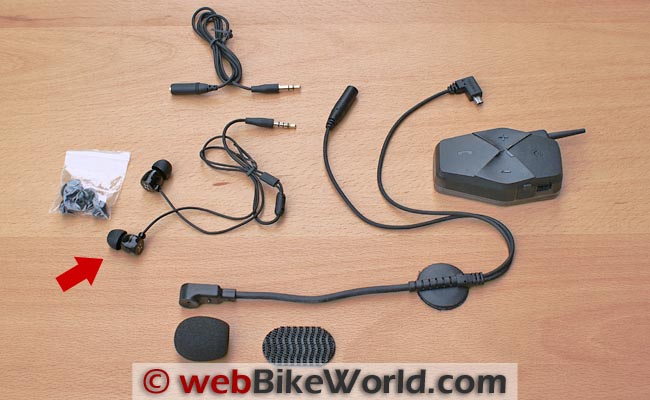
For the in-ear audio pieces, a low-profile milled aluminum shell is claimed to provide great acoustic performance with a snug comfortable and quiet fit offered by using one of the three sizes of silicone (foam) ear-buds provided.
As usual however, even the smallest ear-bud was still a bit large for my ear although tolerable for short periods of time.
Wireless Remote Control
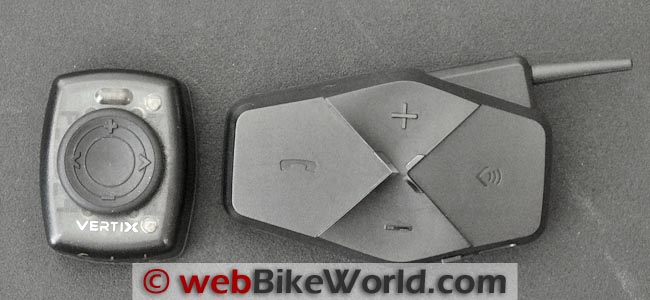
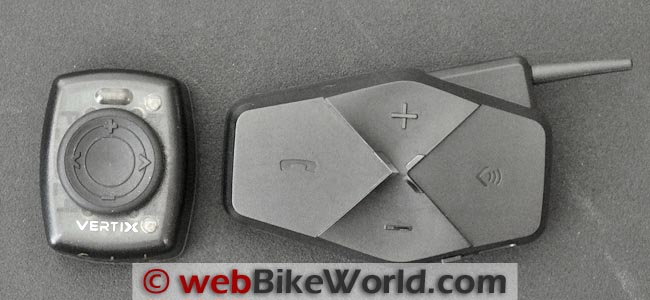
The new Vertix remote control kit is a tidy packaging of lightweight quality pieces, which provide handgrip or handlebar mounting options for the remote control unit.
This allows users to control the Raptor-i intercom by way of a short-range wireless link between the remote and the module, all without having to reach up and access the headset; potentially much easier and safer.
Measuring 47 x 37 x 27 mm, the remote control features a four-way pressure switch on the front emulating the four controls on the headset.
A large quarter-turn cover (with an alignment mark) on the back houses the CR2032 (or equivalent) battery.
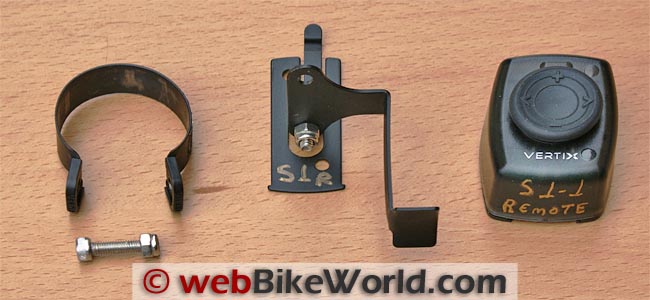
The preferred mounting option has the module clipped onto its mounting plate that is then mounted to the motorcycle via a column piece or arm and a fastening clamp. The kits include multiple-sized options for the essential components and all needed hardware is provided.
An infrared (IR) link provides communications between the remote and headset module; two small IR windows are visible under the right side of the translucent housing.
In using a short-range wireless link it is important to maintain line-of-sight between the two devices, which is easy to do with the remote is installed somewhere on the left side of the handlebars, as intended.
Vertix Raptor-i System Information
Both the Bluetooth Raptor-i intercom module and the Vertix remote control kits come with a double-sided User Guide handout in English.
These guides provide simple narrative and detailed visual information on one side and operational quick reference information on the other, which is quite effective overall.
These handouts are being updated by Vertix and will be printed in English, French, Italian, Spanish and German.
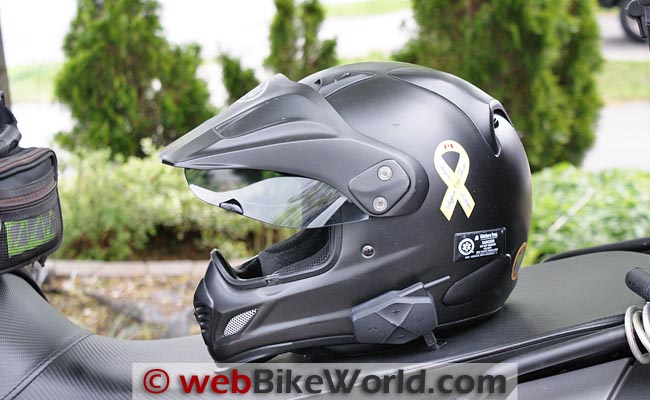
I installed all five headsets and the two Raptor-i modules in a variety of helmets, including the Arai XD (review), the Arai XD (review), the Arai Corsair (review), the SCHUBERTH C3 (review), the Scorpion EVO-400 (review) and a Bell Mag9 (review) helmet.
The remote control units were initially installed and used on two BMW R 1200 GS motorcycles, as well as on other motorcycles, thanks to heavy-duty 3M Dual-Lock reusable fasteners.
Helmet Installation
Other than matching up the desired Vertix intercom headset kit (speaker or in-ear based) with a helmet, no major problems were encountered, although a potential fitment issue did arise as described below.
The Vertix boom microphone kits come in two forms.
The in-ear kits have a Velcro-patch mounting plate that adheres to a brushed comfort liner or by mounting it directly to the EPS liner using the companion Velcro-patch adhesive pad from the kit.
The speaker-based headsets use an integrated boom microphone-left speaker assembly.
And it is this piece that can cause an issue. Integrated speaker-microphone components are simple and low-cost, but this one-piece approach can make it hard to get an effective fit in some modular and open-face helmets when shell size, liner and boom length are key factors.
For the medium- or large-size SCHUBERTH C3 helmet, the integrated component sits in the forward part of the liner’s elongated speaker depression placing the boom microphone about centre or left of centre of the mouth.
But on large shell units, such as the the Nolan N103 (review), the boom is short; thankfully, the microphone performs quite well sitting on the cheek.
Having seen and used just about every approach going over the years, I prefer a modular connector-based headsets with detachable speakers and microphones (boom and/or wire-based) that also have their own mounting points.
It is one of those “universal” issues that can make or break a retail-boxed system.
[UPDATE: See information and photos on revised Vertix Raptor-i headset in the Owner Comments section below.]
Vertix Intercom Remote Control Installation
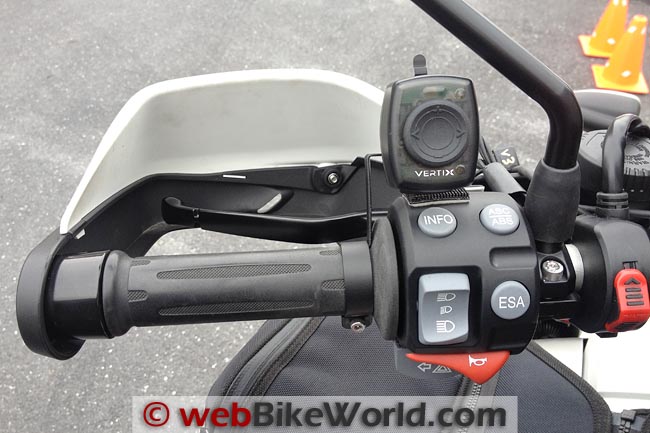
The Vertix Raptor remote control unit is easily mounted on most motorcycles, even if real estate is limited.
After sorting out the components and doing a couple of fitment assessments using the various pieces, I went with the standard left handgrip option illustrated on the User Guide handout.
For the BMW R 1200 GS and F 800 GS handgrips, the largest of three progressively sized (26, 28 and 30 mm) compression clamps provided by Vertix was needed.
Before mounting the clamp loosely on the handgrip, two of the small plastic edge protectors in the kit got put over the ends; this can prevent damage to the soft handgrip as the clamp is tightened and provides a more finished look as well.
System Management
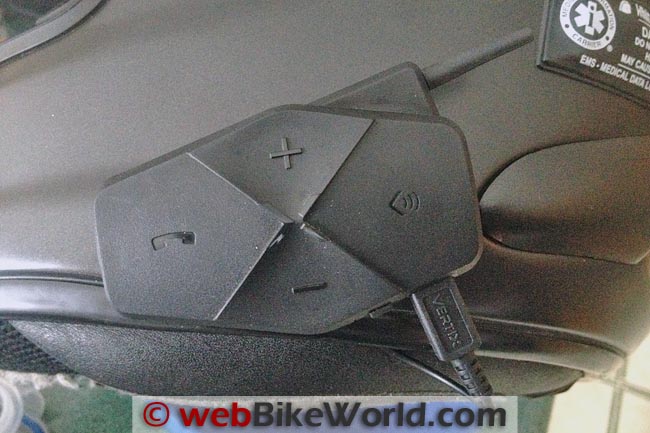
Like most modern motorcycle Bluetooth intercoms, the Vertix Raptor-i is easy to use and maintain. Its four surface controls are easy to find, aided in large by a thin “X” molding defining the four control areas and the scalloped vertically placed (+) and (–) buttons.
Finding the desired control even with medium- to heavy-weight gloves is easy after continued use.
A minor observation: powering the Vertix Raptor-i intercom system off takes a long period of time, indicated by a single flash of the Blue LED (easy to miss) and a three-tone sequence in the headset.
After having used the system over an extended period of time, I think that a multi-flash sequence using the red LED would be more effective visually to indicate power-off.
Where to Buy Vertix Raptor-i
Check Reviews & Prices on Amazon Check Reviews & Prices On RevZillaSee More: Motorcycle Intercom, Motorcycle Accessories, Motorcycle Helmets
Initial Setup and Configuration
Although the instructions provided with the Vertix Raptor-i are relatively clear and visually informative, a couple of questions arose regarding pairing of the remote control unit to the Raptor-i intercom modules.
But a timely exchange of emails resulted in additional information being provided quickly — something always appreciated.
Interface Controls
Like most other intercoms we have reviewed, each input control or button has multiple tasks, all visually detailed in the Vertix User Guide handout.
Device Pairing
From the off position, hold the Power/Intercom button down for eight to ten seconds putting the module into pairing mode, now put the peripheral into pairing mode.
The Vertix Raptor-i intercom module will be identified as “VTX RAPTOR-i_v1.56.x” and “0000” is the PIN code if needed when pairing with other Bluetooth devices, such as a cell phone. A slow flashing blue LED on the module indicates successful pairing has taken place.
Intercom Pairing
With both intercom modules turned off, hold the Power/Intercom buttons down on both until they go into pairing mode, then press the Power/Intercom button on either of the intercoms.
As paired, the Blue LEDs will resume a slow flashing. A third Raptor-i can be paired in the same manner.
Remote Control Pairing
With the Raptor-i turned on, press and hold the (+) and (-) buttons until the front window IR LED illuminates blue. Release the buttons and the IR LED will turn off.
Once this has been accomplished and with first use it may take a second or so to get the two devices communicating, but activating one of the functions controls on the remote initiates things.
FM and MP3 Modes
The Phone button acts as the toggle between incoming stereo audio and the integrated stereo FM radio and also functions as the Play/Pause for music streaming and for saving off favourite FM stations to one of the eight memory storage assignments.
The + and – buttons provide volume level adjustments for all audio (hold the button) and forward/backward MP3 functionality along with FM radio tuning or recall of saved stations, all activated by single or quick double-pushes of the respective control.
System Reset
Not detailed on the current handout is a reset procedure, used to erase controller pairings, something that came in handy during all the testing I carried out.
To reset the Bluetooth pairing, while the set is on (slow blue flash on main LED), press and hold the (Phone) and (-) buttons until the main LED flashes red twice.
Then release the buttons and the unit should still remain on and the main LED will flash blue slowly. All Bluetooth pairings have been reset.
To reset the remote control pairing, while the set is on, press and hold the (+) and (-) buttons until the front window blue LED lights up. Release the buttons and the blue LED will turn off. The remote control pairing has been reset.
Audio Switching
Like most new Bluetooth systems the Vertix Raptor-i provides seamless switching between active audio sources based on the pre-defined priorities (high to low): mobile phone, intercom, GPS and then MP3/FM Radio.
Charging
The included AC/DC adapter is appreciated; many other motorcycle Bluetooth intercom kits no longer include a wall charger.
Riding With the Vertix Raptor-i
With the helmet secured, a four to five second push of the Power/Intercom button brings the system to life announced by a tonal sequence and a slow pulsing of the blue LED.
Intercom: A short push of the Power/Intercom button initiates the intercom feature and within 2 to 3 seconds a short series of tones announces the link call and within a second some barely perceptible white noise confirms the duplex connection is active.
Another single push of the button terminates an intercom session.
Three systems (Set A, B and C) can be paired together, and initiating a call from Set A to Set C just takes double push of the Power/Intercom button to activate. I thought perhaps three-way conferencing was supported, but it isn’t, so it is strictly one pair at a time.
Intercom Range and Audio Quality
Intercom voice/sound quality is very close to that of the UClear HBC200 Force (review) intercoms. Admittedly the Vertix systems use similar DSP technology to provide crystal-clear long range audio between the paired parties. From my perspective, the race is on…
The stated range of 500 to 800 meters (the literature does differ) is realistic, with even longer ranges over open terrain being viable.
It takes one or two hills or some tight curves to start degrading the intercom link with some noise although voice clarity remains very good.
Given this sustained strong performance the Raptor-i is the equal of and even has a slight lead at times over the HBC200 Force system (under similar conditions).
It provides crystal-clear audio out to maximum range even with elevated cockpit noise levels and some weakening of the link over distance.
So at this point in time my top-of-the-rung intercom performance systems, those being the HBC200 Force system and the oft-forgotten Midland BT NeXt (review) are close to being relegated down a step or two. Change really is the only constant…
Pairing With Other Devices
If the iPhone 4S has been previously paired with the Vertix Raptor-i and if it has Bluetooth activated, it will reconnect with the Raptor-i in seconds, confirmed by one or two single tones (seemingly one for each profile activated).
A quick single push of the (front) phone button on the Vertix intercom activates audio streaming; another tap pausing it.
FM Radio
Audio from the excellent FM stereo radio in the Vertix Raptor-i is available any time, unless higher-priority audio is active.
A double tap on the phone control activates or deactivates the feature and switching between A2DP music streaming and FM radio audio is seamless and fast; a second longer perhaps via the remote control.
Like most modern FM tuners with advanced features, you can often hear signal optimization taking place, especially in a cluttered FM radio environment.
The technology packed into the feature may be hard to understand, but the results are easy to appreciate.
Battery Life
The battery life of the Vertix Raptor-i is excellent. When listening to the FM radio or streaming audio with frequent long intercom sessions the system could be used six to eight hours and typically for another hour or so the next day.
Recharging after one day of use takes just over one hour, indicating that the battery is still in good shape.

Using the Vertix Remote Control
After getting two replacement units with the updated firmware, it was necessary to pair the Vertix remote control modules to the new units. And given Murphy’s Law, one took but the other one didn’t.
A new battery (CR2032 or equivalent) and careful repositioning of the outer ring terminal before reassembly brought it back to life and paired up on the first pass.
If the battery is good, a push on any of the four points of the rocker control activates the red LED and in a second or so, a link to the Raptor-i headset.
When the link is active, the module’s front LED flashes blue as the two devices communicate (another trouble-shooting tip).
With the remote control rocker emulating the four buttons on the Bluetooth module, input is intuitive and execution is typically very fast, especially the FM radio function.
Even with a bit of lag from time to time, using the remote provides an effective (and safer) system management environment.

Where to Buy Vertix Raptor-i
Check Reviews & Prices on Amazon Check Reviews & Prices On RevZillaSee More: Motorcycle Intercom, Motorcycle Accessories, Motorcycle Helmets
Vertix Speakers and In-Ear Speakers
In-ear speakers are not new to me, but I still prefer helmet-mounted speakers combined with ear protection pieces for helmet audio, a fact that did serve to highlight the need for a second full-face helmet kit with wired microphone headset.
In-ear audio is said to be more effective in terms of both delivery and increased damping of surrounding environmental noise, but if volume levels are not managed, they can (note I say can) limit audio situational awareness due to insulation of this key sensor.
Also, in many countries, the use of in-ear speakers whilst riding or driving may be illegal.
But despite my preference for helmet speakers, I must admit that the Vertix in-ear speakers are outstanding, with excellent low, mid and high tones that is distortion-free, even at maximum output settings.
Vertix recognizes that many users prefer their own in-ear systems, custom-fitted or otherwise, which is why all of their in-ear kits include a special extension/conversion cable so that standard 3-pin stereo connectors can be connected to the 4-pin configuration used by Vertix.
[UPDATE: Factory says “The extension cable is so that the user can use Vertix earphones with their regular MP3 player or cell phone to listen to music. The Vertix system is a digital system and as such, our speakers are digital speakers.”]
The impact of not using this conversion cable with a three-pin stereo headset is clearly illustrated when listening to audio from the integrated stereo FM radio; output is low and seemingly single-channel.
Vertix Raptor-i Speakers and Sound Quality
Both the Vertix in-ear speakers or the helmet speakers provide an outstanding audio environment optimized for use with the Raptor-i intercoms.
In appreciating all the factors involved in obtaining great audio performance, including coding and decoding issues, the results when maximizing output settings on the connected device and then cranking up headset volume are, in two words: painfully loud (but distortion free).
Subjectively, the Vertix helmet speakers come close — really close — to matching the audio environment experienced from the UClear HBC200 helmet speakers in most helmets. And in two different helmets, the Vertix helmet speakers provided the better audio environment.
In using the Raptor-i systems with full-face, flip-up and three-quarter style helmets while riding different motorcycles it remains obvious that respective helmet environments are key to overall system effectiveness.
With the three-quarter helmets the noisiest even behind a fully faired motorcycle.
As expected, the in-ear speakers provide a better audio baseline under widely varying cockpit and helmet conditions, although as usual, at least from my experience, low frequency noise and vibration, often from bone conduction, still intrudes.
But regardless of whether the speakers or in-ear headsets are used, the Vertix technology delivers in providing and maintaining a useable environment under widely varying cockpit and helmet environments, with degradation only being observed at well above normal highway speeds.
The only audio downer observed is when using third-party speakers; two high-quality in-ear sets along with the Tork XPro speakers (review) and the Iasus XS2 helmet speakers (review).
Some audio distortion is evident when settings between the connected peripheral and the Raptor-i exceeded 60 to 70 percent, although the Iasus XS2 speakers are slightly better, remaining “clean” until the 80 to 90% level is reached.
Firmware Updates
The original two Vertix Raptor-i intercoms we received were running version 1.56.3 firmware, but the two replacement models subsequently received have version 1.56.4 installed.
It seems that some tweaking took place, but no specific information was provided and no Raptor-i Support information is currently posted on the website.
|
webBikeWorld Overall Opinionator: Vertix Raptor-i Intercom
|
|
|---|---|
| Picks… | …and Pans |
|
|
Conclusion
You know what? I kind of miss “The Voice” (spoken status announcements).
After having become so used to it (spoiled, perhaps) by the sometimes simple and sometimes complex but very functional voice menu and command features used by many other new Bluetooth helmet intercom systems recently.
But simpler is still good — very good — a fact proven by the Vertix Raptor-i system. The Vertix Raptor-i doesn’t have a multi-point intercom connectivity feature, which limits some pairing configurations.
This is somewhat solvable by letting any compatible navigation device handle phone hosting duties. On the other hand, the Vertix Raptor-i intercoms do pair up and reconnect with anything presented within seconds.
Another big positive is the audio management and switching in the Raptor-i intercoms; nothing else comes close to rivaling the speed and accuracy of the Raptor-i in switching between audio sources, especially stereo audio streaming and FM radio audio.
And for me, the remote control module makes the Raptor-i a more complete and more effective system.
I’ve used other wireless handlebar remote controls and other manufacturers are bringing them to market, but at this point in time the Vertix Raptor-i Remote Control setup is the best I have used.
|
wBW Review: Vertix Raptor-i Intercom
|
|
|---|---|
| Manufacturer: Vertix | List Price: $192.00 (single) to $383 (dual) |
| Colours: Black | Made In: China |
| Sizes: N/A | Review Date: May 2013 |
Where to Buy Vertix Raptor-i
Check Reviews & Prices on Amazon Check Reviews & Prices On RevZillaSee More: Motorcycle Intercom, Motorcycle Accessories, Motorcycle Helmets
Owner Comments and Feedback
See details on submitting comments.
From Vertix (May 2013): “We have revised the speaker design and no longer use the integrated boom microphone and speaker setup.
The new sets literally arrived 2 days ago and we will be glad to forward you the speakers to take a look. We have also enhanced the connectors to 90 degree connectors as we have encountered many cases of connector failure due to stress on the 180 degree connectors.
Please see attached the picture of the new speakers.”




No Comment