
Multistrada Chain Adjustment
Adjusting a motorcycle chain isn’t much fun, no matter how you slice it.
But adjusting the chain on a Multistrada (the 620 anyway) is about as simple as it gets.
We’ve covered motorcycle chain adjustments before, with articles on replacing sprockets and a chain. Also adjusting a chain on the Triumph Tiger and adjusting the chain on the Ducati GT1000.
So there may not be much new in this article!
I haven’t discovered any new procedures that will make the job any easier or the chain longer-lasting, but every motorcycle has its quirks, and with the thought that maybe some tips here will help other Multistrada owners or others, let’s go through it once more.
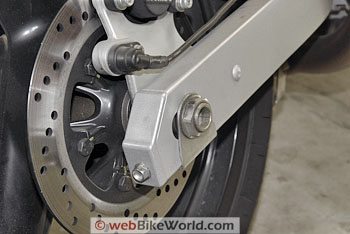
So why is it so easy to adjust the chain on the Multistradino? Well, since the exhausts are centrally located up under the tail, the entire run of the chain on the left-hand side is easily accessible. And both sides of the 620’s double-sided swingarm are right out in the open, leaving the axle nuts and adjusting bolts nicely exposed and ready for wrenching.
The amount of chain slack on the Multistrada should be checked with the bike on its side stand, according to the owner’s manual.
Actually, this is the correct procedure for checking the chain slack on most bikes, but the problem is that it can be very difficult to get under the bike to access the chain in the middle of its run on some models — like the GT1000 for example. I usually put that bike up on a rear swingarm stand instead because the low-hanging exhaust on the left-hand side makes it difficult to reach underneath to measure the slack.
Ducati suggests moving the bike around until the tightest section of chain is hanging in the center point to use for the measurement. This is always more difficult to do than it seems and it’s more of a matter of feel than anything else.
I usually don’t get too uptight about it and simply walk the bike back and forth over a short distance to see if I can tell if there’s a section of chain tighter than the rest. It’s usually fairly easy to come up with at least one section with less slack.
Like the GT1000, Ducati recommends 25 mm to 27 mm of slack in the chain, which is only a 2 mm distance — not very much, and difficult to both measure and to get exactly correct when taking up the slack.
The slack must be measured from the same point to the same point on the chain. In other words, hold the scale or the rule or the measuring device (I sometimes use a Vernier caliper with the tips spread to the maximum allowable slack) at the bottom of a link, then push up on the chain while holding the scale in the same relative vertical position and measure how far the bottom of that same link moves.
This is easier said than done (actually, it’s not that easy to say either!), and many owners have devices used to measure the slack.
I’ve always thought it would be nice to make a something like a small stand that holds an adjustable indicator that can be adjusted to point to the bottom of the chain and another indicator that can be set to the top of the tolerance. The stand could be placed on the floor and the indicators would stay in place as the chain was moved up and down to check the slack.
Measuring Chain Slack
In the meantime, I usually lay on a creeper and hold a 12″ metal rule on the floor, used as a sort of rest to hold a smaller 150 mm rule that I use to line up with the bottom of the chain. I then move the chain up and down and measure the slack. With only 2 mm of tolerance, it’s important to have the lower indicator stationary to get a somewhat accurate reading.
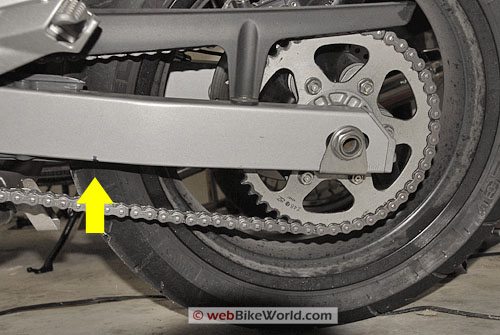
By the way, the owner’s manual suggests checking the chain slack at the center point of the swingarm, measured from the center of the rear axle to the center of the front sprocket.
I measured this distance and then marked off the point exactly half-way with a permanent marker on the swingarm (see photo below). I may eventually use a center punch to prick a little indent at that point for really permanent marking.
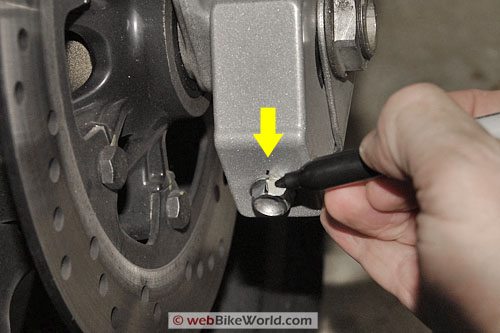
I also used a black permanent marker to color an edge on each of the 12 mm adjusting bolts (photo below). This makes it easier to determine how far the bolt is turning.
Where to Buy Multistrada Chain
Check Reviews & Prices on Amazon Check Reviews & Prices On RevZillaSee More: Motorcycle Chain Lube, Motorcycle Accessories, Motorcycle Lubricants
Axle Nut
The bike has a 30 mm axle nut on either side of the swingarm, holding the rear wheel in place. Two 12 mm adjusting bolts are located at the rear of each swingarm end; the bolts are used to tighten or loosen the chain.
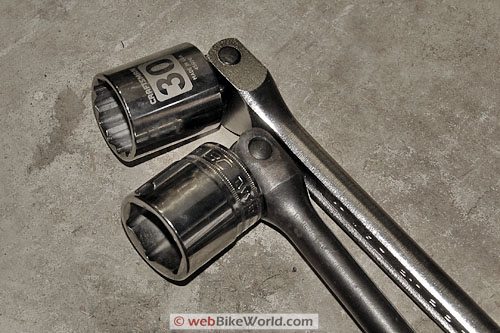
I have two 30 mm diameter sockets for this job (photo above). One is a 6-point and one is a 12-point, both 1/2″ drive. I prefer the 6-point socket because I think it gives better purchase on the axle nut, but the 12-point seems to work fine on the Multistrada 620. Note that I have discovered that a 12-point socket can slip on some nuts that require more than around 80 Nm of torque or so.
I mount the 30 mm sockets on 1/2″ drive breaker bars for leverage to loosen the nuts, which are held on with 83 Nm (61 ft. lbs.) of torque. This much torque takes a fairly hefty pull, and I use the Precision Instruments split beam torque wrench (wBW review) to tighten the nuts the correct amount when it comes time to reassemble.
After the first 550 miles or so, the Multistrada’s chain had about 31 mm of slack, which is 6 mm more than the recommended 27 mm maximum. So after loosening the 30 mm axle nuts just enough to allow the axle to move, I tightened the adjusting bolts equally by one flat on the bolt head; that is, I turned them about 60 degrees.
Measuring the slack, I discovered that this tightened up the chain by 7 mm — which is a bit too much and made the chain slightly tight at around 24mm. But after moving the bike forward slightly, I realized that it was actually pretty close to the 25 mm slack and I figured the chain would probably stretch a bit anyway, so I let it go.
It’s more difficult to put slack back in to the chain than it is to take it out; to put slack back in, the axle nuts have to be loosened up, the adjusting bolts backed out and the bike has to be pushed forward and stopped quickly with a jab on the rear brake.
The momentum of the bike moving forward and the rear brake suddenly engaging is usually enough to force the rear axle back in place.
But on the rare occasions when this has happened to me (usually at my first attempt to adjust the chain on a new bike), I’m never quite sure whether the axle has been bumped back against the adjuster stops correctly, so I don’t like having to do this.
It’s always better to sneak up on the correct adjustment a little at a time if necessary, rather than tightening the chain too much at first and then trying to correct it.
If the adjusting bolts are turned equally — and there’s no reason they shouldn’t be pretty close, especially if they are marked and closely observed to make sure — it probably won’t be necessary to check the wheel alignment.
I have never found that I needed a wheel alignment after adjusting a chain, as long as the adjusting bolts are tightened as close to equal as possible. I’ve also found that it takes quite a bit to force a motorcycle out of alignment and it has to be pretty bad to notice.
Conclusion
That’s about it — as in our other motorcycle chain adjustment articles, it takes longer to describe the process than it does to actually do it. The Multistrada 620 is one of the easiest bikes around for a chain adjustment and it only took me about 5 minutes or so.
If you’d like to add some comments or if you have a tip of your own, feel free to contact us at![]() See the reader comments below.
See the reader comments below.
Note: For informational use only. All material and photographs are Copyright © webWorld International, LLC – 2000-2011. All rights reserved. See the webBikeWorld® Site Info page. NOTE: Product specifications, features and details may change or differ from our descriptions. Always check before purchasing. Read the Terms and Conditions!
Where to Buy Multistrada Chain
Check Reviews & Prices on Amazon Check Reviews & Prices On RevZillaSee More: Motorcycle Chain Lube, Motorcycle Accessories, Motorcycle Lubricants
Owner Comments and Feedback
Not all comments will be published (details). Comments may be edited for clarity prior to publication.
From “B.N.”: “Someone gave me a great method for checking the alignment of the rear wheel. It’s the best method I have seen, and makes it easy to adjust the wheel after removing it to replace a tire or sprocket, or just to keep an eye on wheel alignment.
I take a metal ruler about 18 inches long and hold the edge against the side of the sprocket, with the ruler laying on the lower run of the chain. If the wheel is in alignment, the inner edge of the ruler will be a constant distance from the inner edge of the chain links.
Any misalignment is apparent by looking at the distance of the edge of the chain at the near and far end of the ruler. This is a lot easier than trying to measure the distance from the axle to the swing- arm pivot on both sides of the bike, or any of the other ways I have seen alignment checks done.
Fortunately, I bought a Buell. Now I don’t have to deal with any chain issues at all!”
From “A.B.”: “I just read the article on the Multistrada Chain Adjustment and the writer said “I’ve always thought it would be nice to make a something like a small stand that holds an adjustable indicator that can be adjusted to point to the bottom of the chain and another indicator that can be set to the top of the tolerance. The stand could be placed on the floor and the indicators would stay in place as the chain was moved up and down to check the slack.”
What I use to measure the chain slack on my Ninja 250, while being rather simple it does work, is a small 2×4 board with a dowel rod inserted into it. I then have a 50mm section of drinking straw with a millimeter graph paper taped to it on the dowel rod. The straw slides on the dowel rod of course and allows me to quickly check the slack and then adjust as needed. Hope this helps.”
Other WebBikeWorld Chain Lube Posts

No Comment