
Ducati GT1000 Blog – Page 2 (Older Entries)
The entries below are from the original page of the GT1000 Blog and it includes email from GT owners. If you have any tips on parts or accessories for the GT or any of the SportClassics, please feel free to drop me a line at [email protected]
| The GT O’Meter | |
|---|---|
| Likes | Dislikes |
| – The sound | – The plastic |
| – Handling | – Evaporative emissions canister |
| – Tires look great | – Understeer from round tire profile |
| – OE Mirrors: the view | – OE Mirrors: the lollipop look |
| – Precision shifter | – Riding position (I’ve learned to live with it) |
| – Fantastic rear, great front brakes | – Abrupt on/off throttle |
| – Battery charger harness (added by dealer) | – Fuel tank removal |
| More: GT1000 Blog Page 1 | |
CRG Hindsight LS Lane Split Bar End Mirrors

January 3, 2007 –As promised, here’s the review article with tips on installing them on the GT1000!
Winter!
February 9, 2007 – A Cold, Hard Winter!
Wow! The weather went from being very unusually warm to very unusually cold! It’s the coldest February in 30 years in these parts, some of the old-timers are telling me.
I haven’t done a thing on the GT since January, when we had some days in the 70’s! And the cold weather hit so fast, I didn’t even have time to winterize the bike, or the lawnmower…
In the meantime, reader “M.C.” sent us this info on his GT1000:
“I’ve had my GT 1000 for about 4 months now and am loving it more and more over time. I purchased the saddle bags when I bought the bike and they are relatively useful, although somewhat limited by their shape. They also make it a little tricky for my passenger to find the rear foot pegs.
If you haven’t been contacted by Ducati about your ECU (electronic control unit) yet, check it out – it may be under a recall. My bike was raspy and sputtery at low rpms and backfired a lot under heavy deceleration.
When I inquired at the dealer about it, they told me about the recall. After having the new ECU installed, the bike runs smooth as silk, which should make around town driving a little more tolerable.
When you go to the dealer to have this replaced, make sure to bring both black keys and your red key since they have to program them all for the new ECU.
I was not told this so I got to make an extra trip to the dealer with my full range of keys in order to get it all done properly.
Another important modification I made was to replace the “bug antenna” mirrors with handle bar mirrors.
I originally ordered the custom mirrors from Ducati, but the picture in the catalog was very deceiving and when Installed, I found those mirrors would only be useful for dentistry – they were so small I couldn’t see anything.
I took them back to the dealer and said “I want the mirrors from the sport 1000 model”. They are handle bar mirrors, but they are large and offer excellent visibility. I’m thrilled with them.
I’m thinking of using the old tapped hole from one of the factory mirrors as a place to mount a GPS unit. I’ll probably take the mirror to my local metal guy and have him cut the stem a couple inches high and then weld a bracket for the GPS. If that works, I’ll take some photos and submit them.
I’m also thinking of upgrading to an air horn system, so if anyone knows of something functional, attractive, and not so wimpy that I could mount where the little cheapo plastic ones are now, I’d love to know about it.
Thanks and safe riding to you all!”
Editor’s Note: I recently noticed that one of the original handlebar mirror mounts on the GT1000 uses left-hand threads, so be careful what you screw in there!
GGT1000 Rear Luggage Rack
March 16, 2007 – Ducati GT1000 Luggage Rack
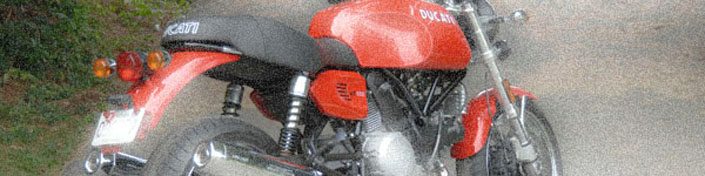
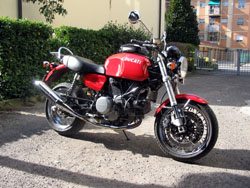
“Michele” from Italy sent an email with information and photos of the Ducati luggage rack for the GT1000. Michele says that he is “The happy owner of one Ducati GT 1000, color Ducati Red Anniversary.
I am very satisfied: it is the motorcycle I was dreaming about when I was 15 years old, but with the technology of 2006, and am enjoying her very much.”
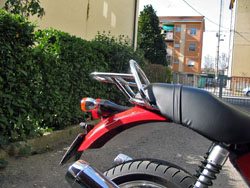
“In your fantastic blog, I have read than the user S.J. was looking for a parcel carrier (luggage rack) for (the GT1000). I have found the (official rack in the) Ducati accessory catalogue, and have bought it (130 €): now my passenger feels more safe and I can also load a little luggage.”
“I will also use this parcel carrier to install two soft saddle bags (I own), for the journeys which I will have. I have also bought, from a retailer of original Ducati accessories, a luggage rack, which I use when I travel without passenger.”
Chrome Wheel Corrosion Problem?
March 21, 2007 – Chrome Corrosion Problem? Another update from W.L. (see Blog Page 2):
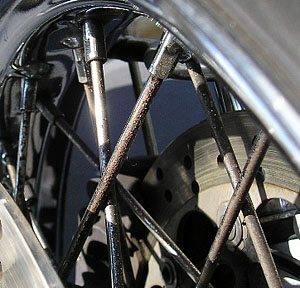
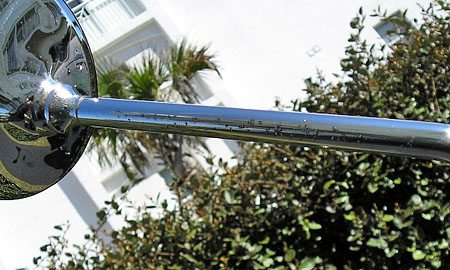
“Just an update from life at the beach. My mirrors and especially my spokes are rusting.
Even though I wash and blow dry the bike every day I ride, the impact side of some of Ducati chrome is going to crap like nothing I have seen before.
The impact of salt air is rough on anything but it took my Harley 5 years to show the corrosion the GT1000 has shown in 9 months and 9K miles.
Both mirror and spokes (the front wheel is worst) still shine like new on the back side but are crap on the front side. You may remember I had to get after market buddy pegs for my wife because she could not reach the stock ones around the saddle bags. They have not been affected.
I confronted Ducati’s rep at Ducati Daytona Day. His answer was no warranty on weather related items and yes it looks like Ducati sure used cheap spokes. You might want to let the other riders know about this.
I know corrosion here is bad (Florida) and I expect it. But it could sneak up on someone else as the bikes get older with catastrophic results IE: high speed spoke failure!
I am working with Buchanan Spokes to come up with polished stainless steel replacements. Should have something in a few weeks. As you can see, the rims are still fine.”
UPDATE: “I just received two sets of Stainless Steel Spokes from Buchanan’s Spoke & Rim. They look as good if not better than the originals. I had sent them a spoke to duplicate as all 72 spokes (36 +36) in the Sport Classics are identical.
They now have the specifications for the spokes if anyone else needs some.
It cost me $1.29 per spoke and $1.53 per nipple and another $1.29 to polish each spoke / nipple set. I dealt with Angel. Mon-Sat, 8:30-4:45, (626) 969-4655. I found them on (the webBikeWorldMotorcycle Wheels page).
If you are not up to lacing you can send them your wheel and they will lace and true for about another $100. Thanks again for all the resources you make available.”
More GT1000 Rust: “My name is F. from Italy (Rome), proud owner of a Red GT1000, but first of all, thank for keeping this blog!
I’ve just finished reading your last news about rust and corrosion on the bike, my experience is not so bad as your photos show up, but on my GT1000 I noticed some little rust spot on the mirrors, on the (spokes) and on the handlebar.
I agree with you when you say that the chrome quality is not good at all.
My bike has never seen any water drop, and has never been ridden below a water storm neither rain, but as you know, sometimes you can encounter a wet road and some water can touch the bike, and this is the case after which I’ve found rust spots on spikes and handlebar.
Then I bought a special paste to clean up the rust from the chrome parts, and this works fine but the local dealer told me to not clean the rust, rather to make the rust grow in order to justify a new handlebar (we have 2 years warranty). Now I’m wondering if I had a good advice…
A strange thing I noticed is that the chrome quality is different from part to part, the beautiful chrome exhaust does not show any rust spot or corrosion, but it has been touched by the same amount of water.
My bike sleeps in a safe closed box with other bikes, casually, there is also an old HD 883 which looks beautifully (for the chrome parts) and it did not present any rust or corrosion, so I agree with you when you say about the VERY poor chrome quality on the GT1000.
I guess soon I will claim about this (not so minor) issue directly to the local Ducati dealer, and then directly to Borgo Panigale.”
GT1000 Fuel Line Recall Fix
March 7, 2007 – Ducati SportClassic Fuel Line Problem Now an Official Recall
The U.S. National Highway Traffic Safety Administration (NHTSA) has issued a recall of 817 Ducati SportClassics for the fuel line problem we reported on back in September of 2006. Here’s the official recall notice and more information, including a drawing of the affected parts.
March 24, 2007 – Fuel Line Recall Fix and Fuel Filter Replacement – Check it out folks, here’s how to do your own fuel line recall fix!
It’s pretty easy and the hardest part is draining the fuel. As it turns out, this is the same procedure needed to replace the GT1000 fuel filter.
Ikon Shocks for the GT1000
April 21, 2007 – GT1000 Ikon Shocks and ECU Idling Problem: Here’s a note from “E.O.” regarding some problems with his GT1000:
“Greetings! I wanted to give you a quick update on my GT. The Ikon 7614 shocks that I installed several months ago have been absolutely great. Much more comfortable for me and for my wife.
She stopped complaining since the changeover. What’s more, the front end is much more stable, since the bike doesn’t pogo like it did with the Sachs. More control on the rear translates into better handling on the front.
Now, some issues, specifically with idling. About 7,200 miles or so, the bike began acting badly and would not idle properly after a cold start.
It would eventually settle down and idle after I got it running and took it for a spin for a few miles, but from a fresh start or after having been left sitting for an hour or so after a run, it just did not want to idle.
I had read on the blog about a potential ECU recall, but when I brought it in for the 7,500 service (at 7,900), there were two recalls – the gas tank one and another for an oil filter screen (the part cost 59 cents.
Can’t imagine what the shop will bill Ducati). Nothing in the computer about an ECU issue. But, after the service, the shop could not get the bike to idle properly. So, they ordered a “stepper” motor.
Took over a week to arrive, and they just called and said “that didn’t work.”
So I’m wondering if anyone else has experienced an issue with idling, and what the cure for it is? The shop did mention that they will now look at the ECU.
I’m down two weeks now, and quite anxious. Thankfully, I have the Bonnie and a Victory to back me up. But there’s nothing like the rush I get on the GT.”
If you have any insight into possible solutions for the GT1000 idling problem, please drop us a line at [email protected]
NOTE: Owners can file a complaint with the U.S. Department of Transportation, National Highway Traffic Safety Administration (NHTSA) Office of Defect Investigation. Select the “File a Complaint” link on the left-hand side.
Note that it is helpful if you have your VIN number, but it isn’t necessary. If they get enough complaints, they may issue a recall. Based on my experience, they are pretty responsive on this type of issue.
Responses
Follow-up from “E.O.” (April 27, 2007): “I contacted the SE Ducati Service Rep last Friday, who I know from a personal intro. He contacted the shop wrench, and when I returned this week from an out of town business trip, the bike was all set to go.
Seems that when the shop replaced the “stepper” motor for the idle issue, they failed to “calibrate” it. All these computer things on bikes today. So once they found out about that step in the installation process, they were able to get it running right.
The bike now runs much, much smoother (both my wife and I agree), and more powerfully, too. The head wrench said that the valves were found to be over-tight, but are now within spec, so the 7,500 mile service is very important to have performed.
Oh yeah, I specifically mentioned to the wrench that the throttle cables had way too much slack, which he adjusted to spec during the service. The adjustment made a world of difference in 1st gear launches and slow speed maneuvers (U turns, etc.), just like you noted in your report.
Looking forward to this weekend so I can flame a few tanks of gas. I’ll let you know if I develop any other problems, their resolution, etc. No word means I’m out there racking up [s]miles.
From “C.F.”: “I had the exact same problem but not until after I had the GT1000 replacement ECU installed. (Some motorcycle dealers) say it can’t be (fixed). Anyway, I’m having some success with adjusting the air bleed screws.
They definitely have an effect on the idle. I’m still fine tuning but I am pleased with the results so far.”
“Here’s an update. My bike idled too high (1200-12500) when I backed the air bleed screws out 1-1/2 turns and also had a delayed return to idle. I’ve readjusted to 3/4 turn out and it’s at about 1100-11500. Pretty good and a little stronger than the 1050-1100 it was at before I started all this.
But, the cold start very low idle (950-1000)/stall problem (same as E.O. describes) that appeared after I had the ECU upgraded remains. It idles fast for about 3 seconds and then suddenly drops. By the way, the two shops I’ve asked about this both say it’s normal and that they cannot adjust for it.”
From “J.C.”: “Hi. Last November at 1314 miles my GT would not start. My dealer had it for about 6 weeks before calling me to pick it up. The repairs were covered under warrantee, and the work order shows that some fuel pump clamps and the ECU were replaced.
I’m not certain that the amount of time taken for the repair is significant since it’s New Hampshire that we’re talking about and Winter tends to get in the way of most riding between Thanksgiving and Spring.
It may be that the lions share of the new ECUs were sent to warmer climates, but it’s pure speculation.
Prior to the breakdown I’d say that the bike had the same kinds of low-speed surging issues that have been reported by any number of your readers. It’s been much easier to drive with the new ECU. I’ve only had time to run a couple of tanks of gas through it since the repair.
It appears that fuel mileage has improved on the order of 10%, but I’ve been close, but have never seen 50MPG. I’ve noticed that some “surging” appears to return as the fuel supply shrinks.
I’ve enjoyed the bike aide from those problems. I’ve added the factory “comfort” seat which my wife reports to be more comfortable than the stock seat. I’ve also added the factory parcel carrier which oddly enough did not come with hardware.
The existing bolts are not long enough and I needed to find some longer ones and some washers. I’ve also replaced the stock chrome lollipop mirrors with black mirrors from a Monster.
I have not observed any chrome problems, but then I haven’t had the bike that long and it’s in a heated garage.”
Bar End Mirrors Again
December 30, 2006 – Plenty of surprisingly good riding weather lately, even though it’s December 30! The temperature yesterday reached 58 degrees F!
I lost an Oberon bar end mirror (see article) — one minute it was there and the next minute I looked down and the left mirror was gone. The Oberons look great but I think there are too many set screws to try and keep tight in the soft aluminum.
So I ordered a set of Constructor’s Racing Group (CRG) bar end mirrors and they arrived very quickly (also available at Bevel Heaven, along with many other types of bar end mirrors).
I moved the right-hand Oberon to the left side and installed the CRG on the right, using the 6-7mm or so of handlebar that sticks out from under the twist grip and then installing the Ducati stock bar end weight over it to hold it on.
Works great and the 3″ diameter CRG Hindsight LS mirror provides a fantastic field of view — much better than the 2″ Oberon. The CRG mirror glass seems to be much higher quality also.
I could honestly get away with only the single CRG because its slightly convex shape reveals everything right up to the tail light on the GT!
But I’ll install the left side also and report back within a day or two in a full-length review article with photos. I may have to cut down the foam grip slightly on the left hand side to reveal the same 6-7mm of handlebar so the CRG mirror mount has something to hold on to.
GT 1000 Paint Protection
December 29, 2006 – I’ve been hesitant about cutting my own 3M Scotchcal paint protection film for the GT1000 to protect the paint on the fuel tank. Even though I have a lot of experience with this stuff, it’s very hard to mold it to something like the relatively severe compound curves on the back of the tank.
Chris B. (FJR1300) told me about the Tankslappers brand of pre-cut paint protection film, and lo and behold, they have a set for the GT1000.
I ordered a set and will report back soon, but I’m not 100% sure that what they’re selling is the same 3M Scotchcal with the sticky stuff on back that I’ve used before in bulk or if it’s the plain clear paint protection film that we used on the old Tiger.
Beware of using paint protection film that isn’t sticky — it doesn’t stick! Anyway, I’ll report back soon.
SportClassic Oil Pickup Screen Confusion
December 19, 2006 – Yet more information added to the GT1000 oil and filter change article; this time regarding some confusion on how often to remove and clean the oil pickup screen.
SportClassic Owner Report
December 19, 2006 – PS 1000 owner “B.S.” writes: “Determined to make this bike as good as I could for me I replaced the front and rear suspension with the optional Öhlins set up, [expensive] with the settings the same as the PS.
Also, since no steering damper is provided nor a lug on the frame to accommodate one, I purchased an Öhlins steering damper from Steve Cramer in NZ who also had the appropriate brackets made up and are very well made.
Now I have a far more compliant suspension and head shakes are a thing of the past.
At an age of 58 I found the riding position a bit too uncomfortable around town mostly, with wrists and neck complaining the most. I have since replaced the original bars with the optional higher version with much improvement in comfort.
MyMy last change was to replace the gearbox with a tooth lower which means the engine is less likely to “hunt” and low speeds and makes for a better ride around town. Finally, my final challenge appears to be how to best overcome the numbing of my right hand after 50kms or so due to vibration.
Any recommendations please on replacement grips or will more kms lead to a loosening of the engine and less vibration etc?”
GT 1000 Throttle Cable Adjustment and Lighting Woes

December 17, 2006 – Can’t believe it’s been almost one month since I’ve posted anything. The weather got cold — well, relatively speaking anyway — and I got tied up with some other projects.
But now it’s warmed up again (65 degrees on Dec. 17?!) so I went for a ride.
I think the GT is really coming into its own. It feels like the engine has loosened up and revs harder and smoother. I’m still having a ball riding this thing; each time I get on it I feel like I learn something new about it that makes me like it even more.
I noticed that there seemed to be too much throttle play and I checked it at over 4mm, which is more than twice the minimum called for in the owner’s manual. So I did some tweaking and wrote it up in a separate GT1000 Throttle Cable Adjustment article.
Ducati GT1000 LED Brake Lights and Turn Signals
By the way — I was working on the continuation of the article that looked at different lighting options for the GT1000 (see article). The GT uses “wedge” bulbs in the yellow directionals and I wanted to try some wedge-type LEDs instead.
I ordered a batch of 921 wedge LED lights and a couple of 1157 LEDs to try in the brake/tail light.
Well, the box never arrived and when I contacted the retailer and the Postal Service, I discovered that the box must have been stolen from my mailbox.
OK, there’s $110.00 down the drain.
I placed a duplicate order and paid extra to have it delivered via UPS. This time it arrived and I put it aside and…somehow it completely disappeared.
My wife and I have torn apart the house, basement, garage, cars… I’ve looked everywhere and can’t find it! I know it arrived because I ordered a little LED key chain light also and that I have.
So there’s ANOTHER $115.00 down the tubes! This is in addition to the first order I placed when I foolishly ordered a bunch of 1156 LEDs, thinking that the GT must use them in the directionals.
So far I’ve blown about $300.00 on LED bulbs and have nothing to show for it! So, as you can imagine, I’ve given up on this project for now…!
Recommended Motor Oil for the GT 1000
November 21, 2006 – I just discovered some important information on the recommended engine oil type for the GT1000; although it’s somewhat confusing, Ducati apparently recommends full synthetic oil.
Shell Advance Ultra 4, which is virtually unavailable in the U.S.A., and which Ducati recommends on page 149 of the GT1000 owner’s manual, is a full synthetic oil.
I have created a new cross reference chart on the GT1000 oil change page that suggests possible substitutes for the various Ducati recommend (Shell Advance) lubricants.
Also see the updated entry on the GT1000’s second oil change, using the amazing Motul 300V double ester synthetic oil.
GT1000 Chain Adjustment

November 11, 2006 – Just posted – basic maintenance article covering a GT 1000 chain adjustment. Not much new here but nice to know that it’s a relatively easy project. Many more webBikeWorld motorcycle chain lube reviews here.
LED Brake Light

November 11, 2006 – Check out the SpiderLite folding LED brake light! I tried to install it on the GT but ran into some problems so I’m ordering a spare lens to try again. But this thing is pretty cool, so I thought you might like to learn more
Building the GT1000
November 3, 2006 – Just found a link on the Ducati website (no longer active, unfortunately) with photos showing the GT1000 in the early stages of development; check out the Öhlins shocks on the prototype!
I’m ticked that the weather here is starting to turn cold. Having to ride while bundled up in winter clothing on an unfaired bike isn’t all that appealing to me…just as I’ve finally started to figure out all of the GT’s quirks and it’s starting to feel very smooth to me.
I wonder if putting a couple thousand miles on it has freed up the engine a bit? It seems to be running smoother after the oil change also. And the mirror and handgrip replacement have, I think, made a big difference also.
I’ve also discovered two things – first, the shifter works like a dream, so it pays to learn how to become very smooth when shifting up; the bike really likes a smooth touch.
I’ve never owned a bike that had a shifting mechanism this precise — the BMW’s I’ve owned in the past encouraged a very deliberate shifting technique that have created some bad shifting habits on my part.
The GT1000 rewards smooth shifting. Instead of letting off the gas all the way, just back off a tiny bit and touch the shift pedal up and let the bike do the rest. This helps to prevent the bucking on/off feel that I think is partly the result of a too-light flywheel.
It takes some practice, but eventually I have learned to become very precise and smooth on the shifter and it makes a big difference in the bike’s demeanor.
I’m still not fond of the stiffness (firmness) in the forks, and I definitely want to find a way to correct it. Possibly lighter weight fork oil will do it, or maybe a set of the Öhlins forks, which I understand will be released soon.
Many Sportbike riders falsely assume that a stiffer suspension must be better (i.e., more “racy”), but this isn’t necessarily so.
A motorcycle’s suspension must be supple enough to absorb all of the irregularities in the road without transmitting them to the rider in a way that upsets the handling or causes unwanted inputs through the handlebars.
I definitely think the GT1000’s front forks should be more pliable (i.e., softer, less firm, more absorbing, etc.), allowing for better bump absorption. This would make the bike much more pleasant overall. In the meantime, the trick is to try and keep as much weight off the handlebars as possible, which isn’t easy with the low bars on the GT.
One way to do this is to squeeze the tank with the legs and knees to stay connected to the bike, instead of keeping all the weight on the hands.
This helps to reduce bump steer and also the pre-tank-slapper handlebar shake that some GT1000 riders have reported when cornering on a bumpy surface.
The problem with grabbing the tank with the legs is that the clothing can easily scratch the paint. And that’s why I simply have to get to the installation of the Scotchcal paint protection film as soon as possible.
I wish I could find a clear Scotchcal-like film that was also “grippy”. I’m not referring to the bumpy stuff used on Sportbikes; I don’t think that would suit the GT’s style. Just some clear, plain paint protection film that has grip…
By the way, you’ll want to make doubly sure all of your braking and downshifting is done before the corners on this bike.
I know that’s supposed to be the rule anyway, but it’s extra-important on the GT1000 because two things can happen – if you’re caught in a too-high gear, it will chug and buck through the turn causing some real puckering.
Or, if you downshift too late or are going to slow in the turn and have to give it throttle and you’re in a lower or too-low gear, watch out, because the lack of flywheel effect, the relatively high horsepower and torque and the light weight will catch you out as soon as you touch the throttle!
GT1000 Fly Screen

October 31, 2006 – Happy Halloween! Here’s an article on installing the National Cycle fly screen on the GT1000 (also fits the Sport 1000). It looks great and is very easy to install
First Oil & Filter Change

Octobe 22, 2006 – GT1000 oil and filter change. Lots of information and tips; whether you do it yourself or bring it to the dealer, read this article and learn what questions to ask. UPDATE: Includes info on the second oil change, using Motul 300V synthetic.
Billet Oil Filter Cap
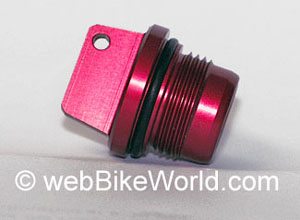
October 21, 2006 – Ducati Billet Oil Filler Cap
I just couldn’t resist adding this aluminum oil filler cap to my Pro Italia shopping cart. I started out looking for a Ducati oil filter wrench (more on that in an upcoming article) and ended up with this.
It’s way, way too expensive at $24.95 and I’m disappointed with the quality. You can see in the photo below left that the machining marks are visible all over the grip, underneath the too-thin anodizing.
There are also some burrs along the edge, so someone didn’t pay much attention to detail after it was machined.
The hole is for a safety wire if desired. The cap comes with the O-ring shown in the photo.
It’s available in red, gold, silver or black, and I sort of wish I got the silver, which I think would probably look better on the GT1000 painted engine casing.
A frivolous purchase, to be sure, but hey, it’s a Ducati, and it’s all about the bling, eh?
GT1000 Rear Swingarm Stand

October 17, 2006 – Review of the Pit Bull rear stand for Ducati Sportclassics.
Oberon Bar End Mirrors

October 12, 2006 – Check it out – Oberon Bar End Mirrors on a GT1000! I also added some el Cheapo soft foam grips and this combination has lowered the GT’s vibes and changed the way the bike feels for the better!
A Smooth GT1000?
October 11, 2006 – I had a laugh today that I’d like to share. Motorcycle News (UK) today ran a comparison of the GT1000, the Triumph Speed Triple and the Moto Morini 9-1/2.
I don’t know what GT1000 they were riding, but they said “at low revs the engine is silky smooth…” and that the bike has “impeccable throttle control”!
Hey MCN – the GT is a wonderful bike with some great features, but a “silky smooth” engine at low revs and “impeccable throttle control” are definitely NOT two of them! Even Motorcycle Consumer News (U.S.A.) recently tried two different GT’s and slammed the vibrating engine…
GT1000 Brake Light Bulb

October 7, 2006 – I just posted a detailed article on replacing the GT1000’s brake light bulb. I wanted to see if an LED would fit and I learned some interesting tips along the way…
Windscreen and Bags?
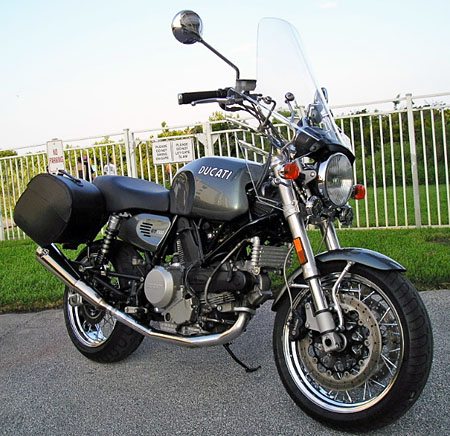
October 6, 2006 – The windscreen and bags arrived, ordered on August 20th. The labels indicated they were shipped directly from Italy to the dealer. Will work on mounting them over the next week or so and report back…
Evaporative Emissions Canister

September 30, 2006 – Finally! Here’s my article detailing the removal of the evaporative emissions canister on the GT1000 for maintenance, testing or repair.
Termignoni Exhaust
September 27, 2006 – Here’s a note from GT1000 owner W.L.: “Thank you for starting this blog. My wife and I have put almost 5000 miles on our GT 1000 since taking delivery on July 8th. We love the bike but have made numerous changes to make it more comfortable.
Fortunately I have not encountered the fuel line problem. I have the panniers, Termignoni’s, and the windshield.
The panniers are great but they have a low weight limit (3Kg) for their size. They are very easy to remove and carry. The down side, their position. Even with them in the most aft position my wife (5′ 2″) has a very hard time getting her feet on the buddy pegs.
She had to wear shoes with heels to hook on the pegs because the panniers were pushing forward on her legs.
I took the stock buddy pegs off and installed after market clamp on pegs about 3″ forward of the originals. This made her happy and did not cause interference with my size 12 foot on the front pegs.
The other downer is that the metal rings to the handles on top of the panniers are already rusting out. I live on the beach in Florida, but I store the bike under a cover in the garage. I also wash it off at the end of every day we ride.
I expect rust because of our location, but in the first month this is not a good sign.
The Termignoni’s add a noticeable power increase and they have a very easy to remove center baffle. Remove the screw (the nut is spot welded to the baffle) and yank on the crossbar with pliers.
Talk about a sweet sound and it is no louder than my XL1200S with Screaming Eagle pipes. I have strangers coming up to me and complementing me about how nice it sounds and by the way what is (or who makes) a Ducati.”
Note from “B.R.”: “Just a small tip to anyone looking to put Termis on their bike, the baffles do come out, but before you can loosen the screw on the underneath of each muffler, you have to break the spot weld that holds the screw in place.
I used a grinding wheel on my Dremel to take care of this. Just touch the weld for a second with the grinding wheel and it weakens the weld enough to loosen the screw.”
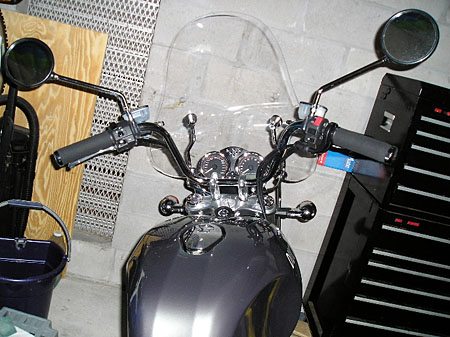
“The windscreen looks good but that is all I can say about it. I am 6′ 1″ and it deflects the wind into my neck and face. The top is only 18″ above the headlight and there is no adjustment.
2 of the 4 screws that go through the windshield were at least a 1/4″ too long for the fixed depth of the support they go into. Found this out by having one break off before it even put pressure on the rubber grommet.
Got a scratch on my shield for that one. After I core drilled, taped and re-studded the broken one I ground the other screws down to be able to put pressure on the grommets and secure the windscreen.
A 24″ after market universal windscreen is on order. In the meantime I drilled new holes in the screen to raise it as much as possible.
The stock handlebars were too low for comfort so I installed Bikemaster Nighthawk bars with a 7” rise. Bought braided hydraulic lines and the fittings to make longer clutch and front brake cables from a local industrial supply.
The electrical cables had enough extra length doubled up and clamped to the frame to make up the difference.
Locating the place to drill the holes for the bar pins on the switches takes some thought to get things positioned correctly. The stock throttle cables will work if you run them on the back side of the bar but be careful to place the throttle so you do not stretch the cables with the steering full to the left.
I also installed more padded comfort grips. Much more comfortable riding position. The next project is a friction control or lock to get rid of the throttle sensitivity you talk about. That is a real PAIN on long rides or bumpy roads.
The octane number in the manual is right next to tank capacity in liters and has the same 95 in three other languages. I think it is safe to say they are talking European Grades. I have used 89 for almost all of the 4876 miles I have on the bike. The few time I have used 92 I swear it ran rougher and had no improvement in performance.

Rather than remove the reflectors on the license tag holder I used them to mount LED light bars. The Florida tag does not extend over them so I mounted a 5 light LED bar on each side wired to the brake light and two 4 light LED diamonds on the lower reflector wired to the tail light.
I replaced the standard tail light bulb with an LED rotator light with flashing brake light. I do ride at night and want more visibility.
In 1993 I was stopped at a stop sign in a residential area under a street light and had a 78 Caddy turned my 883 Sportster into a hood ornament.
I searched through the largest motorcycle salvage yard in Daytona and found nothing that would make a nice modification for a luggage rack. If you find one, let us know.
Sorry for being so long winded but it rained all day today and I could not go riding. Please keep up the good work. Thanks again!”
Blog Notes
September 24, 2006: The page you are on is the original GT1000 blog page, I had to start a new page because this one got too big. See the GT1000 Blog Home Page for the latest entries.
I also added a separate page to start listing the Ducati Sportclassic parts and accessories. If you know of any parts or accessories for the GT1000, the Paul Smart 1000 or the Sport 1000, please drop me a line.
September 21, 2006 – Update on Next Projects: We received the Pit Bull rear paddock stand last evening; it was ordered on September 14 and the Pit Bull folks said they had a batch at the plater’s so it might take a few extra days.
I’d say that an order placed for a large item like this that’s delivered in 6 days across country is pretty good! I’ll be reporting on that soon, probably later on this weekend.
Also upcoming: details on removing the rear brake/stop light assembly; I thought we might be able to add an LED brake light to the GT1000, but there are some complications that have sent us back to the drawing board. More to come on that soon…
As promised, here are the details on the removal of the evaporative emissions canister for maintenance.
In the meantime, have you checked out our review of the Marlin Bullet Billet motorcycle thermometer? A cool product that’s designed for the Harley crowd, it just barely fits under the GT’s low handlebars, but it looks great and can be purchased with either a thermometer or a clock.
GT1000 Battery Covers – Part II
Removing the GT1000 Battery Cover: September 20, 2006 (also see Blog entry below).
Here’s a quick and easy tip — this may seem to simplistic to even discuss, but hey, you never know!
To remove the GT battery covers (the covers on each side of the bike), you’ll need a T30 Torx wrench on a long driver, like this nice Wiha tools bit driver shown in this photo.
This tool comes in very handy for many motorcycle projects, including another GT1000 project, as we shall see when I detail how to remove the rear brake/stop light assembly.
Unfasten the single Torx-headed screw first. It has a Nylon washer underneath the head, so don’t lose it.
Carefully pull the battery cover slightly out away from the bike.
The cover is held on the bike these pins, shown on the back side of the cover (on the right in the bottom photo), which slide into the rubber grommets indicated by the yellow arrows.
As with everything on the GT, be especially careful, slow and deliberate when you’re playing with parts like this.
You don’t want to break anything because it would probably take a year and a day to order a new part from the Mother Ship.
Be careful also when re-inserting the Torx screw, it seems like it would be very easy to strip the screw or the threaded nut.
GT1000 Fuel Line Recall
September 17, 2006 – Sportclassic Fuel Line Problem: A visitor “I.D.” wrote to let us know that there is a fuel line problem with some GT1000’s:
UPDATE: September 25, 2006 – more on this problem on the Sportclassics Fuel Line Problem page, including a diagram and parts list for the fuel pump.
“Just a note to let you know I purchased a GT-1000 500 miles ago and am enjoying your Blog. Your riding remarks are right on the money – – – especially regarding the gearing and throttle response. Not to say that I’m not loving every mile, but as you said, it’s taking some time to learn the character of this one. I’ve added the bags and have ordered the sport pipes.
By the way, I recently visited Ducati of NYC (Very Cool Shop). Several GT’s sold by them and other dealers are experiencing a problem with the fuel line that leads from the fuel pump to the inside of the tank.
The flaw causes the line to come loose and continue to feed gas back into the tank (sorry, I’m not very technical). When the problem occurs, the rider is left stranded with a dead bike. Please let me know if you are aware of this problem.
I purchased my bike in PA at American Warhorse and have forwarded them this info. Ducati of NYC also said that Ducati also recognizes this problem and has already made an adjustment. However, they were unable give me the VIN# of the first bike to be modified.
Once again, I am truly enjoying your blog and find it very informative.”
Reply: Thanks for the info, I wasn’t aware of this, if anyone can identify the parts, I can check to see if it’s something that the owner can fix.
Apparently, this problem is not uncommon; there are several reported instances in the group of the fuel line problem on the GT1000, the Paul Smart and the Sport 1000.
GT1000 Owner’s Manual
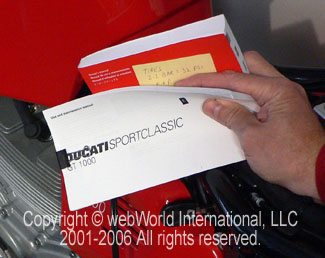
GT1000 Owner’s Manual: Here’s an easy place to start — the Owner’s Manual. It’s about 320 pages, but only the first 89 are in English. The other repeated sections are in Spanish, French and Japanese (What, no Italian??).
This means I’m schlepping around about 240 pages of, well, useless information for me anyway. Since the underseat storage area is miniscule, every square inch counts, so it would have been nice to just print the 89 pages in English and be done with it.
I’ll probably make copies of the pages I need and stuff ’em in there. But since the manual only has the most basic information about the bike, it doesn’t really matter much whether I can carry it on board or not.
GT1000 Owner’s Manual, Part 2: September 12, 2006 – I had a problem with the overly large GT1000 owner’s manual, which has only 89 pages printed in English out of 320 total (see below).
So I downloaded the electronic .pdf version of the GT1000 from the Ducati Owner’s Manual section of the Ducati website, which has downloadable Ducati owner’s manuals from 2000 to 2009.
I printed out only the English section, from page 81 to 169, then I trimmed it on a paper trimmer. It fits in the seat compartment if I fold it in half. A sharper computer jock then me could probably figure out how to print it in booklet form to make it even smaller.
The original manual weighs 224 grams (7-7/8 oz.) but my custom version weighs only 84 grams (3.0 oz.)!
GT1000 Fuel Consumption
September 10, 2006: I measured the fuel mileage just for kicks. I used 1.376 gallons in 70.2 miles for an average of 51 miles per gallon. Not bad, considering I’ve been hammering it pretty hard, although still keeping it under 5,000 RPM for the break-in.
The chain has just gone out of the recommended adjustment range of 25-29mm slack so I’ll need to attend to it this week. I also just ordered a Marlin’s billet thermometer and two different types of Oberon Engineering mirrors; the bar end in silver and the handlebar mirror in black. Will report back when these arrive…
More First Impressions
September 9, 2006: After several hundred miles of banging around on the back roads, I’ve realized that the throttle return spring is very stiff. This causes my right hand to get tired after about 50 miles or so, and come to the conclusion that this is what makes the bike difficult to control at slow speeds, over bumps or when trying to slowly roll on the throttle in a low speed corner.
Don’t be fooled into thinking the GT1000 is a beginner’s Ducati — it is definitely not.
Between the riding position, which forces a lot of weight on to the bars, the heavy throttle return spring, the ridiculous over-gearing (only the first 4 of 6 gears are useful at speeds under 75 MPH) and the lack of flywheel effect (which causes instantaneous on- and instant off-throttle response), this is a difficult bike to control in the city, at slow speeds and in slow corners.
I have to really concentrate to keep the throttle smooth and it’s not fun on bumpy, slow roads like those which might be found during a city commute.
I’ve read some reviews claiming that the GT1000 is a good retro commuter bike — I say no way. Most of the “reviewers” get a paid trip to Italy where they take a 25 mile ride and then write up a 1,500 word story like they know what they’re talking about. Don’t believe it!
Don’t get me wrong – the bike has loads of character, but it’s taking much longer than I anticipated to learn its idiosyncrasies. I’m not sure if I’ll ever be able to master the throttle in town. Out in the country on open roads it’s a different story…until a slow corner comes along.
And I will definitely change the gearing, it’s geared way too high and lugs in 6th gear in anything under about 80 MPH. I took it out on the Interstate and at 75 MPH in 6th I couldn’t make it up a slight rise without lugging it with the resulting loads of vibration.
By the way, now that the front brakes have seated, they’re much, much better than they were for the first 200 miles or so. All of a sudden they have control, feel and great stopping power. I removed the “wooden brake feel” complaint from the “Dislikes” column of the GeeT-O-Meter!
Headlight Protection
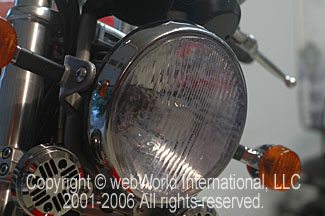
GT1000 Headlight Protection: We covered this topic before in this wBW article.
The GT1000’s headlight, including the shell and the chrome trim ring, are made from plastic. The clear headlight cover feels much thinner and cheaper than the Lexan-type headlight covers used on cars.
I can’t imagine how long it would take to order a new h/eadlight assembly from Ducati, so I figured I better try and protect this one.
Installing the 40 mil Scotchcal on this bike is easy. The headlight is 7″ in diameter. I measured a circle on a piece of the 40 mil Scotchcal, which is specifically designed to protect headlights. I used one of those cheap grade-school protractors with a Bic pen in place of the pencil.
I cut out the circle with a pair of sharp scissors (it doesn’t really have to be exactly precise) and cleaned up the lens. I put the Scotchcal in a bowl of water and heated it up in the Microwave for 2 minutes to soften it up.
I then sprayed the water, alcohol and soap mixture on the lens and pressed the Scotchcal on it. It helps to have the headlight on to warm things up. Hold the edges down and squeegee out the liquid.
You can see some foggy spots beneath the Scotchcal in the top photo.
This usually does not happen and it may either be from my 2-year old piece of Scotchcal or maybe the plastic on the lens doesn’t like the water/alcohol/soap mixture. No matter – you can only see it if you look closely and it doesn’t seem to affect the light output.
First Impressions
September 4, 2006: Labor Day – and finally some incredibly perfect riding weather! New bike owners will usually say that their latest ride is the best bike they ever owned, and I’m as guilty as anyone.
But in this case, it’s true! The honeymoon is not over — the GT1000 just gets better and better with each ride.
And especially so now that the tires are finally getting scrubbed in!
It was taking forever for the little mold nubs to wear off, so I got out a piece of 60 grit emery cloth and started rubbing away on the front. I ended up pulling each nubbie off with my fingernails….
Not sure if this helps traction, but the front tire sure looks better! I’m leaving the little black nubs on the garage floor for my wife to notice and tell me we have bugs. Then I’ll sweep ’em up and seem like a hero..
By the way, the rear brake is fantastic — most rear motorcycle brakes feel like pressing on a 2×4. This one not only has feel, it has control. The first rear motorcycle brake that is actually useful!
September 3, 2006: Tropical Storm Ernesto passed by and left a beautiful early fall day with perfect riding weather! I’m getting used to the riding position and I’ve noticed that part of the problem is that the seat cover is slippery, which causes me to slide down towards the tank when riding and especially when coming to a stop.
Also, the fuel injection has an on/off feel that makes it hard to corner smoothly in some cases. The stiff forks and the rider’s weight on the handlebars don’t help either; if it gets bumpy in a corner and the throttle hand moves just a tiny bit, the bike will surge ahead unexpectedly. Do Monster owners have the same problem?
Lowering the air pressure in the tires to the correct amount (32 PSI) helped and I may try 30 PSI just to see what happens.
The digital oil temperature readout is great — it lets me keep tabs on engine heat. It takes a couple of miles for the engine to reach a steady operating temperature, which is surprising; I thought it would warm up more quickly.
I discovered today that the fuel tank holds 3.962 gallons. Believe it or not, just as I turned a corner, about to pull in to a gas station, the LCD display flashed the “Fuel” warning and the low fuel warning light came on.
200 feet later, I was at the pump. Ducati recommends 95 octane, so I’ve been filling up with Mobil or Shell high test.
Note: wBW visitor “G.B.” writes: “The Ducati manual is stating European Grades. Euro RON rating system is different than the R+M/2 used on the US pumps. For motorcycles manufactured outside the US, the owners handbook will specify the minimum fuel octane requirement as either 92 RON (US Regular), 95 RON (US Plus), or 98 RON (US Premium.)
The octane rating system is different in the US. When this system is used, 87 (R+M/2) is called Regular, 89 (R+M/2) is called Plus and 92 (R+M/2) is called Premium. Higher grade gas can actually lessen your performance, and in worst case scenario, clog up your engine.
So, as a general rule of thumb, run the lowest grade that does not cause detonation (pinging) in your bike. This confused me quite a bit when I got my 749 as well.”
My Comments: The owner’s manual is rather confusing on this one. All it says is “Use fuel with low lead content and an original octane number of at least 95.” It does not indicate which octane rating system to use
GT1000 Tool Kit
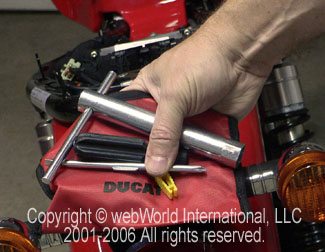
Tool Kit: Speaking of underseat storage, not much of it is taken up by this rudimentary tool kit.
This is it folks — that’s all there is!
Spark plug wrench with T-bar, plastic screwdriver handle, reversible Philips and slotted screwdriver and a yellow plastic clip, which is used for…?
UPDATE: “C.M.” wrote to tell me that the yellow thingy is a fuse remover! I’m embarrassed — I should have known that…!
GT1000 Battery
GT1000 Battery: There’s the battery, hidden way down deep, inside a nice plastic (natch) box.
Looks like the fuel tank will have to be removed to access the battery (Update: apparently the box tilts and comes out the back).
I plan on rolling up my sleeves and diving in because I want to install a semi-permanent Battery Tender harness, which will make it much easier to place the bike on and off the charger after each ride.
Stay tuned…
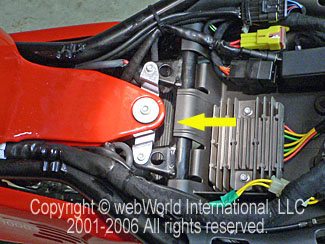
Battery Charger Harness?
Battery Charger
I learned that the dealer (Battley Cycles, Gaithersburg, Maryland) actually installs a Battery Tender harness on every bike they sell!
In any case, it’s hidden underneath the fuel tank, attached to the right-side frame with a cable tie. This photo (left) shows it after I pulled it out from behind the battery cover.
I loosened it up and pulled it over to the left-hand side of the bike, where it is perfectly situated for charging in my garage.
Swingarm Stand Part I
Swingarm (Paddock) Stand: Unfortunately, the Wheel Horse workhorse swingarm stand is too narrow to fit across the GeeT’s 180-series tire and round cross-section swingarm, even with the tabs spread as wide as possible.
I’ll have to look for a replacement, so stay tuned on this one also…
UPDATE: Here’s the Pit Bull Ducati GT1000 Swingarm Stand review.
Battery Covers
Battery Cover: The plastic battery covers aren’t really battery covers. UPDATE: See Blog entry above for September 20, 2006.
The fuel tank must be removed to access the battery and the battery is encased in a plastic housing. This may make it difficult to attach accessories.
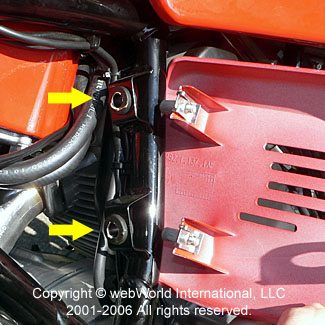
The side covers are attached with three socket head cap screws (Allen); two towards the front (left side in photo) and one in the rear.
Stay tuned…
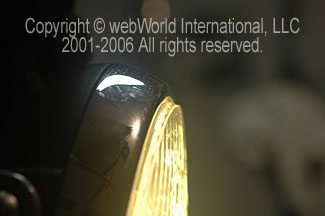
Yellow Headlight Bulb
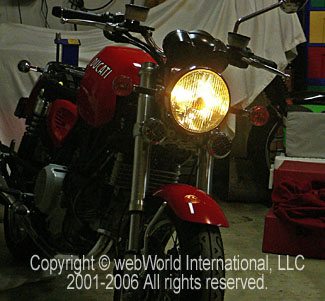
Yellow Headlight: I had an extra left over from our review and installed it in the GT1000. Why? Who knows….because it’s different?
Looks retro to me and it really works on this bike’s huge single headlight. Hopefully it will attract attention from cagers.
This is where I discovered that the entire headlight shell assembly, including the chrome trim ring AND the clear headlight itself is made from plastic. I mean come on — $10K bucks and no glass headlight??
The very rudimentary owner’s manual says there’s a single screw underneath the headlight to allow removal of the trim ring. This bike has two screws, one at 8 o’clock and one at 4 o’clock when looking directly at the headlight, back at the bike.
A plain and simple rubber gasket supposedly keeps the moisture out of the headlight shell.
Remove those Philips head screws (be careful, all the P-head screws on this bike seem to be made from butter and they strip faster than the girls in a “Gone Wild” video.
Pull the trim ring off carefully and the H4 55/60W bulb comes out normally — it’s held in by one of those single wires that’s pressed across the back. I switched it for a Nokya yellow bulb (see the wBW review) and it looks very cool and I definitely can tell that other bikers and cagers are seeing me — they’re stopping to look.
Here’s a thought: since many cars now have daylight headlights on, our motorcycle headlights are not as noticeable because they get lost in the crowd.
Maybe motorcycles only should be allowed to install very yellow bulbs, which will make us more visible? I don’t really want to install a modulator on this bike (even though it would be easy to do) because it will ruin the retro look.
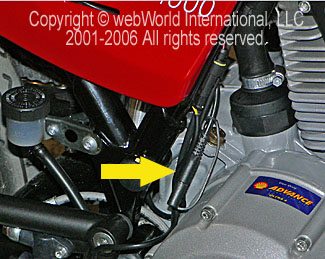
GT1000 Fuel Tank Removal
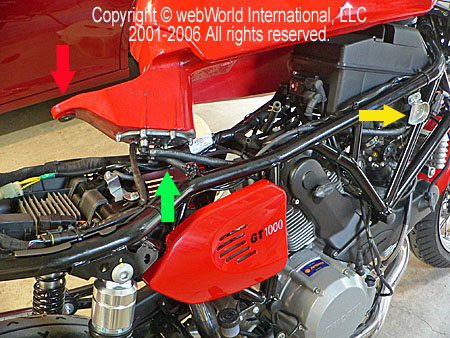
Fuel Tank Removal: I finally got up the gumption to try this. The owner’s manual has no directions, so you’re on your own.
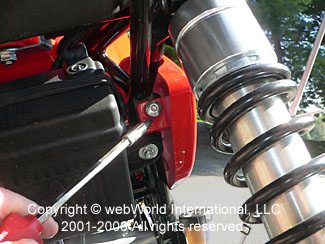
After removing the seat, unfasten the hex head cap screw (Allen, 5mm) at the back of the tank (red arrow).
The tank sits in between the frame rails and is held in front by the rubber bumpers that slide into a receptacle, one on either side of the frame (yellow arrow). There are no front bolts on the fuel tank.
There are two hoses that run up to the bottom of the tank. One is a simple fuel filler overflow (right side) and the other is a larger hose that runs to the evaporative emissions canister.
The evaporative hose has a pinch-type hose clamp that can be removed with a pair of needle nose pliers held up underneath the tank.
It’s easy to get the tank this far, but to completely remove it you would have to pull what I assume is the fuel pump (green arrow). This looks very complicated and I also assume the fuel tank would have to be drained first?
UPDATE: See the fuel line recall fix article for instructions on removing the tank.
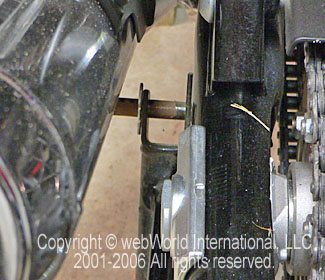
Removing the Front and Rear Reflectors
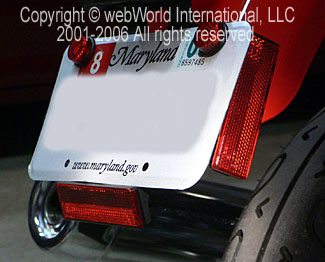
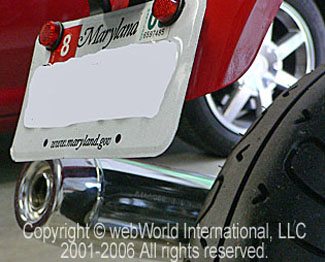
Removing Rear Reflectors: I know – this isn’t safe, but I never ride at night and it makes the bike look so much cleaner. This one’s fairly easy: remove the license plate (numbers craftily disguised in these photos).
I used a Dremel with a cutoff wheel to grind away the plastic that holds the side reflectors and the reflector on the bottom that was interfering with the license plate anyway. The plastic is soft, almost like a Nylon, so it is very easy to remove.
Be very careful not to damage the fender! And wear eye protection — the plastic bits fly everywhere!
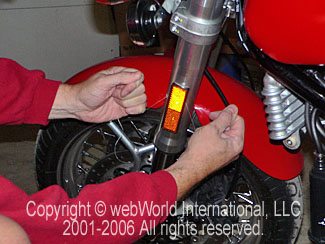
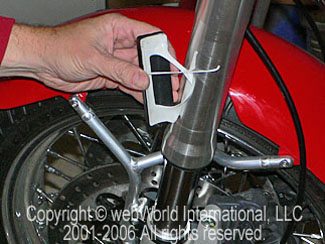
Removing Front Reflectors:: Yeah – this isn’t safe either, but I never ride at night and….ditto. These are very easy to remove.
Slide a piece of dental floss behind and saw back and forth. Once you get part of it loosened, it’s easy to pull up a corner and peel it off.
Unlike the rear reflectors, these can be saved and glued back on with double-sided tape if necessary.
By the way, get a load of that beautiful welded fender holder. They saved big bucks by installing plastic fenders and then blow it all on an incredible piece of art like that? I don’t get it…
More: GT1000 Blog Page1

I wonder if anyone still reads this blog? I stumbled upon it today and read all the boo-hoo’ing and hand-wringing about this spectacular machine. I bought mine new, off the dealer floor in 2007 and and (other than the weird gas-tank bracket fail/recall) and typical maintenance it hasn’t even ever had one single problem. It’s powerful and surefooted as a commuter bike, or pegging the spedo on the Bonneville Salt Flats (not a flake of rust). If you’re fortunate enough to own one of these beauties, count yourself lucky and enjoy every moment of it! If you’re contemplating one and you have the option – skip the windscreen, (it’s stupid AND ugly), but for sure get the Termignoni exhaust kit. You won’t regret it. Cheers!
Yes, I’ve read the blog. I’m reading it because my bike just shit off while riding the other day. I’m having a difficult time nailing down/isolating the problem.
I read it 🙂