BMW Airhead Spline Lube
An Airhead spline lube is a necessary maintenance task.
It is covered extensively in some of the online articles listed below.
It’s actually a fairly easy job, and there are several good articles (see below) that cover all the details.
I’m not sure if I’m adding anything to the general knowledge with this article.
But I took some photos when I performed a spline lube on my 1986 R65 and 1984 R100RS, and I hope these somewhat poor quality photos can help.
By the way, the 1986 R65 is a later model “monoshock” with a “single-sided” swingarm, so the procedure may be slightly different than other Airheads.
Although I have since used the same procedure on my 1984 BMW R100RS and not much is different.
In fact, I’d venture to say that the spline lube on the dual-shock R100RS is actually a bit easier; either that, or my experience with spline lubes is paying off!
The job took me about 3-4 hours the first time and less than 2 hours the second time.
If you have any comments or can add anything to this article, please let me know via email to [email protected] in case I have forgotten some steps or missed something important.
That’s why you should also refer to:
-
The wBW article Removing the Pulse-Air Injection System on a BMW Airhead
-
Lubing splines on R100GS by Dan Dunphy
-
R-bike Spline lube by Paul Kalichman
-
Lubing Transmission/Clutch Splines by Bob Fleischer, Airhead Master Mechanic Extraordinaire
Where to Buy BMW Airhead Motorcycle Spline Lube
Check Reviews & Prices on AmazonSee More: Motorcycle Accessories, Motorcycle Tire, Motorcycle Helmets
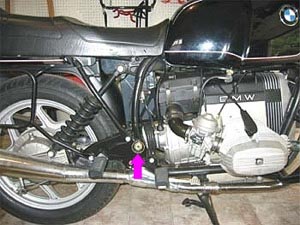
First thing I did was to pry off the two plastic covers over the swingarm nuts (pink arrow, photo left).
I wanted to make sure that the 27mm socket I owned would fit in between the nut and the frame before I started the job, otherwise it would mean a trip over to Sears to see if I could find the correct socket.
Fortunately, the 1/2″ drive 27mm socket I have worked fine without any modifications on both the ’86 and ’84, although it just barely fit the ’84.
Apparently, some BMW’s were not machined concentrically in this area, and the 27mm socket may have to be machined or ground to fit. Bob Fleischer goes into this in detail in his article listed above.
By the way, a 1-1/16″ socket will also work, because 27mm is almost exactly 1.062.
Some sockets may have too large a radius at their open edge, which may prevent enough of the socket’s “teeth” from grabbing the very thin swingarm nut. You may have to grind or machine off the end of your socket to fit.
Craftsman sockets have a (bad) reputation for having too large a radius, which helps them slip easier over a nut, but can also make them slip off just as easy in tight spots such as this.
Although most of my tools are Craftsman, and I’ve never really found this to be a problem.
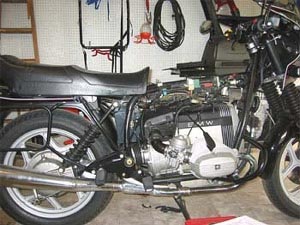
I thought perhaps I could get away without taking off the fuel tank, but that dream quickly ended.
It’s much easier to remove the airbox and to gain access to the area you’ll be focused on if you remove the tank.This goes for both model years.
Fortunately, removing the tank on most Airheads is pretty simple; on the ’86, pull off the C-shaped circlips underneath at the back of the tank, which are accessible after lifting or removing the seat.
The ’84 has a couple of thumbscrews that hold the tank on to two threaded bosses.
Disconnect the fuel lines (making sure the petcocks are off!) and the fuel overflow line from under the tank, and all you have to do is lift up the tank, one hand on the back and one on the front.
Be careful you don’t scratch the tank on either the handlebar assembly or the open seat (on the ’84).
If the tank hasn’t been off in a while, it may stick to the rubber bumpers up under the front of the tank and all of a sudden pop off and the momentum may bang the top of the tank up under the handlebars.
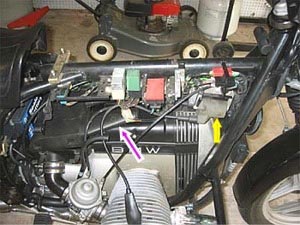
Next, remove the airbox assembly (pink/white arrow) and remove the air filter.
By the way, the yellow arrow points to the spark coil on the ’86. This is the original coil, and I didn’t notice at this time that the coil had the typical crack right down the center.
The bike became very hard to start and later on I replaced it with the newer BMW design coil and the bike starts fine now.
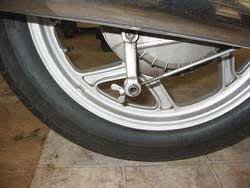
On the ’86, remove the wing nut from the rear brake adjustment rod and slide the rod out from the adjuster arm. This will allow you to slide the swingarm assembly back.
This step is necessary on this bike, a 1986 R65, which has the single-sided “mono-shock” swingarm. I didn’t have to mess with this on my ’84 RS, because it has a rear disk brake.
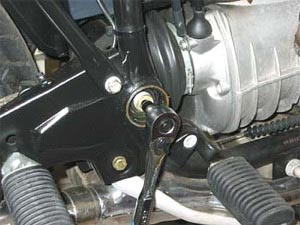
Remove the 27mm nuts from the swingarm pivot, then remove the swingarm pivot pins with a 6mm Allen wrench.
Lift the swingarm slightly to take the pressure off the pivot pins and they should slide right out towards the back of the bike.
Be careful at this point, as the swingarm is loose.
Where to Buy BMW Airhead Motorcycle Spline Lube
Check Reviews & Prices on AmazonSee More: Motorcycle Accessories, Motorcycle Tire, Motorcycle Helmets
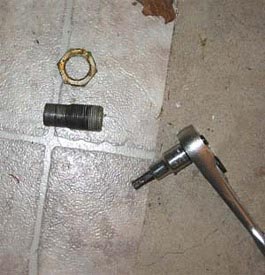
Photo of the swingarm pivot pin and 27mm nut after removal.
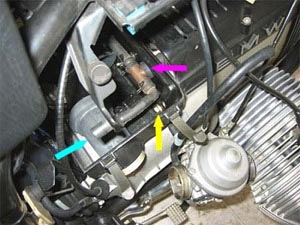
There are four bolts that hold the transmission and engine case together, two on each side, upper and lower. The upper bolts are 13mm hex bolts and are located inside the airbox.
The lower bolts are 6mm Allen; the left side bolts to a threaded hole in the engine case and the right side goes through the engine case and is held by a hex nut and washer.
The yellow arrow in this photo points to the 13mm bolt on the right top, in the airbox (right side in this photo, yellow arrow) the lower 6mm Allen is shown in the next photo.
There’s also a 13mm hex bolt in the center of airbox that must be removed; this bolt holds airbox on to the top of transmission. You’ll have to disconnect some of the tubing (turquoise and pink arrows) to get to the bolts.
Note that this bike is shown with the “pulse-air” injection system and airbox valve removed; see the wBW article on how to remove the pulse-air injection system for maintenance.
By the way, the Wiha long ball-end hex wrenches (wBW review) and the 13mm GearWrench (wBW review) box end wrench really helped access the nuts and bolts for the spline lube.
I have no connection with Wiha other than as a satisfied customer, but you should check out their tools.
The left side of the airbox also has a 13mm bolt and a 6mm Allen as its lower engine bolt.
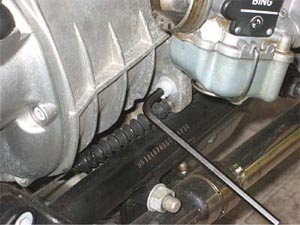
Remove this 6mm Allen bolt; this is the bottom right lower side. Note the cutaway on the cooling fin.
This bolt goes through the engine case and has a 13mm nut on the opposite end of the bolt.
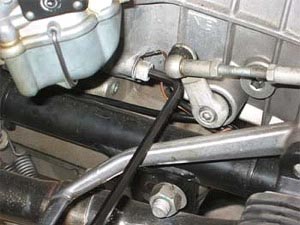
This is the left side, lower 6mm Allen bolt. The hole is threaded, so this bolt connects directly to the engine case.
Some Airhead models (like my ’84 RS) may require that you remove the bolt holding the foot rest on this side so that the shift linkage doesn’t prevent you from being able to slide the transmission back.
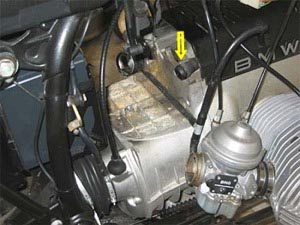
This photo shows the airbox removed. It comes out easily after the center bolt and the two top 13mm hex head bolts are removed. The yellow arrow points to a crankcase breather hose.
This hose was cracked from age, but they wanted a fortune for a new one at the BMW dealer, so I coated the old one with black silicone RTV sealant.
It has a strange bend in it and I couldn’t find a cheap replacement. Not sure if it will hold up over time, but we’ll see…
I didn’t have to remove the battery. Removing the airbox, which is much easier, gave me all the room I needed to work.
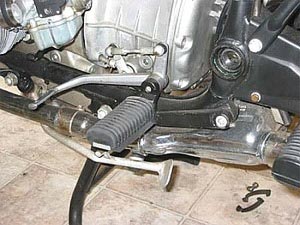
Pivot pin removed from left side of bike. Transmission to engine case bolts removed also, so the transmission is ready to slide back away from the engine case.
I had to remove the left footpeg also (8mm Allen bolt, 17mm nut) to pull the transmission back. The shift linkage also had to be removed.
The monoshock on the ’86 was in the way of removing the transmission, so I had to remove the upper bolt from the shock tower and slide the shock out of the way.
To slide the transmission back, pull in the clutch. The action of the clutch should move the transmission away from the engine case. Carefully slide the transmission back; you may have to pull on the swingarm a bit.
Be careful — there is an electrical sending unit under the transmission and you could damage it when it slides back. Don’t put any weight on it either.
Where to Buy BMW Airhead Motorcycle Spline Lube
Check Reviews & Prices on AmazonSee More: Motorcycle Accessories, Motorcycle Tire, Motorcycle Helmets
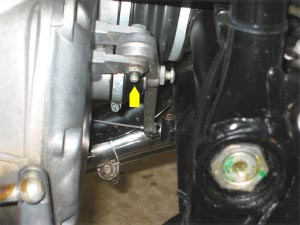
I had to remove the clutch actuator rod on the ’84 to have enough room to slide the transmission back. This is easy to do: slide the clutch cable off the bottom (you can just see it below the yellow arrow in about the center of the frame).
Take off the bolt and washer and slide out the bolt, and the actuator comes right off.
This gives you some room to clean everything up in back of the transmission while you have the actuator off. I put a dab of moly lube on the bolt before I re-installed the actuator rod.
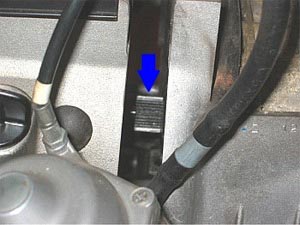
Here’s a photo of the spline. Use an old toothbrush to clean it off with some contact cleaner, brake cleaner or other quick evaporating spray cleaner.
Be careful not to get the old dirt and goo sprayed all over the clutch and other areas; you may want to put a couple of rags in there to protect the clutch.
Take a tiny bit of moly grease and coat this spline with an old toothbrush or cut off paint brush. I used Honda’s Moly 60 paste (here’s a source where you can purchase a 3 oz. tube for about 8 bucks), but there are plenty of good ones on the market.
I wouldn’t get too uptight about what type to use; unlike a K-bike, this job is easy enough and only takes a couple of hours at most, so you can get in there much more often than on a K to check the wear and lube it properly.
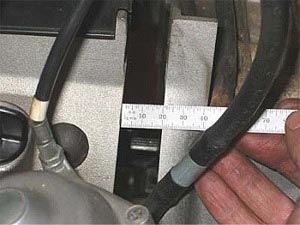
I was only able to pull the transmission back from the engine case about 20mm on either bike (about 3/4″), but that gave me enough room to do the job.
Installation is reverse of this procedure. Squeeze the clutch back and forth as you’re sliding the transmission back on over the spline; this will help to ensure everything is lined up.
You’ll need to “balance” the swingarm between both sides of the frame. The procedure for this is fairly well described in the Clymer Airhead manual, but basically the swingarm has to be centered between each side of the frame.
I used a Vernier calipers to measure this. It’s a procedure that calls for patience. As you tighten one side’s swingarm pivot pin, the swingarm moves the other side.
You have to go back and forth until you get the correct distance, but remember that when you torque the pivot pin and put on the 27mm Allen nut, you may throw things out of whack.
I never was 100% sure I got this right, but the bike doesn’t seem to mind. Make sure you re-torque the swingarm locknuts to the correct torque — I forgot to do this on one side and had the nut back all the way off while riding, not a pleasant experience!
Lubing the splines on the ’86 has made a big difference in the way it shifts — it really shifts beautifully and the transmission seems like it “snicks” right into gear.
The ’84 must have had a spline lube done by the previous owner, because I could still see the lube on the splines.
▪ Motorcycle Product Reviews
▪ Maintenance and Repair Articles
Where to Buy BMW Airhead Motorcycle Spline Lube
Check Reviews & Prices on AmazonSee More: Motorcycle Accessories, Motorcycle Tire, Motorcycle Helmets
Owner Comments and Feedback
See details on submitting comments.
From “D.H.” (4/09): “I had been dreading this maintenance project since I got my 1972 R60/5 last summer.
I already had the airbox off the bike waiting for a new battery to be delivered, so with a printout of your web page in hand I thought I’d give it a shot.
IT WAS EASY! My only snafu was that one of the swingarm pivot bolts didn’t seem to want to go back where it came from (it felt like it was starting to cross thread when I got a couple of turns in).
I tried the left bolt in the right and vice versa and that seemed to work out okay. Thanks for the step by step guide.”
Editor’s Reply: Glad we could help. I suggest checking the swingarm bolts after riding 100-200 miles just to make sure everything is OK.
The right bolt on my R65 came loose and only the plastic cap held it on, the handling got pretty scary there for a minute until I figured it out! So always re-check the swingarm bolts a second time after adjusting them.
From “SLB” (2/09): “I brought home my first BMW just before the new year. It’s a 1987 R80RT. I’ve been on bikes – Honda, Suzuki, and mostly Yamaha – since 1969. This boxer had 50k miles on it, I’m the 5th owner.
All fluids were changed just before I bought it, but there was no mention of the clutch splines having been lubricated.
I searched several sites and found yours to be the clearest and easiest to follow. I tackled my splines today – having bought the Honda 60 moly grease and the right tools – and it took me about 3 hours.
I must say – BMWs are different from Yamahas 🙂
Many thanks for your clear instructions and pictures. You made this job much more reachable for this rookie airhead.”
From “R.M.”: “I followed your article on doing a spline lube for my own BMW 1986 R65 monoshock. I found your article to be informative, easy to follow and the photos a great help (they made the difference!).
It only took me a few hours to do, even with going about some of the things the wrong way.
I carried out a spline lube because I found the gears were often hard to shift without experiencing a considerable clunk and grate of gears, particularly shifting down from 3rd to 2nd and from 2nd to 1st.
Getting the ‘right revs’ helped but not always. I found doing the spline lube helped particularly in the other gears, making the shifts silky smooth, but still had problems with the 2nd and 1st gears as described above.
What I have discovered since (at least 6 weeks later) is that I didn’t have the clutch properly adjusted.
I was looking over my R65 owners manual (as came with the bike when new) and it described how to adjust the clutch (i.e. adjusting the cable AND adjusting the locknut at rear of clutch housing to give clutch lever free play), whereas previously I had been adjusting just via the cable lever adjust nuts.
It in fact has made a considerable difference to the above problem and all gears now shift very well indeed. I know it (the correct way to adjust the clutch) may seem an obvious thing to do but it wasn’t for me.
I can’t for example find any reference to how to adjust the clutch in my Clymer workshop manual which I guess one could expect to. Adjusting the clutch in the correct manner might be something useful to add to your article sometime.
Re getting the correct spacing either side of the swing arm pivot pin; in the absence of calipers, I tried different combination of feeler gauge blades until they seemed the same both sides and then used them when tightening the lock nuts. This proved to work very simple way of doing it.
Again thanks for a well done article and the time you put into it, It has been a real help.”
Other WebBikeWorld Accessory Posts


No Comment