An Electrochromic Visor System for Motorcycle Helmets
An electrochromic visor changes color or tint when electricity is applied.
This is different than a photochromic visor, which changes tint when exposed to UV light.
We’ve been reviewing both of these technologies since 2008 and the AMI Powersports “Akari” AX12 electrochromic visor is the latest evolution.
The AX12 uses a liquid crystal display (LCD); more about that in the details.
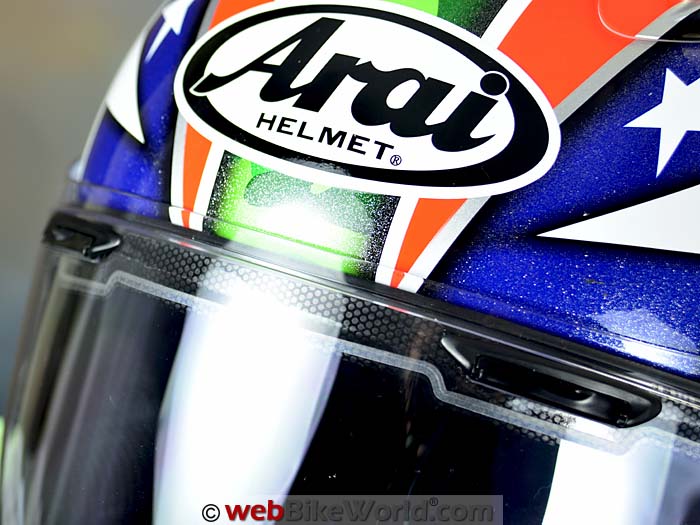
The AX12 comes in a generic form that will fit most face shields and an Arai version for the special Arai face shield with brow vents.
Installation is easy and the kit comes with detailed instructions.
Once installed, the AX12 is easy to operate via the on/off switch that must be attached to the outside of the face shield.
The switch has a USB port to recharge the battery that powers the system.
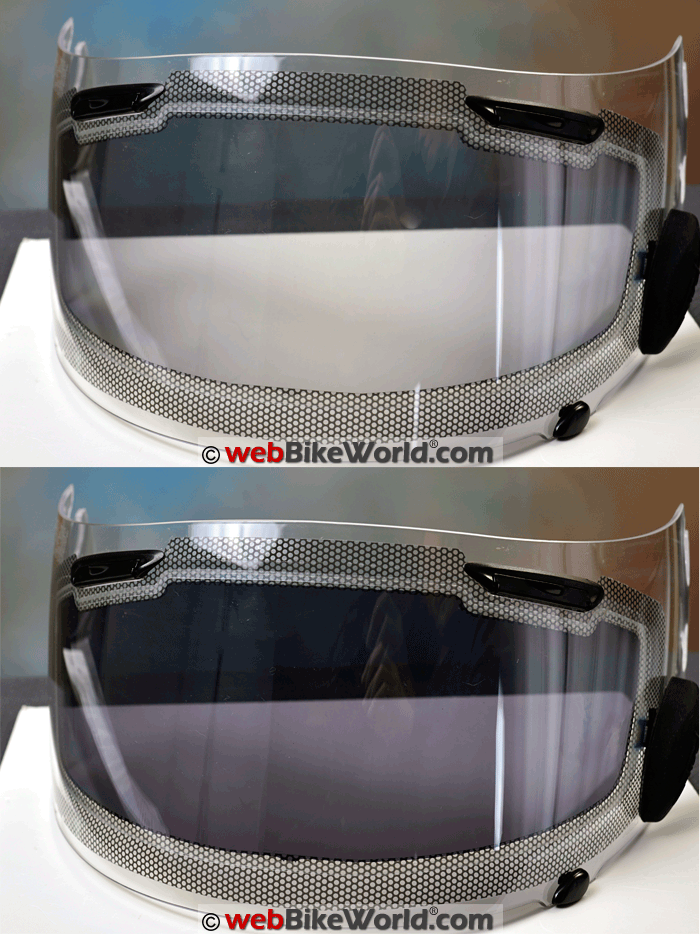
Something to note with photochromic or electrochromic visors or inserts is that they’re not perfectly clear when off and not dark enough when on.
The AX12 is no exception.
But the AX12 may be a safer option than a built-in rotating sun shade, which typically takes up critical crush space in the top of the helmet and can reduce impact protection in that area.
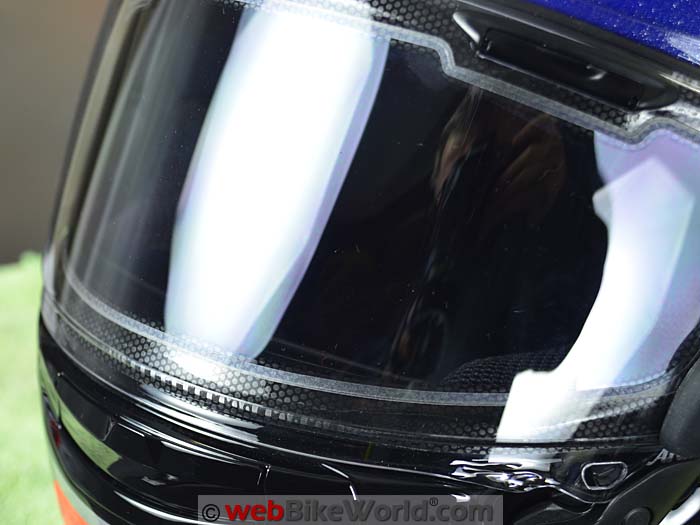
The AX12 also has a wide border that affects the line of sight and may also interfere with the seal of the eye port gasket on some helmets.
Overall, the Akari AX12 is an interesting — albeit expensive — option for motorcycle helmet visor tinting that may be a good solution for some helmets.
Where to Buy AMI Powersports Akari AX12
See More Motorcycle Helmets at RevZilla and Amazon
Background
We have been following the evolution of photochromic and electrochromic visors, face shields and inserts for motorcycle helmets since 2005.
You can read all of our motorcycle visor reviews, anti-fog treatment reviews and more here.
The AMI Powersports Akari AX12 is the most recent evolution of this technology. It’s related to thee-Tint AX9 Photochromic Visor (Preview) at the 2011 Dealer Powersports Expo in Indianapolis.
At the time, a company rep said they would send one for a review, but I never heard from them again. I figured it was another product that couldn’t quite make it to market.
So here it is 5 years later and apparently the AX9 is now the AX12. They look similar, but the AX12 has a wide border compared to the narrower but thicker edging of the AX9.
The AX12 is available in a generic size that should fit most helmets and a version with the eye brow cutouts for Arai helmets. Other than that, versions appear identical.
Here’s more on the AX12 from the AMI Powersports specifications:
“The e-Tint technology relies primarily on a liquid crystal system. A mixture of dyes in a liquid crystal host is sandwiched between two curved flexible plastic substrates coated with transparent electrodes.
By applying voltage to the substrates, the electro-optic response of the liquid crystal is used to control the tint of the insert.”
AMI Powersports states that their system “consumes less power and is faster in switching from light to dark and vice versa.
Furthermore, electrochromic technology works via an electrochemical reaction and thus, is susceptible to degradation over time.
The liquid crystal system is a system where the orientation and arrangement of the molecules are physically changed with the application of a small voltage (8 volts) and should provide a more robust system vs. chemical reactions.”
Electrochromic and Photochromic Visor Insert Pros and Cons
With many of today’s DOT rated helmets now featuring an internal sun visor, why do you need an electrochromic visor insert?
Good question!
Many motorcyclists are concerned about the potential reduction in the “crush zone” of a helmet with a cavity that contains the internal sun visor.
This is why — as far as I know — there are no Snell certified helmets with an internal sun shade — the helmets can’t meet the standard.
This is also why Arai went to an external sun shade system with the surprisingly effective (but kind of goofy-looking) Arai Pro Shade (review). It attaches on the outside of the helmet, so there’s no effect on helmet protection.
This allows most Arai helmets to meet both the DOT safety standard in the U.S. and pass the tests for a Snell certification.
But if you don’t own an Arai with a Pro Shade and you’re worried about the reduction in impact protection from an internal sun visor, there’s another way of getting some relief from ol’ Sol. The AX12 electrochromic visor insert!
Sun Shade Alternatives
There are a few other alternatives for glare reduction. For example, there’s a photochromic visor that changes tint when hit by UV light.
But each photochromic face shield must be made for a specific helmet, like the Transitions face shield that comes with the Bell Qualifier DLX (review). This is a very expensive option for the manufacturer, which is why photochromic face shields aren’t very common.
And there’s another problem with a photochromic visor.
On a day with even a minimal amount of sun, the visor turns dark as soon as you step outside and doesn’t change back until night. So you may as well just buy a dark smoke tinted spare face shield instead.
Then there are a few “poor man” solutions, like the el Cheapo Visor Sun Blocker (review) I’ve been using for many years. Or you can just buy sunglasses (or sunglass clip-ons), like the Randolph Engineering Aviator sunglasses with straight temples (review).
The straight temples on the Aviator sunglasses have been specifically designed to fit inside helmet.
Let’s see…there’s also the Sunax Max Sun Shield (review) for Arai and other helmets. It comes in a selection of tints and slips between the headliner and EPS at the top of the eye port of most helmets.
The “switchable” on/off electric-powered visor insert has a lot of promise, however. Press a button and it’s instant on; press again and it’s instant off. More or less.
The problem is that the technology still isn’t quite there yet.
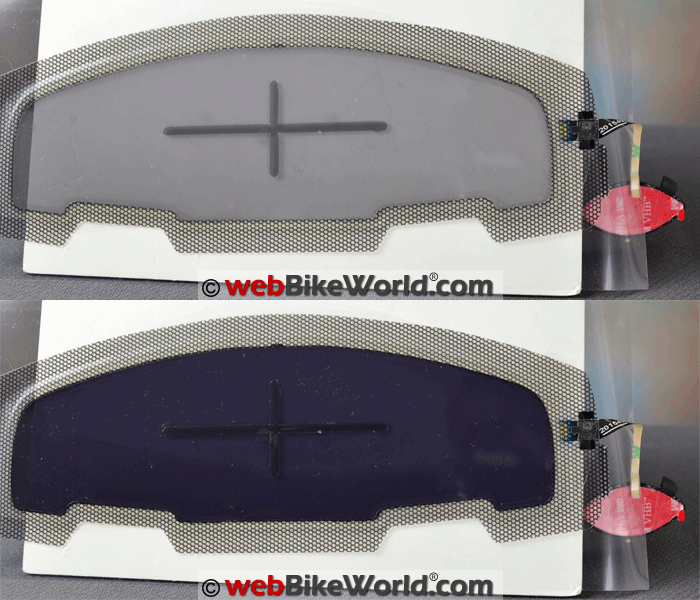
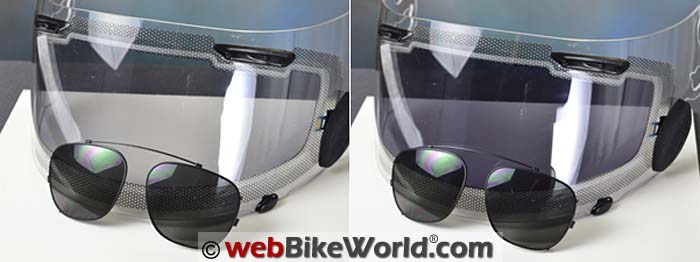
For example, when it’s off, the AX12 isn’t clear, it’s lightly tinted. And when it’s on, it isn’t as dark as even an internal sun shade (and many owners complain that the sun shades aren’t dark enough because the light transmission is limited by law).
AMI states the light transmission as 20% when the AX12 is activated and 60% when it’s off.
The AX12 still works pretty nicely, the light tint when it’s off is fine and the medium-dark tint when it’s on helps. But I wish it got darker.
When “they” can invent an electrochromic insert that is perfectly clear at rest and really dark when on, we’ll be golden.
One other advantage of the AX12, however, is that it’s also as good at anti-fog-proofing your face shield as a Pinlock. On a couple of cool and damp mornings recently, I couldn’t get it to fog even when I tried.
Where to Buy AMI Powersports Akari AX12
See More Motorcycle Helmets at RevZilla and Amazon
In the Kit
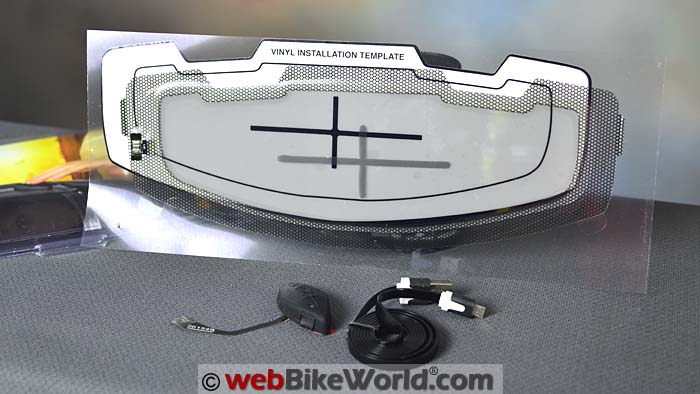
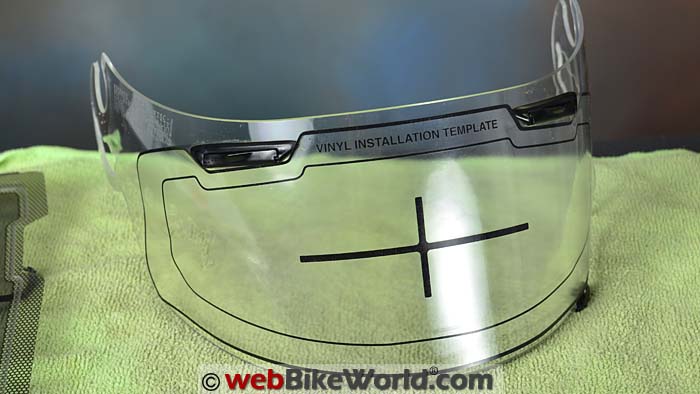
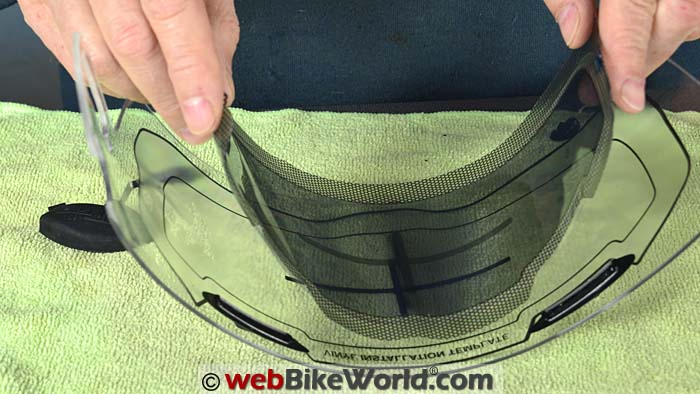
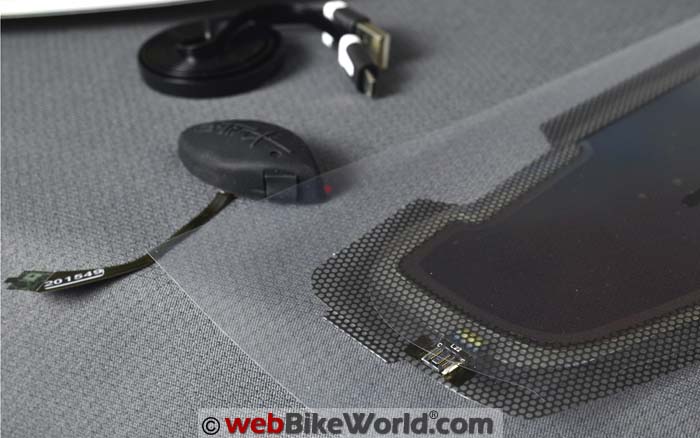
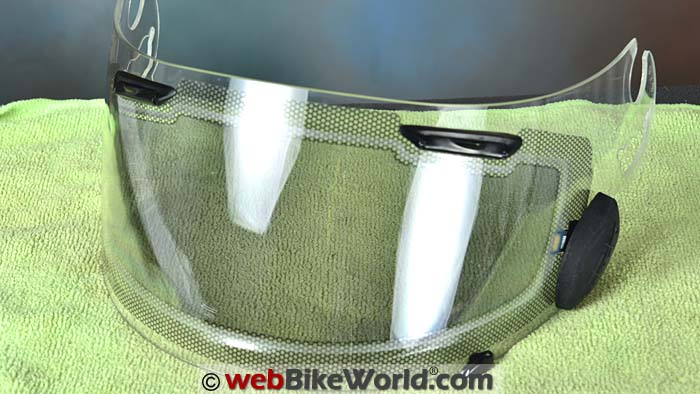
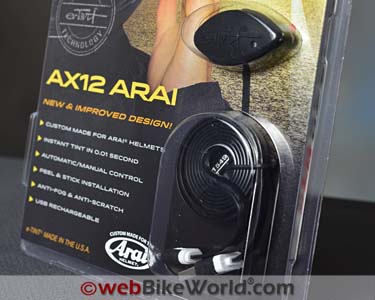
The AX12 kit comes with the LCD insert and a battery pack/on-off switch. Also included is a temporary-use stick-on template for the outside of the face shield that serves to align the AX12 insert (which is applied to the inside of the face shield).
The battery in the on/off switch is rechargeable and the kit comes with a USB cable. And a comprehensive installation guide is also included, printed in several languages.
The AX12 insert has clear poly backing on both sides. AMI Powersports doesn’t have an installation video on their website, but we made a simple video (below) that briefly illustrates the general installation procedure.
Installing the AX12
Installing the AX12 is fairly easy. First, clean the helmet face shield inside and out. This is best accomplished by removing the face shield first.
Next, align the template with the big printed crosshair on the outside of the face shield. This serves to align the AX12, which is attached to the inside.
Flip the face shield over and peel the backing from the front of the AX12. Then bend it using both hands and slowly lower it on to the back of the face shield, lining up the marks.
Press the glue surface to attach the AX12 to the face shield, then peel away the inside backing.
Carefully attach the on/off switch by pressing the tiny connector to the matching connector on the AX12. The on/off switch has double-sided tape; pull off the backing and attach it to the outside of the face shield.
Again, this is all illustrated in our video below.
AX12 Notes
One thing you may have noticed is that the AX12 has a wide border or masking around the outer edge. The border holds the glue that keeps the AX12 insert in place on the back of the face shield.
The border has a sort of cross-hatched or checkerboard pattern and this is definitely visible all around the perimeter when you’re wearing the helmet.
I’m not sure why they didn’t make it clear or narrower, although there would still always be a transition between the electrochromic part and the face shield.
You sort of get used to it when riding, but it’s a disadvantage, in my opinion.
By the way, we did have a small issue also when mounting the AX12 on one of the new type of Arai face shields — the type used on the new Arai Corsair X (review). This face shield has a different molding, I think to accommodate tear-offs, since it’s a racing helmet.
You can see this in the video, but towards the end we removed the AX12 and the on/off switch (although AMI Powersports does not recommend the latter) and re-installed it on a standard Arai face shield from the Arai RX-Q (review).
That worked a lot better; i.e., the AX12 was easier to install with no problem sticking to the standard Arai face shield.
And one more thing: that wide masking around the AX12 can interfere with the seal between the face shield and the eye port gasket. I wonder how long it will take before the masking starts to wear or tears.
The glue used on the masking isn’t very strong, so it also seems possible that air or moisture will leak between the AX12 and the face shield, possibly causing fogging at some point as the AX12 seal wears.
Be sure to install the battery pack correctly, with the USB port facing down. Since the little rubber plug that hopefully keeps the USB port waterproof is difficult to get sealed, this may be a problem in the rain.
Also, the on/off switch has an automatic mode. When the switch is put in auto mode, a light sensor on the outside turns the AX12 on and off, depending on ambient light (this is illustrated in our video).
We found that it doesn’t work consistently, so we just use the on/off switch instead, which is fine
Where to Buy AMI Powersports Akari AX12
See More Motorcycle Helmets at RevZilla and Amazon
Battery and Charging
AMI said the battery takes about 2 hours to charge. Apparently, the battery is fully charged when it’s added to the AX12 kit.
The first thing we did when the kit arrived was to connect the battery to a USB cell phone charger, but there’s no charging status, battery life or indication light on the battery pack/on-off switch.
The only way you’ll know is by first installing your AX12 and the battery pack on a face shield. The AX12 insert will activate when the battery is being charged and deactivate when charging is complete — that’s your only indicator.
AMI claims about 40 hours of battery life when the AX12 is activated and this will vary, depending on how much you use the system.
The battery storage time is listed at an average of 3 weeks. AMI claims 500 charge cycles to retain 80% + of the battery capacity.
The operating range is 14 to 113°F (-10 to 45° C) and the AX12 can be charged in a temperature range of 32 to 113° F (0 to 45° C).
On the Road with the AX12
The AX12 works seamlessly when you’re riding and the on/off button is easy to find and use. And the system really does instantly turn on or off when you press the button.
The promise of instant on/off tinting is definitely enticing and one can imagine that (hopefully) in the near future, the entire face shield would be a solar-powered on/off electrochromic device.
Wouldn’t that be sweet?
Meantime, if you can get past a few of the quirks of using the AX12, it works pretty well and it does offer some relief from glare.
The AX12 doesn’t really help all that much when you’re heading directly into the sun, like when you’re riding west in the late afternoon. For that, you’ll need the Sunax Sun Shield or a strip of electrical tape across the top of the face shield.
Besides the reduction in visibility caused by the border around the AX12 insert, there’s also the fact that the AX12 isn’t completely clear when it’s turned off and it could be much darker when it’s on.
Cost
The AMI Powersports Akari AX12 has a list price of $129.99. The Arai Pro Shade, as an example, has a list price of $100.95. Both of those prices seem rather expensive, considering there are a few much cheaper alternatives.
Conclusion
The AMI Powersports Akari AX12 electrochromic visor insert holds a lot of promise. It works well, although the implementation does seem a bit off, with that wide masking around the edge of the insert and the tint issue in the on and off modes, as noted above.
The cost is significant but if you can get over that and the various quirks, the Pro Shade is a worthwhile option, at least to experiment with.
Where to Buy AMI Powersports Akari AX12
See More Motorcycle Helmets at RevZilla and Amazon
Owner Comments and Feedback
See details on submitting comments.
From “M.H.” (May 2016): “In your review you didn’t mention the automatic mode where the shield will automatically turn on/off as needed. While riding directly into a late afternoon sun is a challenge, I ride where we go from shade to sunlight in seconds.
Having a shield that can change instantly, literally in the blink of an eye, is welcomed.
Otherwise a normal tinted shield would provide not enough light in the shady areas. I have had the AXI shield for four years now with my first one replaced free under warranty. I find it much better than carrying spare shields and it is wonderful in my normal riding environment.
A person riding in the “wide open spaces” would probably be better with a fixed shield.”
Editor’s Reply: We did mention the automatic function in the review and this feature is also illustrated in the video.
From “S.S.” (May 2016): “This shield reminds me of those self-darkening eyeglass lenses that were first available in the 70’s: they were never light enough for indoor use, and were similarly never dark enough for bright sun.
I also purchased one of the Arai Pro Shades for my Vector 2, and find it to be a poorly executed and overly priced accessory.
My tinted section flipped down on its own at random times, and required some judicious knife work to expand the engagement slot to work properly. It was also a pain to keep clean, and the brow vents were so sloppy that I was constantly getting sand and other dust in my eyes.
The only positive attribute was when the shade was in the up position, as it did function as a bit of a brim to keep some sun off the shield. Otherwise, it didn’t work for me.
I also agree with the Pinlock comments. I have two other shields for my Arai, one with Pinlock and one without.
The clear shield gets used all of the time except when fog or rain is an issue, and then I endure the distortion of the Pinlock to salvage some visibility. Generally I do not ride at night in wet weather unless I absolutely have no choice, and then the halo effect of the Pinlock is most noticeable.
My standard set up is to wear my Drivewear high contrast prescription lenses, or my very dark polarized prescription sunglasses for extremely sunny days under whichever shield is appropriate for the weather.
This works very well for me, although the effect of the polarized lenses sometimes does weird things to tar snakes and other surfaces.
Overall, however, I think my field of view and acuity is probably much better than what this electronic shield would deliver for me.
Finally, you once mentioned a scientist from, I believe, Montreal (McGill?) who was working on a permanent fog treatment for visors that looked very promising. Did anything ever come of this? Thanks as always for a great site!”
Rick’s Reply: I need to follow up with the company that makes the RIA permanent anti-fog coating (report), have not heard anything since that article was posted.
From “D.M.” (May 2016): “I enjoyed your review, as always. This product looks like a not-very-good answer in a desperate search for a question. A face shield with BATTERIES? Maybe I’m a Luddite, but why do face shields need to get more complicated–and expensive?
The ubiquitous Pinlock puzzles me, as well. It makes the face shield more complicated, less easy to see through (isn’t that their main purpose?), more difficult to clean, and, or course more expensive.
Every new high-end helmet seems to come with the Pinlock lens, but how many riders actually USE them?
I’m a fan of the Arai Pro-Shade system, as you know, but with more use, the disadvantages never go away: The dark shade, with its peculiar cut-outs for the brow vents, introduces a lot of extraneous reflections.
It is fussy and somewhat complicated to remove the dark shade from the clear shade in order to properly clean both.
And, of course, the clear shield incorporates the distracting contours to fit the (unused, at least by me) Pinlock lens.
For me, the Pro-Shade is still the best compromise, but far from perfect. I wish Arai would come up with something better.
Let’s remember “On Any Sunday,” and the dirt helmets with the rear view mirrors incorporated into the visors. That turned out to be an evolutionary dead end, but was probably a better idea than a distracting, ineffective, electric shield with limited battery life. Just my opinion, of course.”


No Comment