Talon T-2200 Motorcycle Alarm
The Talon T-2200 alarm system could very well provide that “edge” needed as a theft deterrent.
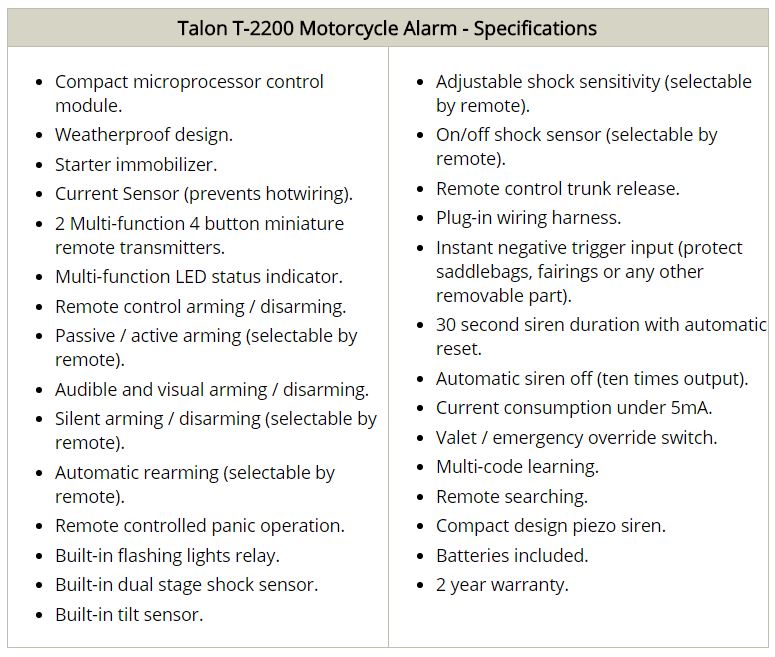
In the field of alarm systems costing under $200 it is very competitively priced, costing less than many of the other systems offering fewer options.
Imagine this: you’re on the way home from a 15 day, 6,300 mile “tour of a lifetime” across the U.S.A.
After a good night’s rest in a motel you head out to your bike for a routine pre-ride inspection, and all you find is an empty parking spot.
Fiction? No.
This actually happened to a fellow I met on a trip out west last September. Imagine his panic when he discovered that his brand new ’05 Ducati ST3 was missing!
Fortunately, in this case, the bike was later found behind a shed not far from the parking lot.
Some wiring had been cut cut, the lock was jimmied and there was some cosmetic damage, but at least it was all there.
The end result? The bike was towed to the nearest Ducati dealer, but he had to fly home and then fly back several weeks later to retrieve it. Lots of heartache, but at least he got his bike back!
This disaster might possibly have been avoided if the bike had been equipped with a motion activated alarm system.
Perhaps the wannabe thieves would have left it alone, especially after noticing the alarm system’s flashing LED, warning them “Don’t touch me!”
Or perhaps they would have thought twice about it as soon as the bike was moved, triggering the alarm.
Motorcycle alarm systems are sometimes installed as standard (or optional) equipment on a few bikes, but the majority have no protection other than a steering lock.
Some, like that Ducati, come with computer chips built into the key (actually a type of low frequency RFID system), a feature commonly found in automobiles.
But this only prevents someone from starting the motor, and they could still simply pick up the bike and make off with it.
Where to Buy Talon T-2200 Motorcycle Alarm
See More: Motorcycle Horn, Motorcycle Lights, Motorcycle Accessories
The Talon T-2200 Motorcycle Alarm
This is where an alarm system, such as this version from Talon Motorcycle Alarm Systems, might save you from a similar fate.
Talon has been in business for about 2 years now, growing out of a personal need by its owner, Brad Vansickle.
Brad had purchased an alarm from an online auction but found that it left much to be desired.
So he decided he would source out some quality components and then put together his own system that would meet both his needs and that of other riders.
As with any start-up business, it hasn’t been all fun, but the hard work is starting to pay off.
The first system, the Komodo 2.0, has helped him develop a following among motorcyclists.
The product’s success has allowed Brad to create a GPS location system, and he’s also been working on an alarm with a paging system, which is a complex project because it requires meeting the radio frequency certifications of other countries.
In the meantime, Talon also has their model T-2200, the subject of this review. The T-2200 is a one-way alarm system, available now for the 2006 riding season.
On the surface it looks like a basic alarm, but it comes with standard equipment that is either not available or is optional at additional cost on competing motorcycle alarm systems.
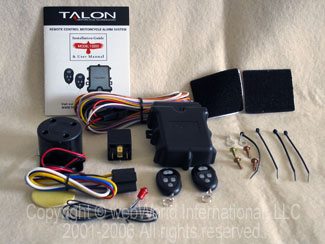
Included in the Talon T-2200 motorcycle alarm system are two compact, keychain sized remotes; an immobilizer; an LED alarm status indicator; a negative trigger input for protecting saddlebags, fairings or any removable parts; and a remote trunk release feature.
Also in the works is a factory plug-in kit which should make connections to the bike’s harness even easier.
Talon’s website is continually updated with information to provide specific wiring instructions for individual bikes/models.
Brad was kind enough to send me the specific instructions and a color wiring diagram for my son’s 2004 Suzuki GSX-R 600, which also includes the specific wire colors for that bike.
Since the “Gixxer” is an ideal target for theft, I felt it would be a good test mule for the T-2200 system. And with a snowstorm arriving for the weekend it was also the perfect time to tackle the install in my heated garage.
Installing the Talon T-2200 Motorcycle Alarm System
After laying out all of the parts and reviewing the instructions, we removed both side fairings and the seat-tail section. We also removed the headlamp assembly, but we probably could have left it in place.
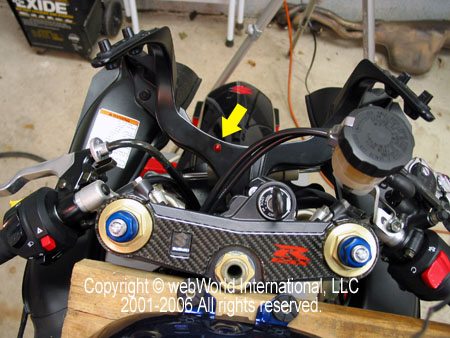
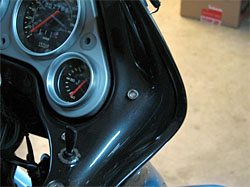
After much discussion, we opted to mount the LED alarm status indicator in the aluminum frame member that supports the headlamp assembly and dash panel (see yellow arrow, photo below).
We wanted a location where it would be visible to anyone that might have a notion to disturb the bike and to easily check the alarm status.
Installation instructions for the LED specified a 5/16″ hole with ¾” clearance behind the hole.
Either my drill bit is on the large side or the LED is a wee bit smaller than 5/16″, but we ended up with a very loose fit.
This was remedied with a piece of shrink-wrap around the base of the LED and by gently dimpling the inside surface with a center-punch.
This was the only complication encountered with the instructions.
(Drilling Notes: When drilling a hole by hand, first use a center punch to create a guide for the drill tip. Make sure the drill bit is perfectly ground and sharp.
Use small diameter drill bits first to create a pilot hole.
You may find that a drill bit slightly undersize will create the correct sized hole because drilling with a hand drill often creates wobble, which will result in a larger diameter hole than expected).
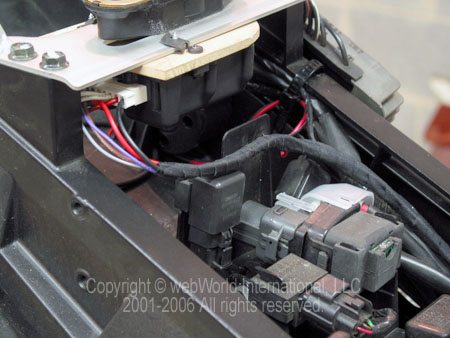
The next step was confirming the wires that would be needed for the turn signals and tail light, along with a place for mounting the siren and control unit.
All of this was easily done right in the tail section of the bike, since the wiring for both rear turn signals and the tail light are right there, and all of the wire colors were as indicated by the instructions.
Where to Buy Talon T-2200 Motorcycle Alarm
See More: Motorcycle Horn, Motorcycle Lights, Motorcycle Accessories
Mounting the Siren
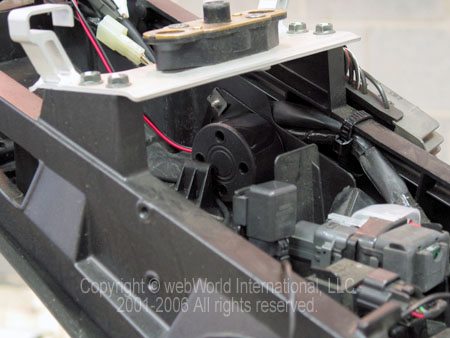
The siren was mounted on the left inside panel of the storage compartment with a screw from the outside and a clip for it to thread into (see photo below).
This had the benefit of keeping it away from water and debris.
We didn’t have to worry as much about having it pointed down to ensure drainage, and there’s no way someone can clip the wiring to it and thus silence the siren.
Since the sensor control unit should be kept away from heat sources, I had hopes of mounting it under the pillion seat brace, but wasn’t going to commit to that location until we could determine it would provide adequate response to movement.
Brad had suggested wiring things up first and then playing with different locations and orientations to find the best set-up. This we did by simply using wire nuts to temporarily make connections to components.
We had wires hanging everywhere, but it gave us the ability to move the sensor around. We found it would work fine mounted where we had planned, with the flat surface facing up and the connector to the right side of the bike.
Mounting the Sensor
The sensor did not seem to respond well when mounted in a vertical plane.
With the system armed and the sensitivity set at its middle setting, it would sound just before the bike was straight up after raising it off the side stand.
The brace I had in mind for mounting the sensor was a bit too narrow.
We resolved this by fabricating a small plate out of some 3/16″ wood and securing it to the brace with screws into clips. These clips are commonly used in automobile interiors and I usually have a few on hand.
Instead of using the supplied “hook and loop” material we opted to secure the sensor to the adapter plate with two machine screws and nuts, along with a drop of thread locker to keep them from coming loose.
Next was figuring out where to mount the immobilizer relay that would interrupt the starter solenoid circuit and where to make the connections into that circuit.
The relay fit nicely just behind the battery secured to the base of the compartment.
I’m not one for cutting harness wires, so after raising the fuel tank far enough to slip a 2″x4″ under each end (without disconnecting anything) we found the stock connector to the starter solenoid.
I simply opened it and used one male and one female connector soldered onto the immobilizer relay harness to make my connections. The only other connections necessary were to the battery positive and ground.
Wiring Issues
All of the wiring for the T-2200 had more than ample length except for the two leads going from the immobilizer relay to the starter solenoid and the one to the LED. I had to lengthen these by about 12″ each.
Now that the operation of the alarm system was confirmed and all of the mounting locations were determined, we decided to cut the wires to length rather than bundle up the excess.
We also eliminated any wires we wouldn’t be using, one of which can be used to remotely open a trunk latch, if you have such as option, or even actuate some accent lighting as you approach the bike in the dark. That could look pretty cool…
The other wire we wouldn’t be using can be used for an optional trigger input. I have to admit this one had me puzzled.
Brad explained to me that by using a simple two part magnetic-type switch, similar to the ones seen on doors in a building, this input can be used to protect luggage compartments, seats and even fairings.
I may look into rigging something up for the rider’s seat, so if someone were to remove the seat to access the battery, it would set off the alarm. Another use would be to connect a perimeter sensor (not yet available directly from Talon).
The unused wires are simple to eliminate by removing the connector at the control unit, pressing in the barb on the pin socket and withdrawing it from the connector.
Rather than rely on the motorcycle frame as a ground for the LED and siren using the supplied screws into the frame, my son and I ran a ground wire directly from the LED and siren to the battery, ensuring a secure ground.
Scotch locks were used to tap into the tail light for the 12-Volt “key on” signal and both turn signal circuits for actuation of the turn signals front and rear.
The turn signals provide a visual confirmation of locking and unlocking and are actuated when the alarm is set off.
All other connections were soldered and shrink-wrapped.
With the wires trimmed to length they were wrapped together (where possible) with a cloth type electrical tape. The type I used is made in Germany and is tough as nails.
The wires were routed along the stock harness to eliminate being obvious or easily accessed by others.
Where to Buy Talon T-2200 Motorcycle Alarm
See More: Motorcycle Horn, Motorcycle Lights, Motorcycle Accessories
Alarm Sensitivity
With the bike fully reassembled, we started playing around with the options and the sensitivity settings. Whenever the Talon T-2200 motorcycle alarm is armed or disarmed, it flashes the turn-signals and chirps the siren.
It’s also possible to do this without the siren sounding (silent mode) with the press of a button.
There is a whole list of optional ways to operate or set up the system. I’m surprised my wife didn’t come out and give us the third degree about playing around with the alarm. It’s LOUD!
At its highest sensitivity we could barely sit on or bump the bike without the Talon T-2200 responding with the two “warn-away” chirps.
When raised up off the side stand, it went into its full alarm mode: siren wailing away and the turn-signals flashing. That’s sure to get someone’s attention!
There’s also a “panic” feature should you need to draw attention during an emergency situation. My only disappointment was with the LED. It seemed a bit on the dim side (Editor’s Note: see below for a work-around).
An improvement would be to make the LED brighter or bigger. This would help catch a would-be thief’s eye and hopefully make him take a pass on messing with the bike.
Conclusion
I’m very pleased with how well the Talon T-2200 alarm is made and how the system operates. It’s compact, fairly simple to install (depending on your bike and available space), comes with two remotes and batteries.
It can be adjusted for sensitivity to personal preferences.
The two additional operational circuits are an added bonus.
With motorcycle theft rates reportedly climbing by as much as 55% and as many as 17 stolen in a single month in a major Florida city, it seems we need as much of a theft deterrent as possible.
The T-2200 alarm system by Talon could very well provide that “edge” needed as a theft deterrent. In the field of alarm systems costing under $200 it is very competitively priced, costing less than many of the other systems offering fewer options.
And here’s a bonus: A call to my insurance company revealed they offer a discount for having an alarm system installed on the bike.
Sounds like a wining combo to me.
|
wBW Review: Talon T-2200 Motorcycle Alarm System
|
|
|---|---|
| Manufacturer: Talon Alarm Systems (As of December 2011, the company is apparently no longer in business). | List Price: $119.00 USD; $139.99 CAD |
| Colors: N/A. | Made In: Canada |
| Review Date: February 2006 | |
Where to Buy Talon T-2200 Motorcycle Alarm
See More: Motorcycle Horn, Motorcycle Lights, Motorcycle Accessories
Owner Comments and Feedback
See details on submitting comments.
From “L.P.”: “After reading your recent review I installed a Talon T-2200 alarm system on my Aprilia and experienced the exact same problems as you did, the LED furnished was not the easiest to mount and after installing proved to be very dim.
I wrote to Brad at Talon to see if he had any suggestions regarding the dim display of the LED.
He suggested that I buy a ‘HYPER’ LED and a 5V relay from the local parts supplier and hook it up to the same circuit as the stock item.
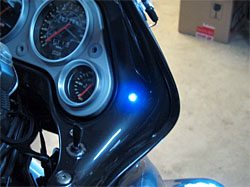
Sounded just a little complicated but what the heck, I decided to have a go at it. With that in mind I stopped by Radio Shack where they had all the items plus they also carried another 5V LED in blue.
This seemed like a possible alternative to doing relays, etc., so I bought one along with a chrome Panel Mount.
After opening up the hole I’d made for the original LED I installed the new one with it’s shiny panel mount in the same spot.
The end result was very satisfactory, the light is very bright and the chrome mount reflects it even more.
I sent this information to Brad in case he wants to forward it to any other users but so far he hasn’t responded. Here’s the Radio Shack part numbers, the total cost of these items was under $5.00:
- 276-311 Blue LED 5 volt 30ma
- 276-080 Panel Mount LED Holders, package of two.”


No Comment