
Pazzo Brake and Clutch Levers Review
Excellent quality, great-looking adjustable brake and clutch levers come in a variety of lengths and colors.
Adjustable levers should be standard on every motorcycle, period.
Let’s face it: hands come in all sizes, from really small to really large. It just doesn’t make sense to have a lever that can’t be adjusted.
This isn’t rocket science, either — the few extra quid that might added to the cost of a motorcycle for adding a pair of adjustable levers would be well worth it in the long run.
Don’t tell that to the aftermarket though — there are a veritable underground of motorcycle lever manufacturers just waiting to sell you their wares at exorbitant prices.
“But wait”, you say; “I thought you said a set of adjustable levers would only cost a few bucks more?”
Well, that would probably be true for a basic set of adjustable levers that are amortized over every bike in the manufacturer’s inventory.
However, aftermarket adjustable motorcycle levers are way beyond basic — they’ve become a fashion accessory!
Where to Buy Pazzo Adjustable Motorcycle Levers Accessory
Check Reviews & Prices on Amazon Check Reviews & Prices On RevZillaSee More: Motorcycle Accessories, Motorcycle Tire, Motorcycle Helmets
Pazzo Adjustable Levers
Just take a gander at the bee-yoo-tee-full Pazzo levers in the photo above and you’ll understand. Levers are an “in your face” (or hands) item — that is, they sort of stick right out at the ends of the handlebars, begging for attention.
You can’t miss ’em! Which means they’re perfect for tarting up your fave ride.
So if you’re going to install a new set of levers, you may as well get something that looks hot, which will help kick your bike up a notch or three on the coolness scale.
The Multistrada 620 came with a set of levers in basic black, with a reach was a bit too much for my average sized hands.
So we looked around at some alternatives — and there are plenty of ’em out there — but fell in love with these Pazzos.
They’re completely CNC machined from 6061-T6 billet aluminum, they use stainless steel hardware and they have cadmium plated springs.
Take a close-up look and you’ll marvel at the technology — these are works of art and surely not meant to be gripped by greasy human mitts! The Pazzo levers weigh 130 grams each, compared to the Multistrada OE lever weight of 82 grams.
And as long as we were going to install one set, why not two? So I ended up with a set of the regular length levers for the Multi and a set of shorties for Rick’s GT1000.
As it turned out, the GT1000 could probably use the regular length and the Multistrada the shorties, but no matter — both bikes look cool.
Pazzo levers are available in a multitude of mix ‘n’ match colors, so just about any anodized lever color can be had with any adjuster color.
The Multi got basic black with red adjusters and the GT gets dressed up with a set of hot-hot red shorties with gold adjusters for the GT1000. Bling!
The levers arrived super quick and after looking things over, we figured installation would be a piece of cake.
Both the GT1000 and Multistrada have hydraulic brakes and clutches, which means no bothering with clutch or brake cables. But there was one catch, as you’ll see…
Let’s do an illustrated narrative:
Installing the Pazzo Adjustable Levers
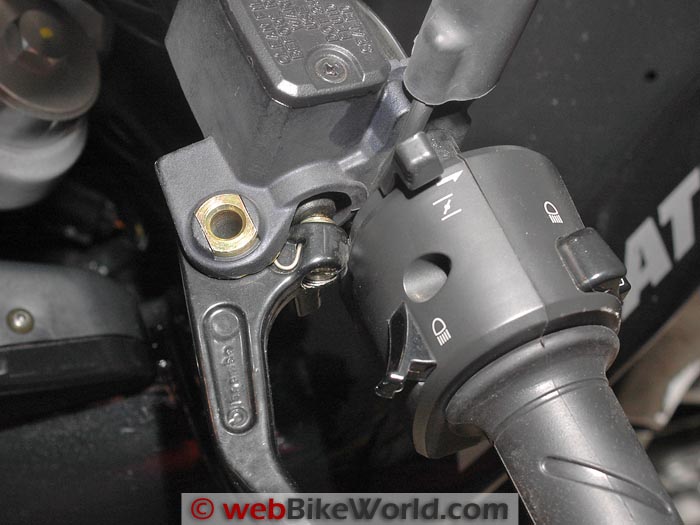
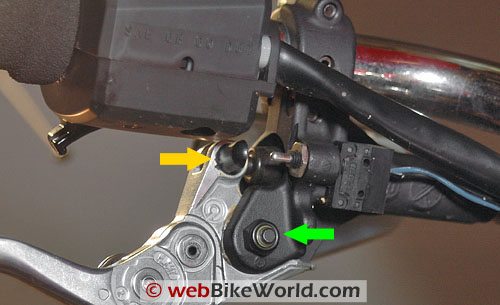
The clutch side on the Multistrada 620 was first (photo above).
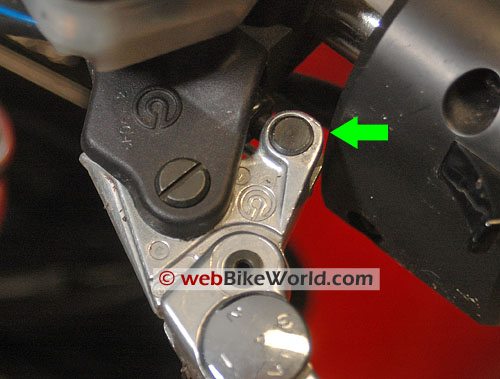
One of the reasons for installing the Pazzo levers in the first place was because the clutch engagement point adjusting screw (green arrow) on the original equipment (OE) lever shown here is permanently sealed.
The opposite side of this set screw is dished, and it covers a plunger that pushes another plunger inside the hydraulic clutch master cylinder that then engages (disengages actually) the clutch plates.
In theory, this screw can be adjusted in or out to change the beginning of the “friction zone”. I have no idea why Ducati permanently sealed this adjusting screw at the factory, instead of using some type of mild thread locker.
The clutch lever on the Multistrada 620 was engaging the clutch way out at the very end of its travel, which made a smooth launch very difficult, especially on a hill with a stop sign.
Why Ducati set the lever to engage at the very end of its travel is especially puzzling because of the entry level nature of the Multistrada 620.
The bike’s ATDC slipper clutch is supposed to help prevent rear wheel lockup for beginners when downshifting (why you need a slipper clutch on a 620 is also beyond me).
But probably the most important feature in a beginner bike is a huge “friction zone” and smooth clutch takeup. The stock Multi had neither.
Ducati would have been better off forgetting about the ATDC clutch and spending a few bucks on adjustable levers to begin with. And by the way, a side effect of the ATDC clutch is a very artificial clutch feel, noticeable by both beginning and experienced riders.
The Pazzo levers also have a set screw to adjust the clutch engagement.
Bbut it is not sealed, and it is very useful to change the start point of the clutch friction zone, although it was set perfectly for my tastes when the levers arrived.
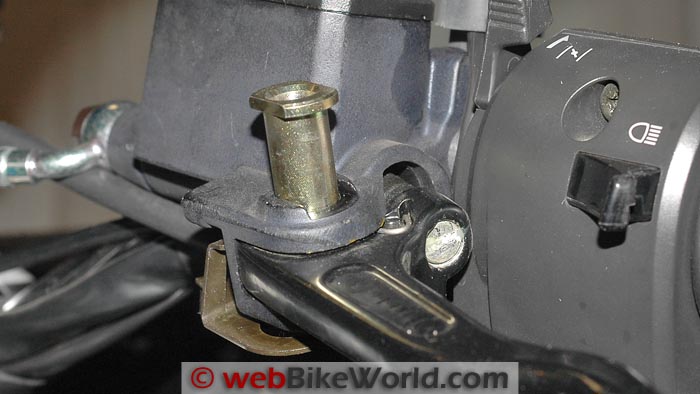
OK, so that’s a long and drawn out story, and here’s the bottom line: The OE Multistrada clutch lever is easy to remove; the brass pin (blue arrow above must be removed, and the lever slides right out of its receiver (see next photo).
Bottoms Up!
The photo above is from underneath the clutch lever looking up. The simple thin pressed steel nut (red arrow) that secures the bottom of the rotating pin must be removed.
It isn’t held on with much force, and the steel is thin, so note how little torque is needed when you’re removing it so that you don’t overdo it when replacing it.
It only needs to be just snug enough to secure the bottom of the pin, which sits in place with gravity, so the nut really doesn’t do much and it doesn’t have to support and weight.
And since the metal that forms the nut is only about one thread thick, it is very easy to strip the nut, so again — be careful and don’t apply more torque than is necessary (I have not been able to find a torque setting for this nut in the Ducati repair manual).
Where to Buy Pazzo Adjustable Motorcycle Levers Accessory
Check Reviews & Prices on Amazon Check Reviews & Prices On RevZillaSee More: Motorcycle Accessories, Motorcycle Tire, Motorcycle Helmets
More Details
After the nut is removed, the pin slides easily out of the receiver.
During reassembly, use light grease to coat the pin and all of the moving parts, such as the tang of the clutch where it fits into the yoke.
I have a 20-year-old tube of Bosch brown grease that was designed to lubricate very heavy-duty Bosch electric grinders, and this grease has come in very handy over the years for just this type of application; it is thick and waterproof and it stays put.
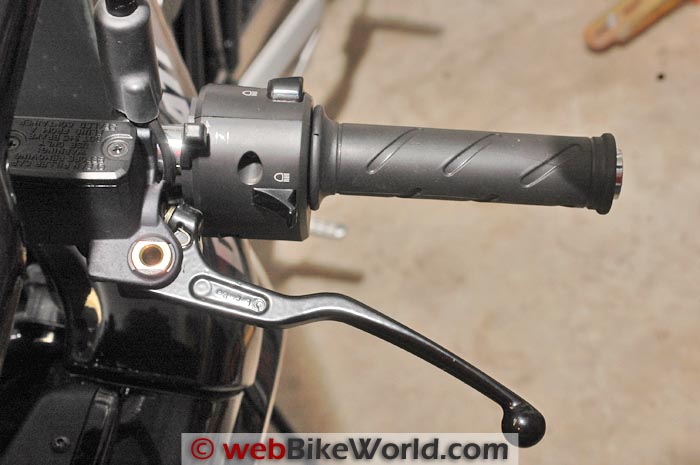
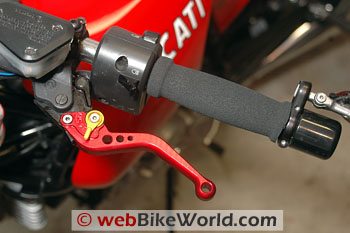
I’m getting ahead of myself, but the photo above shows the Pazzo adjustable clutch lever in place. It has 6 levels of adjustment!
These levers were ordered in basic black to match the bike, but with red adjusters for a dash of color.
Also, note that the OE handlebar grip has been removed and replaced by a Grab On foamie instead ; see the blurb at the bottom of the page.

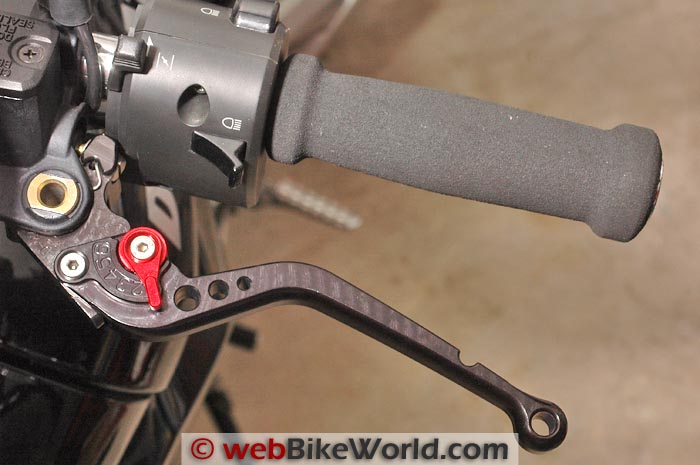
Here’s a close-up (above) of a Pazzo adjustable lever. The CNC machining marks add a nice industrial-techno artistic look!
Throttle Side (Brake Lever)
The Pazzo front brake lever (throttle side) on the Multistrada was slightly harder to install.
Be careful, there’s a floating pin that sits between the lever and the front brake master cylinder that will fall out as the OE lever is removed! I was lucky — I found mine after it dropped to the floor!
All of the pins and fittings on the Pazzo levers had been perfectly set at the factory, including the lever that engages the clutch lockout. I didn’t have to change any of the settings other than the distance adjusters.
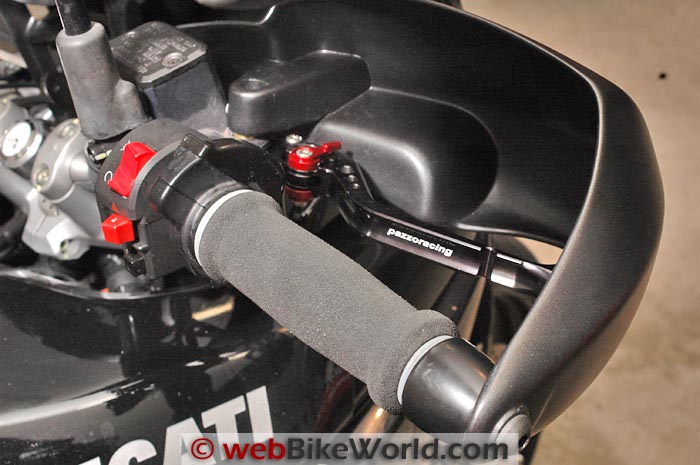
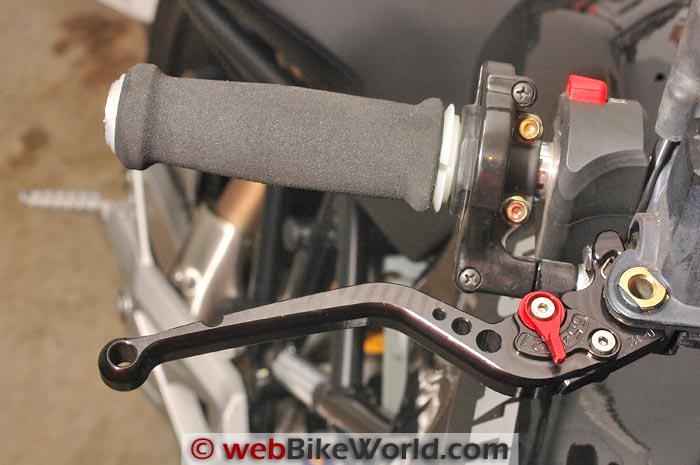
The photo above shows the Pazzo adjustable brake lever and new Grab On foam grip (see info below) installed on the Ducati Multistrada 620 with hand guards. Have you read our article on installing the bar end weights and hand guards?
GT1000 Lever Replacement
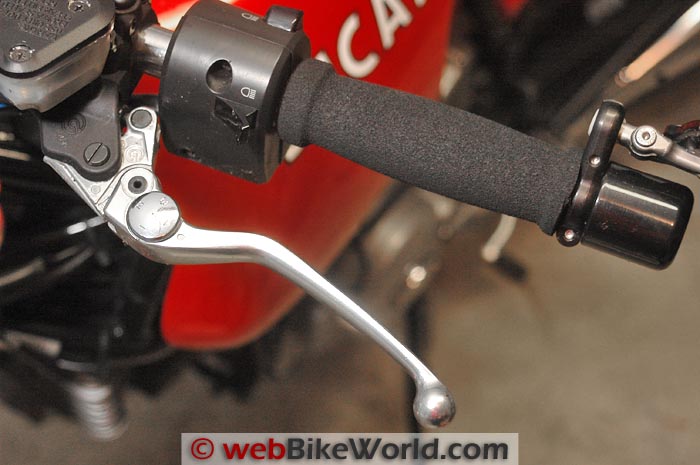
Here’s a view in the above photo of the OE clutch lever on the GT1000. It’s adjustable, but it looks rather wimpy compared to the Pazzos, don’t you think?
Note the green arrow, which points to a screw. This is different than the pin on the Multistrada but serves the same function; this screw is actually the post that functions as the point about which the lever rotates.
It must be removed to remove the lever. I put some grease on the post and the other moving parts before everything was reassembled.
Where to Buy Pazzo Adjustable Motorcycle Levers Accessory
Check Reviews & Prices on Amazon Check Reviews & Prices On RevZillaSee More: Motorcycle Accessories, Motorcycle Tire, Motorcycle Helmets
Tricks and Tips
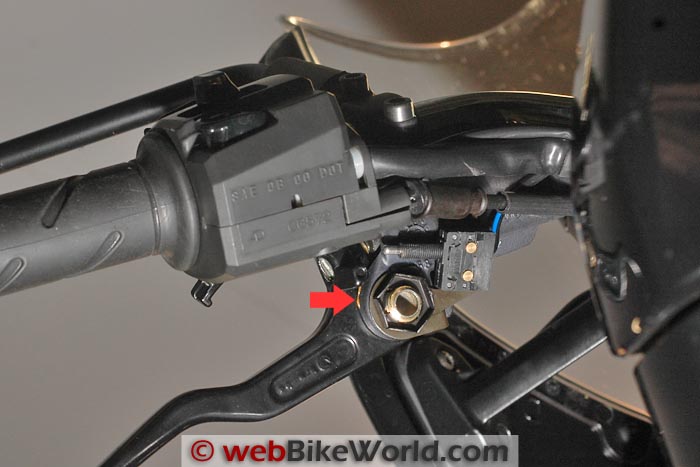
OK, here’s the catch: The GT1000 clutch lever removal procedure is similar to the procedure described above for the Multistrada. But the GT1000 uses a “normal” nut underneath rather than the pressed steel nut.
But there’s another big difference; the GT1000 OE lever has this clutch engagement pin that must be removed from the OE lever and re-used on the Pazzo lever.
The pin indicated by the red arrow screws into the cylinder indicated by the yellow arrow, and there’s a tiny set screw under the tip of the yellow arrow also.
Of course, Ducati sealed all of this with the same type of hard glue; the glue actually appears to be a type that is applied with a hot glue gun.
This is where it gets tricky — I had to use one of those bottle-type propane torches to heat this thing up to nearly red hot to melt the glue, scraping it away a little at a time.
Then after it cooled slightly I sprayed some “PB Blaster Penetrating Catalyst” (a can of which should be in everyone’s garage!), let it soak and repeat.
I was finally able to get everything loose, but be careful, it’s too easy to strip the tiny 1.5 mm set screw.
I had to use a pair of pliers to unscrew the pin (red arrow) after the set screw was removed, and this scarred up the pin slightly, but it’s completely hidden anyway and no one but me (and you) will ever know!
If you don’t have a small torch (a torch kit can be found in a local hardware store for about $20.00), and you don’t feel comfortable doing this, well, you’re stuck. That’s why you’re reading this article, to learn what it will take before you start the project!
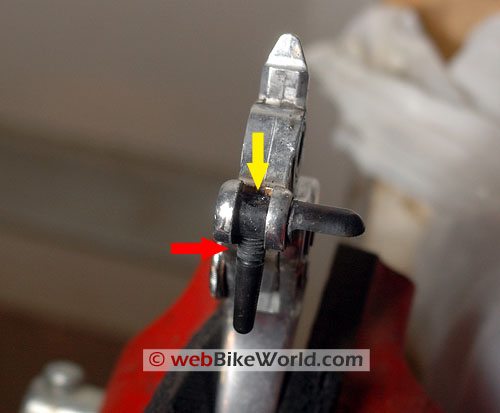
The photo above shows a top view of the offending pin assembly. It must be removed from the OE adjustable lever and installed on the new Pazzo adjustable lever.
The screw that acts as the rotating point for the lever can also be clearly seen in this close-up.
And the photo above shows the view from underneath, showing how the pin ends in a machined flat, which presses against the clutch interlock switch, which allows the bike to be started when the clutch is pulled in.
Note the green arrow; it points to the nut on the bottom of the screw that acts as the rotating post.

Ducati OE vs. Pazzo Levers
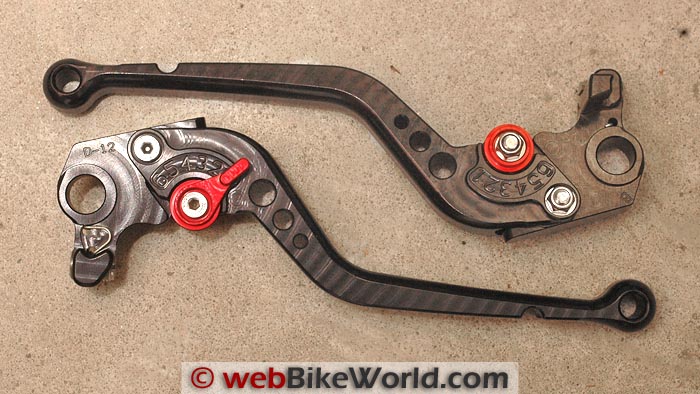
Here’s a comparison of the OE adjustable clutch lever (bottom) with the pin still installed, compared to the Pazzo shorty adjustable lever on top.
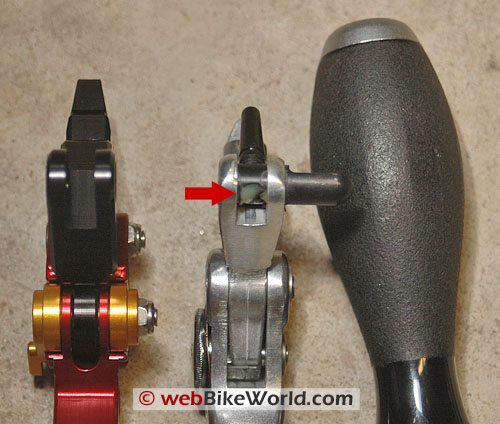
Here’s another look at the OE lever on the right with the pin assembly still installed, and the Pazzo adjustable lever (left), showing the yoke where the pin assembly must be inserted.
The red arrow indicates the glue or sealer that Ducati uses to hold the pin assembly together. The sealer melts if it gets hot enough and it must be removed to unscrew the pin.
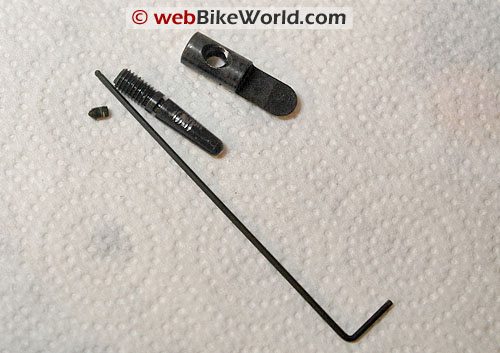
Parts and Pins
Here are the parts after removal from the OE adjustable lever. The 1.5 mm set screw is on the left, with the scarred up pin in the center and the rotating pin on the right. The 1.5 mm hex wrench is shown to illustrate the small size of these parts.
I used blue Loctite on these parts on reassembly, and I hope it holds everything together as well as the semi-permanent Ducati sealer.
Replacing the GT1000 front brake lever with the Pazzo adjustable lever was the same as the Multistrada. Be careful on this side of the loose pin that engages the master cylinder that might try to fall out when the brake lever is removed.
Oh, and one more thing: After I replaced the front brake lever on the Multistrada, I took the bike for a ride and the front brakes felt very mushy.
I came back and parked the bike in the garage and figured I must have allowed an air bubble into the system when I dropped the little pin that goes between the brake lever and the master cylinder.
I planned on bleeding the brakes and tying up the front brake lever with a bungee overnight, as I often do to purge the air bubbles from the system, but a few days later when I tried the front brake, it was as firm as could be!

Grab On Classic Motorcycle Grips
I mentioned these grips in the GT1000 Blog. I usually end up installing these on just about every motorcycle I own.
They’re thick and foamy and I think they provide a better grip.
They “bulk up” the handlebar, which gets my hands closer to the brake (I always ride with my first two fingers covering the front brake lever), which allows me blip the throttle while braking with my two fingers on the front brake.
I have now installed them on both the Multistrada 620 and the GT1000.
Racers don’t like these grips; they normally like hard rubber grips that give the ultimate in feel through the handlebars, but for street riding, I like these better.
You can see them in the photos of the Multistrada and GT1000 above.
These are becoming hard to find; I ordered mine through a local dealer. I ordered 4 packages, just to have a few spares!
Master Listing of All wBW Motorcycle Product Reviews
| wBW Review: Pazzo Adjustable Motorcycle Levers | |
|---|---|
| Manufacturer: Pazzo Racing | List Price (2007): $149.00 to $189.00 |
| Colors: Many different color combinations. | Made In: Canada |
| Review Date: October 2007 | |
Where to Buy Pazzo Adjustable Motorcycle Levers Accessory
Check Reviews & Prices on Amazon Check Reviews & Prices On RevZillaSee More: Motorcycle Accessories, Motorcycle Tire, Motorcycle Helmets
Owner Comments and Feedback
See details on submitting comments.
From “F.X.K.” (January 2013): “I broke a brake lever on my BMW K12RS on a trip to Nova Scotia. A pain and somewhat dangerous without the lever. Better than a clutch lever that would have resulted in a tow.
I ended paying $150 US for the part. Ouch. Given how difficult it was to find a lever, I ended up travelling with spare levers at $300 a set. Aftermarket levers like the Pazzo adjustable look very reasonable in comparison.”
From “P.M.” (4/10): “I own a set of Pazzo levers for my 2010 Triumph Thruxton and your review is spot on. Even though the factory Triumph levers were adjustable, the feel that these levers have is far and away more confidence inspiring than the factory levers.
Maybe it’s the aluminum versus diecast metal but whatever it is, I have better brake feel and clutch control.”
From “L.S.”: “Very good article from you guys. It was about time that someone did an article on these levers. I changed my levers on my ’06 VFR last year. It was done in 5 minutes on that model.
(By the way) Pazzo levers are made in Canada. Keep the good work.”

No Comment